12 Apple DevOps Engineer Interview Questions & Answers

apple icon

Questions with Detailed ExplanationsWith Detailed Explanations

(Last Updated: September 1, 2026)

1. Which AWS service provides cloud-hosted source control with branching, merging, and enhanced security?Cloud InfrastructureEasyApple

Question Details

An organization wants a managed AWS repository for source control. Choose the best option: A. AWS Snapshots; B. AWS CodeCommit; C. Amazon EFS; D. Amazon S3 with versioning enabled.

Short Interview Answer (30-60 seconds)

At a high level, the organization needs managed source control inside AWS. The key requirement is real Git support for branches, merges, pull requests, and version history. I would explain the answer through developer access, the repository workflow, and optional CI/CD integration. The best choice is B, AWS CodeCommit. IAM controls who can access repositories, KMS protects stored data, and AWS developer tools can use the repositories. The main downside is that IAM permissions still need careful management.

Detailed Explanation

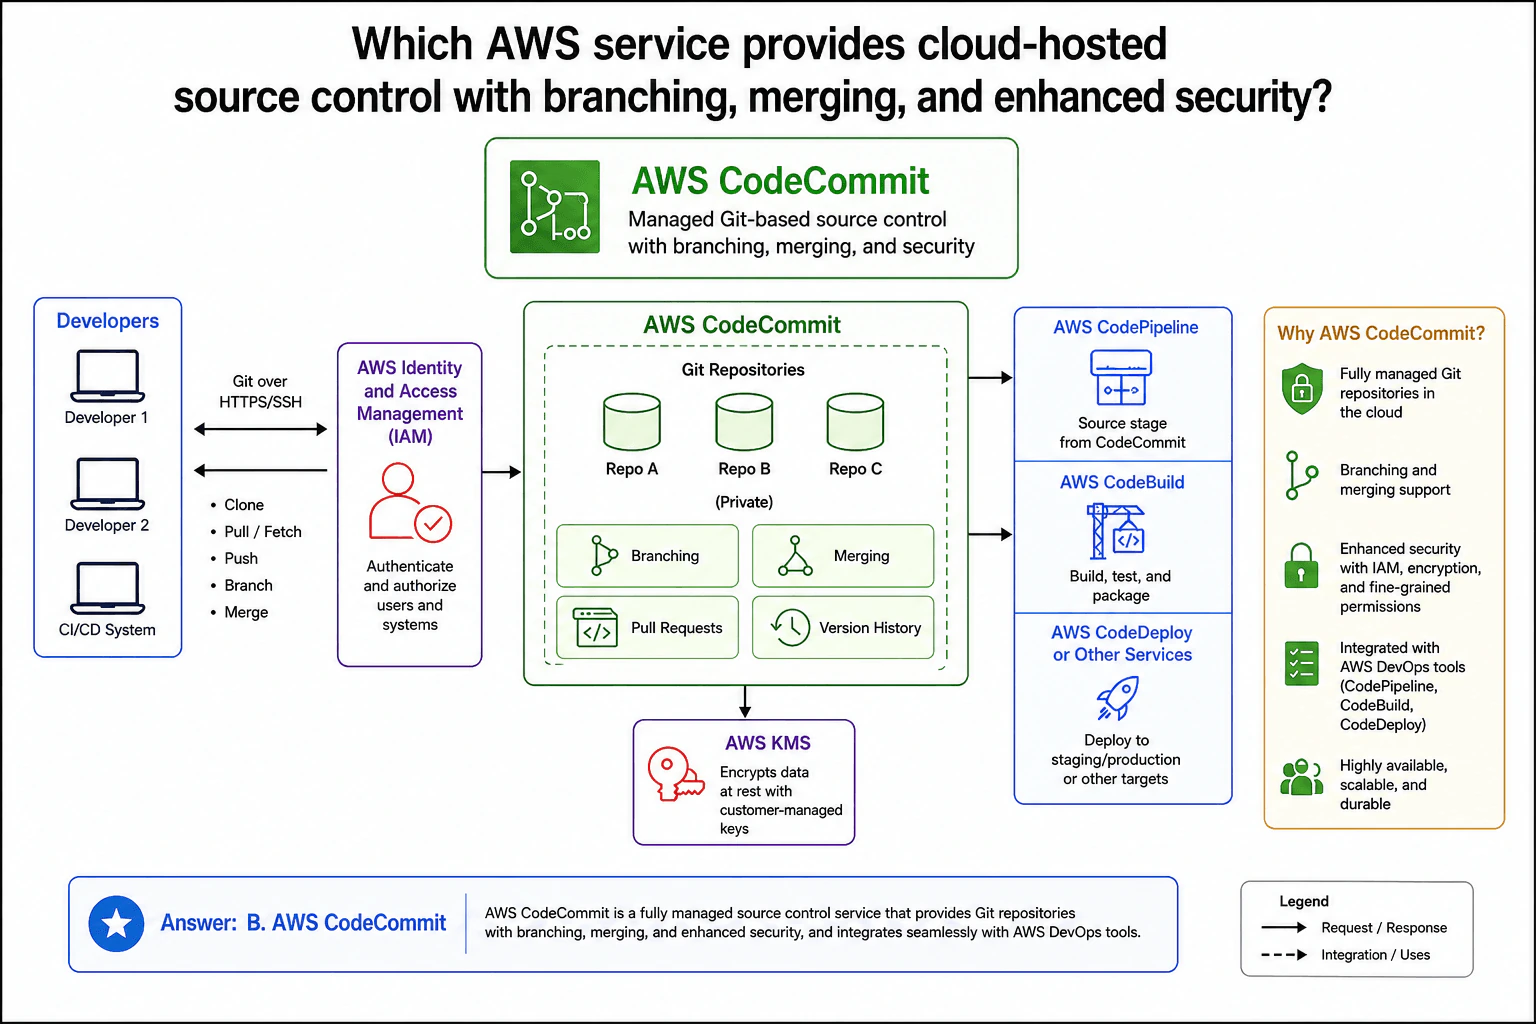
The organization needs a managed place in AWS where developers can safely keep and change source code. The main challenge is that normal file storage is not enough. The service must understand Git work such as branches, merges, pull requests, and version history. The diagram answers this with AWS CodeCommit. Developers connect using normal Git operations. IAM controls access before requests reach CodeCommit. KMS protects stored repository data. CodeCommit can also connect to AWS CodePipeline, AWS CodeBuild, and AWS CodeDeploy for later delivery work.

Useful Questions to Ask the Interviewer
  1. Do developers need both HTTPS and SSH Git access?
  2. Should different teams have different repository permissions?
  3. Do we also need the AWS CI/CD tools shown in the diagram?
Which AWS service provides cloud-hosted source control with branching, merging, and enhanced security? diagram
How to Explain It in an Interview
1. Explain why AWS CodeCommit fits the requirement

I would start by saying that this problem needs source control, not just file storage. AWS CodeCommit is shown as the managed Git-based source-control service. It provides private Git repositories and the Git features required by the question.

The important capabilities are branching, merging, pull requests, and version history. Those features let teams work on separate changes, review them, combine approved work, and keep a history of earlier versions. That is why the best answer is B, AWS CodeCommit.

2. Explain how developers reach the repositories

For the main access path, developers use Git over HTTPS or SSH. The diagram shows common actions such as clone, pull, fetch, push, branch, and merge.

AWS Identity and Access Management, or IAM, sits on this path. IAM authenticates a user or system, which means it checks who is making the request. IAM also authorizes the request, which means it controls what that identity may do. After access is allowed, the Git request reaches CodeCommit.

3. Explain the repository workflow

CodeCommit manages the private repositories shown as Repo A, Repo B, and Repo C. Developers can create branches for separate work and later merge approved changes.

Pull requests support review before changes are merged. Version history keeps the sequence of Git changes. These features are part of the repository workflow rather than separate storage services.

4. Explain the security shown in the diagram

The diagram combines IAM access control with AWS KMS encryption. KMS manages encryption keys used to protect repository data at rest. This adds protection beyond simply keeping files in a shared location.

The important idea is that IAM controls access while KMS protects stored data. The repository still remains the CodeCommit service shown in the center of the design.

5. Explain the optional CI/CD integration

The right side shows how CodeCommit can connect to AWS developer tools. AWS CodePipeline can use CodeCommit as a source stage. AWS CodeBuild can build, test, and package the code. AWS CodeDeploy or other services can then deploy the application to staging, production, or another target.

These integrations are useful, but they are not required to identify the correct answer. CodeCommit is the key service because it provides the managed Git repository itself.

Practical Complexity & Trade-offs

The benefit is that AWS CodeCommit provides managed Git repositories without the team running its own source-control servers. IAM controls who may access repositories and which actions they may perform. KMS protects stored repository data with encryption. The service can also connect to CodePipeline, CodeBuild, and CodeDeploy. The downside is that access rules still need careful management. Permissions that are too broad weaken security. Permissions that are too strict can block normal developer work. We accept that extra permission-management work because it gives the team stronger control over repository access.

Why Interviewers Ask This

The interviewer wants to see whether you can match a cloud requirement to the correct service instead of choosing any storage product. A strong answer recognizes that source control needs Git features such as branches, merges, pull requests, and version history. It also shows that you understand IAM access control, encryption with KMS, and how source repositories can connect to CI/CD tools.
Interviewer may ask next
How would you restrict different developers to specific CodeCommit repositories and Git actions?

I would keep the same design and make the IAM permissions more specific. IAM is already the access-control layer between developers and CodeCommit. Each developer or system would receive only the repository actions it needs. For example, one identity might need read access, while another also needs permission to push changes.

The Git path does not change. Developers still use HTTPS or SSH, IAM still checks the request, and CodeCommit still manages the repositories. Branching, merging, pull requests, and version history also stay the same.

This keeps the design correct because CodeCommit receives only actions IAM has allowed. KMS continues protecting stored repository data separately.

The downside is more permission-management work. Policies that are too broad reduce security. Policies that are too narrow can stop developers from doing normal work until an administrator changes them.

What happens if CodeBuild or CodeDeploy fails after code has already been pushed to CodeCommit?

I would keep CodeCommit as the source-control service and treat the CI/CD tools as later integration steps. Once the Git change has been accepted by CodeCommit, the repository keeps that source history. A later build or deployment problem does not change the role of CodeCommit.

AWS CodePipeline can use CodeCommit as its source stage. CodeBuild then performs the build, test, and package work shown in the diagram. AWS CodeDeploy or another service handles deployment to staging, production, or another target.

If one of those later steps fails, the committed source code is still available in CodeCommit. Developers can inspect the repository and investigate the later stage separately.

The downside is that a successful source-code push does not mean the build or deployment will succeed. Those later stages still need their own checks and operational handling.

2. How would you set up Kubernetes on Amazon EKS?Cloud InfrastructureMediumApple

Question Details

Describe the infrastructure and access path needed to create and operate an EKS cluster. Cover the VPC and subnet boundary, control-plane endpoint access, worker capacity, IAM roles and workload identity, container networking, cluster add-ons, ingress, storage, logging, and the checks used to confirm that workloads can be scheduled and reached.

Short Interview Answer (30-60 seconds)

At a high level, the goal is to run Kubernetes safely on Amazon EKS. The main challenge is connecting users, the managed control plane, worker nodes, and application traffic without exposing more than needed. I would explain it in three parts: cluster access, worker networking, and workload delivery. I would place workers in private subnets, use IAM plus Kubernetes RBAC, use workload identity for pods, and expose applications through an ALB. The trade-off is stronger isolation with more networking and IAM setup.

Detailed Explanation

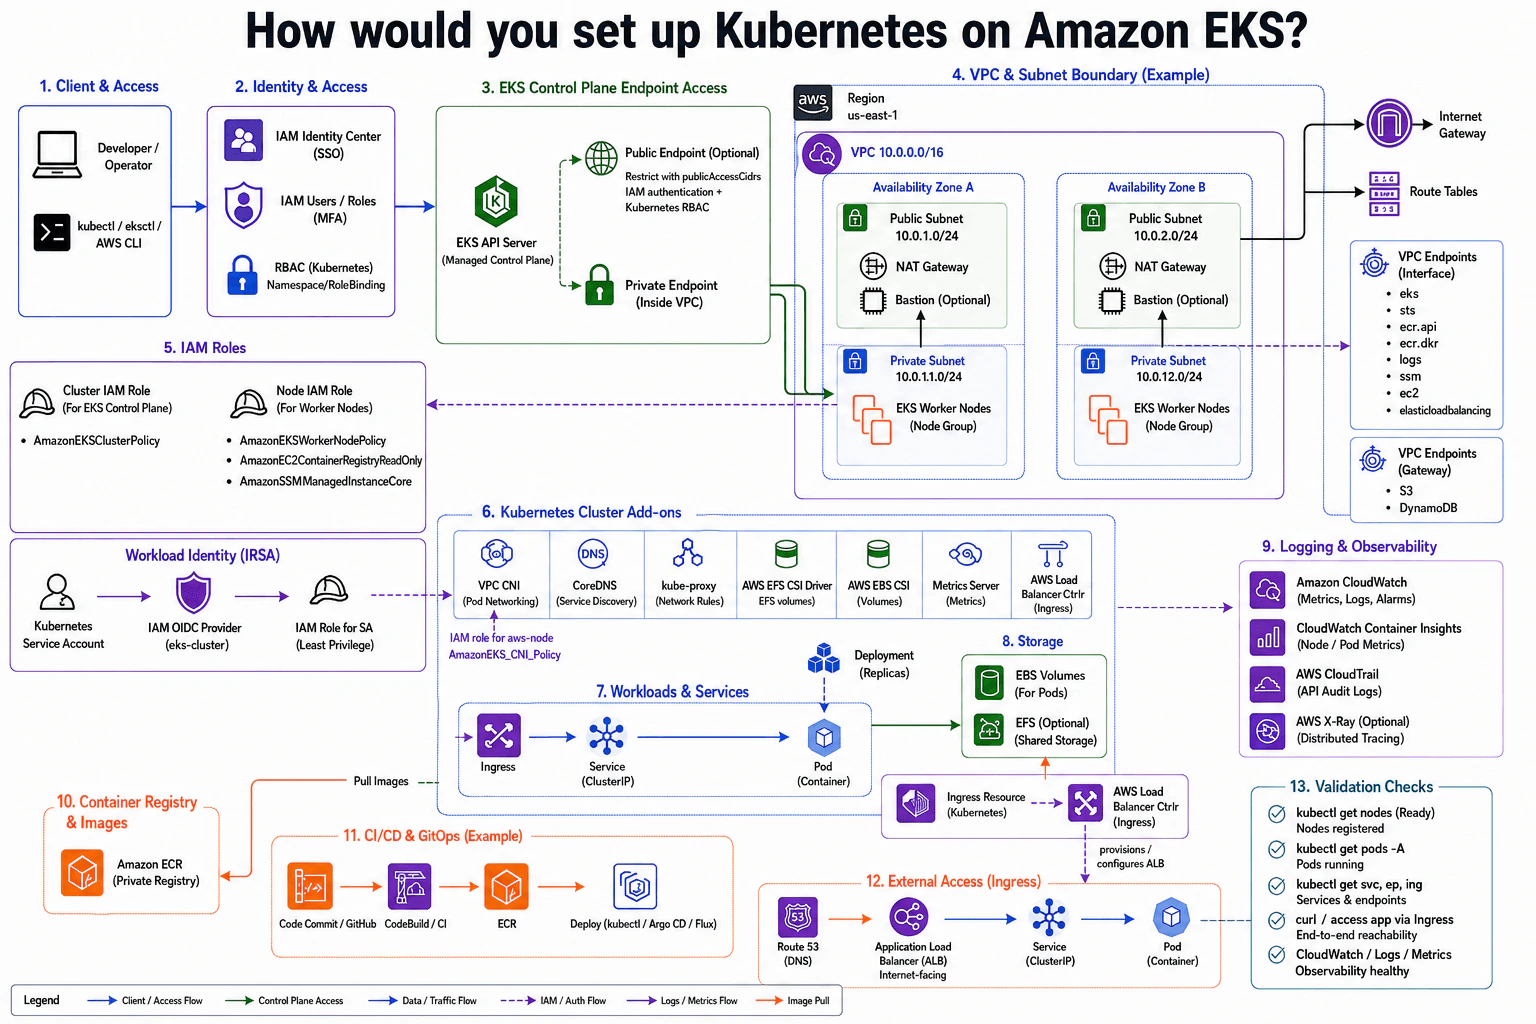
The goal is to run Kubernetes on Amazon EKS so engineers can manage the cluster safely and users can reach applications reliably. The difficult part is connecting several boundaries without exposing more than needed. Administrators need controlled access to the Kubernetes API. Worker nodes need network access and AWS permissions. Pods need networking, storage, and their own permissions. External users need a clear path to the application. The diagram organizes the solution around access, the managed control plane, private worker capacity, add-ons, workload traffic, storage, and monitoring.

Useful Questions to Ask the Interviewer
  1. Should the EKS API be private-only, or should restricted public access also be allowed?
  2. Do worker nodes need internet access, or should they mainly use VPC endpoints?
  3. Do workloads need EBS block storage, EFS shared storage, or both?
How would you set up Kubernetes on Amazon EKS? diagram
How to Explain It in an Interview
1. Control administrator access

Engineers use kubectl, eksctl, or the AWS CLI. They authenticate through IAM Identity Center or IAM users and roles with MFA. Kubernetes RBAC then decides what each authenticated user can do.

The EKS API Server is the managed control plane shown. It has a private endpoint inside the VPC. A public endpoint is optional and restricted with publicAccessCidrs.

2. Build the VPC and worker capacity

The VPC spans two Availability Zones. Each zone has one public subnet and one private subnet. EKS Worker Nodes run in managed node groups inside the private subnets.

Each private subnet sends outbound internet traffic through a NAT Gateway and then the Internet Gateway. The diagram also shows interface VPC endpoints for EKS, STS, ECR, logs, SSM, EC2, and Elastic Load Balancing. Gateway endpoints cover S3 and DynamoDB. Bastion hosts are optional.

3. Separate IAM permissions

The Cluster IAM Role uses AmazonEKSClusterPolicy. The Node IAM Role uses AmazonEKSWorkerNodePolicy, AmazonEC2ContainerRegistryReadOnly, and AmazonSSMManagedInstanceCore.

For pods, workload identity uses a Kubernetes Service Account, IAM OIDC Provider, and IAM Role for SA. This gives workloads smaller permissions. The VPC CNI has its own IAM role for aws-node with AmazonEKS_CNI_Policy.

4. Connect workloads, storage, and ingress

The add-ons are VPC CNI, CoreDNS, kube-proxy, AWS EFS CSI Driver, AWS EBS CSI, Metrics Server, and AWS Load Balancer Controller. The CSI drivers connect Pod storage requests to EBS Volumes or optional EFS shared storage.

A Deployment creates and manages Pod replicas. Runtime traffic does not pass through the Deployment. Route 53 points the application name at an internet-facing Application Load Balancer. The ALB sends traffic to a Service, which routes it to a Pod. The Ingress Resource describes the desired rules. The AWS Load Balancer Controller reads those rules and provisions or configures the ALB.

5. Deploy, observe, and validate

Amazon ECR stores container images. The CI/CD path shows Code Commit or GitHub, CodeBuild or CI, ECR, and deployment with kubectl, Argo CD, or Flux.

CloudWatch provides metrics, logs, and alarms. Container Insights shows node and pod metrics. CloudTrail provides API audit logs. X-Ray is optional for distributed tracing.

Finally, I would confirm nodes are Ready, pods are running, Services and Ingress exist, the application responds through the ALB, and CloudWatch logs and metrics are visible.

Time & Space Complexity

The benefit is strong separation between public access and private worker capacity. Worker nodes stay in private subnets. IAM and Kubernetes RBAC control administration. Workload identity gives pods smaller, separate permissions instead of relying on the whole node role. The downside is more setup. NAT Gateways, VPC endpoints, IAM roles, add-ons, ingress, and storage drivers all need correct configuration. Two Availability Zones improve resilience, but add network pieces. A private EKS endpoint reduces public exposure, but engineers need a network path into the VPC. Optional public endpoint access is simpler, but it must be restricted with publicAccessCidrs.

Why Interviewers Ask This

Interviewers ask this to see whether you understand EKS as a complete platform, not just a cluster-creation command. They want to see how you connect networking, identity, worker nodes, workload permissions, ingress, storage, and monitoring. They also test whether you understand the boundary between the managed EKS control plane and private worker nodes, and whether you can validate that workloads are scheduled and reachable.

Interviewer may ask next
How would your design change if the EKS API had to be private-only?

I would keep the same cluster design, but disable the optional public EKS API endpoint. Administrators would reach the EKS API only through the private endpoint inside the VPC.

That changes the administrator access path. kubectl, eksctl, and the AWS CLI must run from a place that can reach the VPC. IAM authentication and Kubernetes RBAC still control who can perform cluster actions, so the authorization model does not change.

The worker nodes already run in private subnets, so their placement stays the same. The VPC endpoints shown in the diagram can still provide private paths to AWS services. NAT Gateways remain available for outbound internet access where needed.

The benefit is a smaller public attack surface. The downside is operational access. Engineers cannot manage the cluster directly from an arbitrary internet connection. They first need an approved path into the VPC, which adds network setup and can make emergency access less convenient.

What would you check if pods are running but users cannot reach the application through the ALB?

I would troubleshoot the path from the outside toward the Pod. First, I would check Route 53 and confirm that the application name points to the expected Application Load Balancer. Then I would check the ALB and the AWS Load Balancer Controller configuration created from the Kubernetes Ingress Resource.

Next, I would inspect the Service and confirm that it selects the intended Pods. I would verify that the Pods are running and ready. The important point is that runtime traffic goes from the ALB to the Service and then to the Pod. The Deployment manages replicas, but it is not part of the request path.

I would also check CloudWatch logs and metrics for useful errors. If the Service, Pod readiness, or ALB configuration is wrong, users may see the same symptom even though Pods are running. The downside of this layered path is that troubleshooting requires checking several components in order.

3. How would you upgrade a database in AWS without downtime?Cloud InfrastructureHardApple

Question Details

Plan an upgrade for a production database hosted in AWS while applications continue serving traffic. Cover compatibility assessment, backups and recovery validation, replica or parallel-environment preparation, schema and client compatibility, connection handling, replication state, health gates, cutover authority, rollback conditions, and the evidence required before retiring the previous database path.

Short Interview Answer (30-60 seconds)

At a high level, the goal is to upgrade the production database while the application keeps serving users. The hard part is switching safely without losing data or breaking clients. I would explain it in three parts: prepare and validate Green, keep Blue and Green synchronized, then perform a controlled cutover. I would drain old connections, switch the database target, recycle connection pools, watch health signals, and keep Blue available for rollback. The trade-off is extra operational complexity.

Detailed Explanation

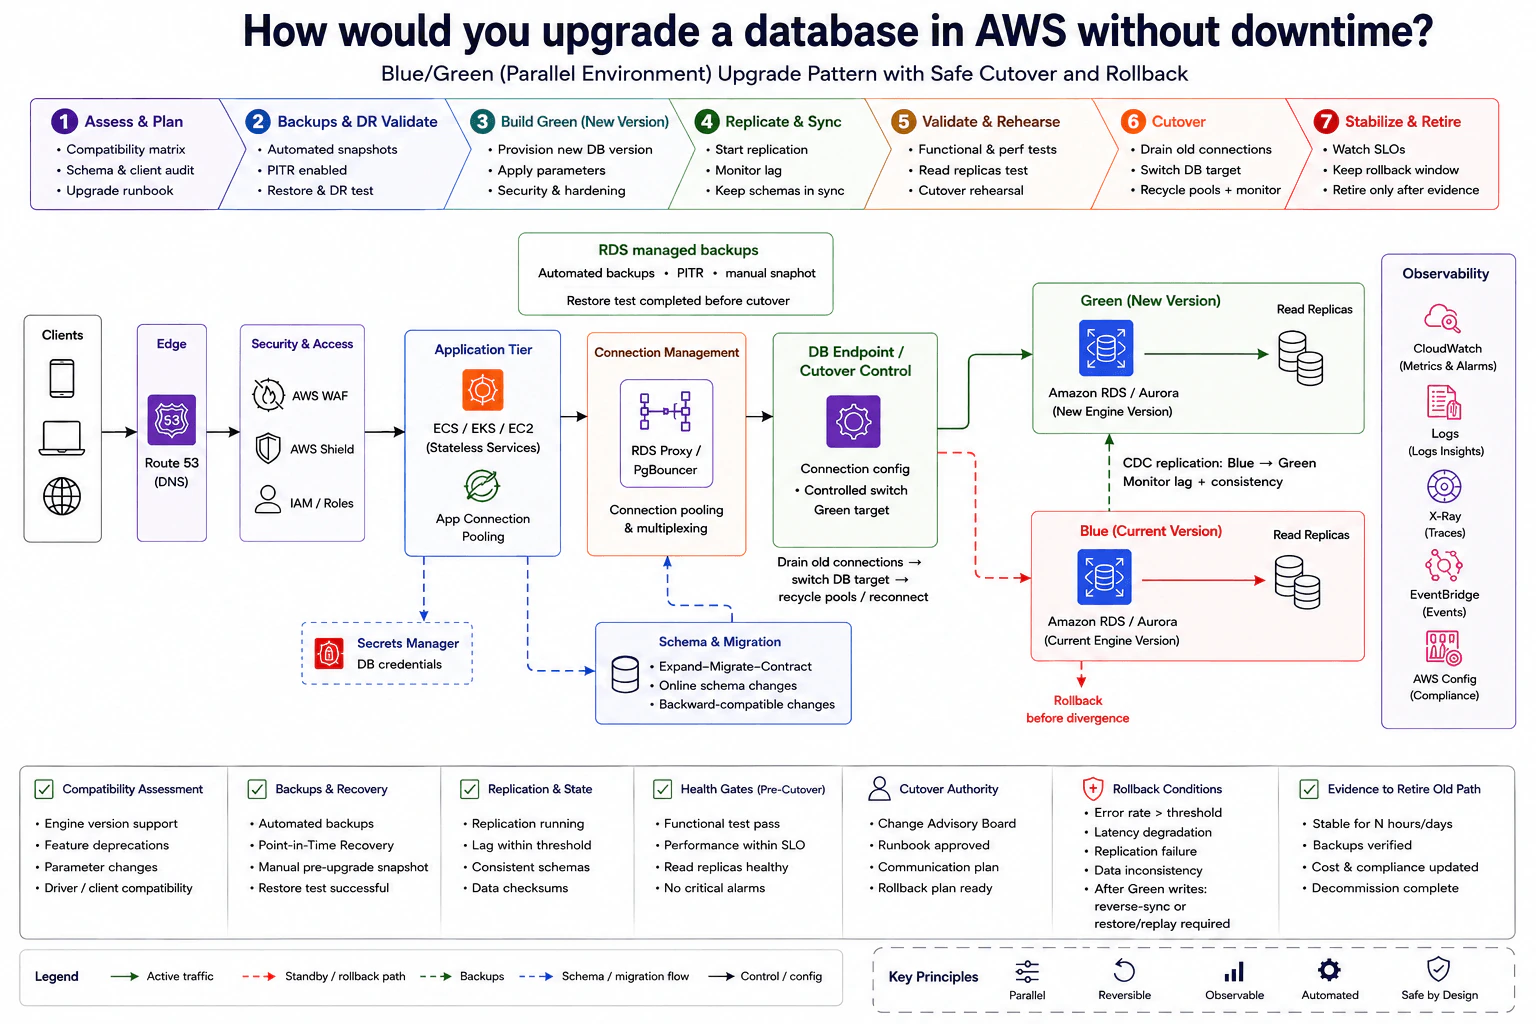
The goal is to replace the current production database with a newer version while users continue using the application. The difficult part is changing a system that is still receiving real traffic and data. We need a tested recovery path, compatible application changes, synchronized data, and a controlled way to move database connections. The diagram handles this by preparing a Green database beside the current Blue database, copying changes from Blue to Green, testing Green, switching application connections, watching health, and keeping Blue available for a limited rollback window.

Useful Questions to Ask the Interviewer
  1. Which database engine and versions are we upgrading between?
  2. Which application drivers or clients could be affected by the new version?
  3. What health limits must Green meet before cutover?
  4. Who has authority to approve the production cutover?
  5. How long must we keep the Blue path before retirement?
How would you upgrade a database in AWS without downtime? diagram
How to Explain It in an Interview
1. Assess compatibility and protect recovery

I would start by proving that the new database version works with the application. I would check engine support, feature deprecations, parameter changes, schema behavior, and driver or client compatibility.

Before changing production, I would validate recovery. The design uses RDS managed backups, Point-in-Time Recovery, a manual pre-upgrade snapshot, and a successful restore test. A backup is useful only when we know it can restore the database.

2. Build and prepare the Green database

Next, I would create Green using the new engine version. Blue stays on the current version and continues serving production traffic.

The application tier stays stateless on ECS, EKS, or EC2. Secrets Manager supplies database credentials. Schema changes use an expand-migrate-contract approach. This means changes stay backward-compatible while Blue and Green coexist. The design also allows online schema changes.

3. Keep Blue and Green synchronized

Before cutover, Blue remains the current database. Change Data Capture, or CDC, copies database changes from Blue to Green.

The direction is strictly Blue to Green. I would watch replication health, lag, schema consistency, and data checksums. Green read replicas must also be healthy. Functional tests, performance checks, and critical alarms form the pre-cutover health gates.

4. Perform a controlled connection cutover

Clients first reach the service through Route 53. AWS WAF and AWS Shield protect the application entry path, while IAM roles control allowed AWS access. The stateless application tier then uses RDS Proxy or PgBouncer for connection pooling and multiplexing.

At cutover, I would drain old database connections. The DB Endpoint / Cutover Control then changes the connection configuration to Green. I would recycle connection pools so new connections use Green. The runbook, communication plan, rollback plan, and Change Advisory Board approval must already be ready.

5. Observe, roll back, or retire Blue

After the switch, I would watch CloudWatch metrics and alarms, logs, X-Ray traces, EventBridge events, and AWS Config information. I would check errors, latency, performance, and critical alarms against the agreed limits.

Blue stays available during the rollback window. A direct rollback is safest before Blue and Green data diverge. After Green accepts new writes, returning to Blue may require reverse-sync or restore and replay. Blue is retired only after stability is proven, backups are verified, cost and compliance work is complete, and decommissioning evidence is recorded.

Practical Complexity & Trade-offs

The benefit is that the application can keep serving users while the database is upgraded. Blue remains available while Green is built, synchronized, tested, and checked. This is safer than upgrading the only production database in place. The downside is more moving parts. We must manage two database paths, replication, connection pools, health checks, backups, and cutover approval. Rollback is also time-sensitive. Before Blue and Green contain different writes, switching back is simpler. After Green accepts new writes, recovery may require reverse-sync or restoring and replaying data.

Why Interviewers Ask This

Interviewers ask this to see whether you can change a critical production system safely. They want to know if you think about compatibility, tested recovery, replication state, connection handling, health gates, approval, and rollback before switching production. They also want to see whether you understand that avoiding planned downtime does not remove operational risk. A strong answer shows careful judgment and clear decision points.

Interviewer may ask next
What would you do if replication lag keeps growing before the planned cutover?

I would not cut over while Green is falling behind Blue. The replication health gate would fail, so Blue would continue serving production traffic while I investigate.

I would use the existing observability tools to check database health, replication behavior, latency, logs, and alarms. I would also verify schema consistency and data checksums. The goal is to understand whether Green can catch up safely and remain consistent with Blue.

The cutover runbook would stay paused until replication returns within the accepted threshold and the other health gates pass again. I would then repeat the required functional and performance checks before asking the Change Advisory Board to approve another cutover attempt.

The downside is that the upgrade takes longer and both environments stay running longer. That extra cost is safer than switching production to a database that is missing recent changes.

How would your rollback plan change after Green has already accepted new writes?

I would no longer treat rollback as a simple connection switch. Once Green accepts new writes, Blue and Green may contain different data. Sending connections directly back to Blue could lose changes that exist only on Green.

The diagram marks this as the point where rollback may need reverse-sync or restore and replay. Before moving connections, I would determine how Green-only writes will be copied back or recovered. I would also verify data consistency before Blue becomes writable again.

The DB Endpoint / Cutover Control still decides which database target the application uses. RDS Proxy or PgBouncer connections would be drained and recycled when that target changes. Health checks and observability would continue during recovery.

The main downside is that rollback becomes slower and more complicated after data diverges. That is why the safest direct rollback window is before Green has accumulated writes that Blue does not have.

4. Which command opens an interactive Bash shell in a running container named `mycontainer`?Containers And KubernetesEasyApple

Question Details

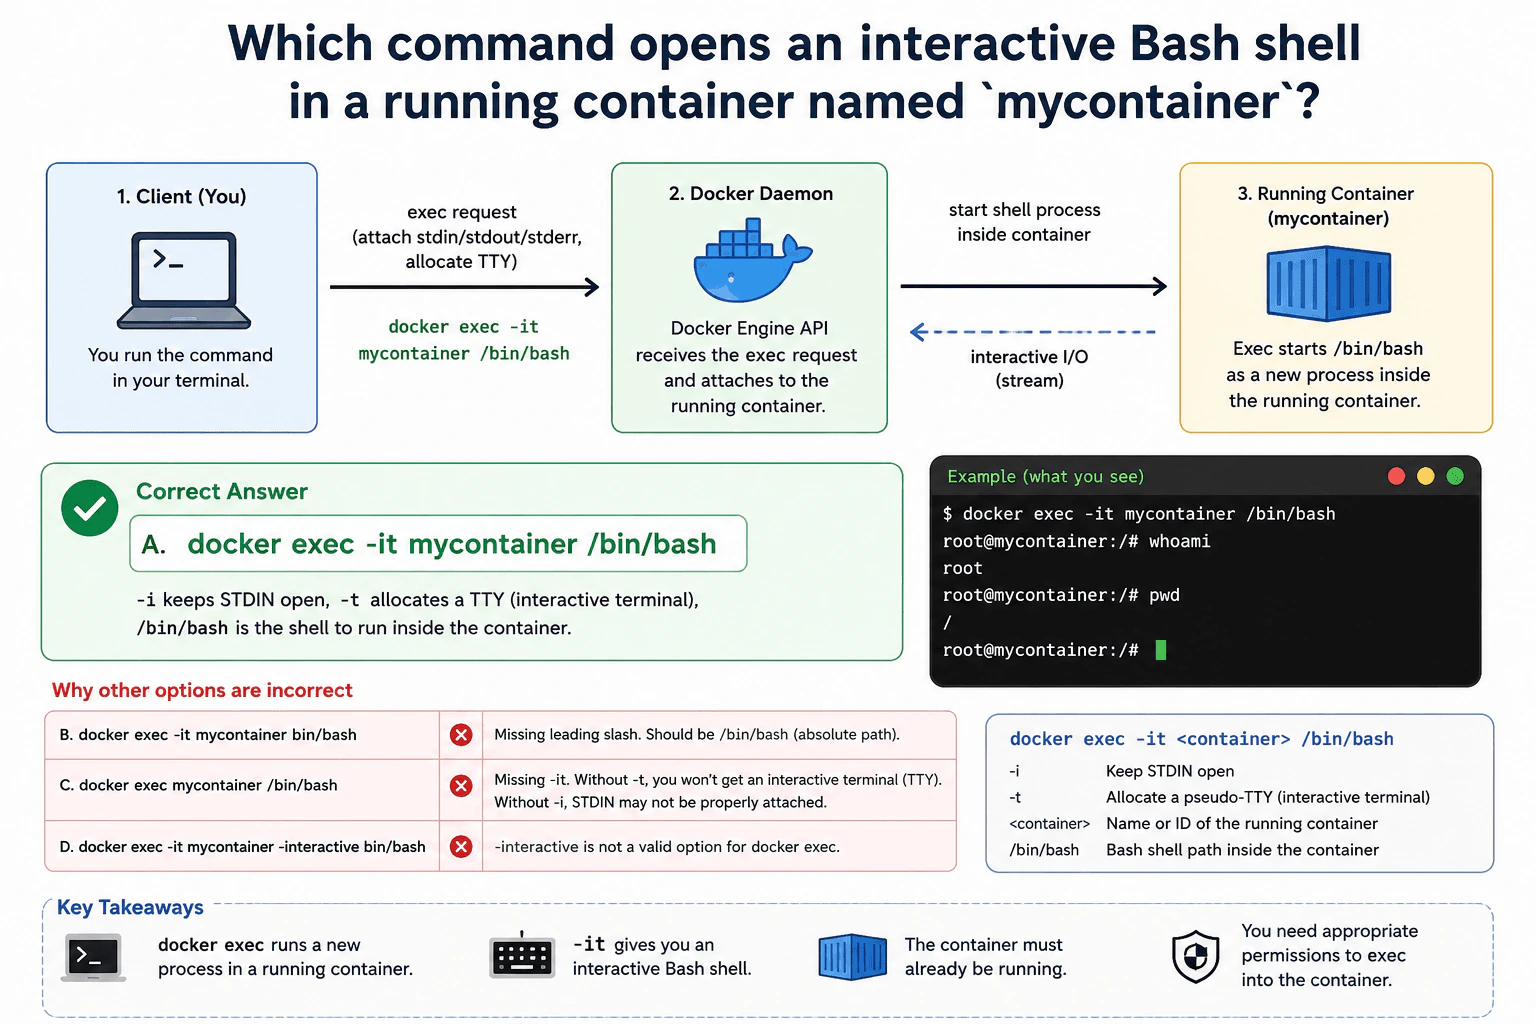
Choose the valid command: A. docker exec -it mycontainer /bin/bash; B. docker exec -it mycontainer bin/bash; C. docker exec mycontainer /bin/bash; D. docker exec -it mycontainer -interactive bin/bash.

Short Interview Answer (30-60 seconds)

At a high level, the goal is to open a live Bash shell inside the running container named mycontainer. The main challenge is keeping that shell connected to the terminal so I can type commands and see the output. I would explain it in three parts: target the running container, start /bin/bash, and attach interactive input and output. The valid command is docker exec -it mycontainer /bin/bash. The downside is that the container must already be running and the user needs permission to execute inside it.

Detailed Explanation

The goal is to open a live Bash command prompt inside a container that is already running. We want to type commands into that shell and immediately see their output. The important part is not only starting Bash. The terminal must stay connected to the Bash process so the session is interactive. The diagram shows one simple path. The command starts in the Client terminal, goes to the Docker Daemon, and starts /bin/bash as a new process inside the Running Container named mycontainer.

Useful Questions to Ask the Interviewer
  1. Can I assume mycontainer is already running?
  2. Can I assume /bin/bash exists inside the container?
  3. Should I choose exactly one command from the four options?
Which command opens an interactive Bash shell in a running container named `mycontainer`? diagram
How to Explain It in an Interview
1. Start with the valid command

I would say the correct choice is A: docker exec -it mycontainer /bin/bash.

docker exec tells Docker to run a new command inside an existing running container. The target container is mycontainer. The command started inside it is /bin/bash.

This does not rebuild or restart the container. It starts Bash as a new process inside the container that is already running.

2. Explain what -it does

The next thing I would explain is why -it matters.

The -i flag keeps standard input, or STDIN, open. In simple words, it lets Bash continue receiving what I type. The -t flag allocates a pseudo-TTY, which gives Bash an interactive terminal.

Together, -it gives the interactive shell behavior required by the question.

3. Follow the request through the diagram

The command begins in the Client terminal. The client sends the exec request to the Docker Daemon.

The Docker Daemon receives the request and attaches it to the running container. It starts /bin/bash as a new process inside mycontainer.

The shell's input and output stay connected to the user's terminal. The diagram shows this return path as an interactive I/O stream. This connection lets the user type commands and immediately see their results.

4. Explain why the other choices are wrong

Option B uses bin/bash instead of the /bin/bash path required by this answer and diagram. The intended executable path here is /bin/bash.

Option C omits -it. Without those flags, it does not provide the interactive terminal behavior the question asks for.

Option D uses -interactive, which is not the valid option shown for docker exec. It also uses bin/bash instead of the required /bin/bash path.

5. Mention the important limits

The container must already be running because docker exec starts a process inside an existing running container. The user also needs appropriate permission to execute commands inside it.

The key idea is simple. docker exec starts the process, -i keeps input open, -t provides the terminal, and /bin/bash is the shell started inside mycontainer.

Practical Complexity & Trade-offs

The benefit is that docker exec -it gives direct interactive access to a running container without rebuilding or restarting it. This is useful for checking files, running commands, and debugging. The downside is that the container must already be running. The Bash executable must also exist at /bin/bash, as shown in the diagram. The user needs permission to execute commands inside the container. Interactive access should therefore be controlled carefully. The shell is only a new process inside that one running container. It does not create shared state between separate containers or replicas.

Why Interviewers Ask This

Interviewers ask this question to check whether you understand basic Docker container operations instead of only memorizing commands. They want to see whether you know what docker exec does, why -i and -t are used together, and why /bin/bash is passed as the process to start. They also want you to recognize that docker exec works with a container that is already running.

Interviewer may ask next
What would you do if the running container does not contain /bin/bash?

I would keep the same docker exec approach, but I would use a shell that actually exists inside the running container. The part that changes is the command started inside mycontainer. For example, if the container has /bin/sh instead of Bash, I could run docker exec -it mycontainer /bin/sh.

The rest of the flow stays the same. The Client sends an exec request to the Docker Daemon. Docker starts the requested shell as a new process inside the Running Container. The -i flag keeps input open, and -t provides the interactive terminal.

Correctness depends on using an executable path that exists inside that container. I would not assume every container image contains Bash. The main downside is that another shell may support fewer features than Bash. Commands or scripts that depend on Bash-specific behavior may therefore need to be changed.

What changes if the container named mycontainer is stopped?

I cannot use the shown docker exec flow while mycontainer is stopped. The diagram depends on mycontainer being a Running Container. docker exec starts a new process inside an existing running container, so there must already be a running container to receive /bin/bash.

I would first start the container using the normal Docker start operation. After it is running, I could use the original command: docker exec -it mycontainer /bin/bash.

The original interaction then stays the same. The Client sends the exec request to the Docker Daemon. Docker starts Bash as a new process inside mycontainer, and the interactive I/O stream connects the shell back to the terminal.

The downside is that starting a stopped container also starts its normal container workload. That is different from simply opening a debugging shell inside a container that was already running.

5. What scheduling behavior does this preferred Pod anti-affinity rule request?Containers And KubernetesMediumApple

Question Details

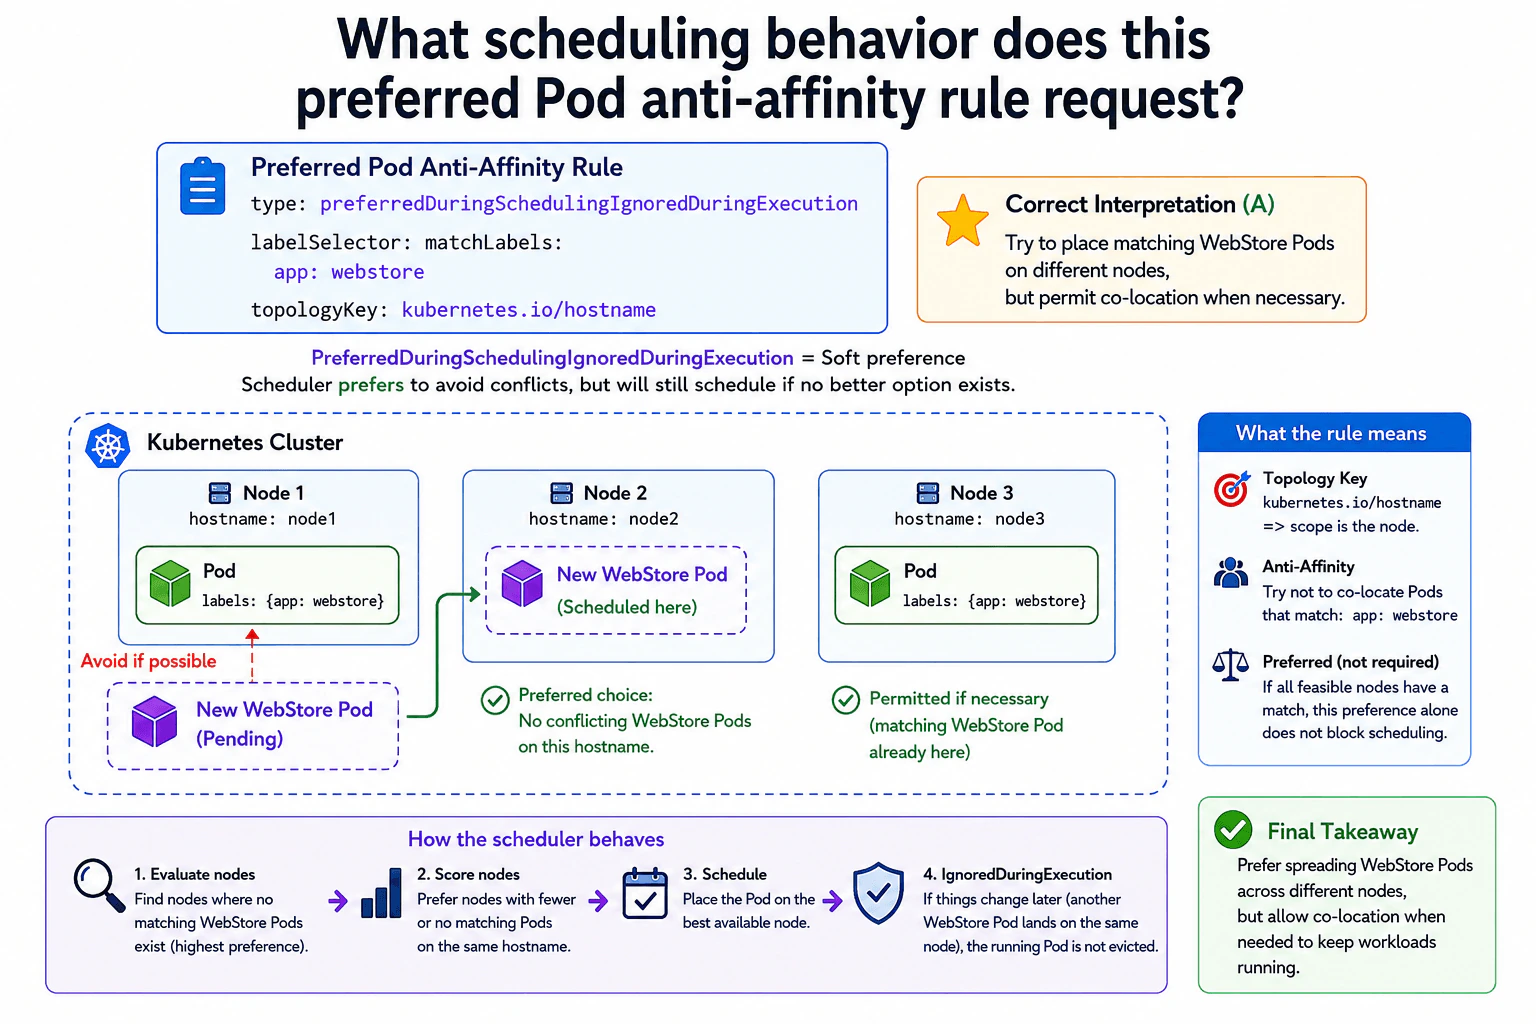
A workload uses preferredDuringSchedulingIgnoredDuringExecution Pod anti-affinity. Its selector matches Pods with label app whose value is webstore, and its topologyKey is kubernetes.io/hostname. Choose the correct interpretation: A. Try to place matching WebStore Pods on different nodes, but permit co-location when necessary; B. Require WebStore and Store Pods to be co-located or leave them unscheduled; C. Prefer WebStore and Store Pods to be co-located but allow different nodes; D. Require that no two matching WebStore Pods share a node or leave them unscheduled.

Short Interview Answer (30-60 seconds)

At a high level, this rule asks Kubernetes to spread matching WebStore Pods across different nodes when possible. The main challenge is understanding that this is a preference, not a hard requirement. I would explain it in three parts: which Pods the selector matches, how the hostname topology defines the node boundary, and how the scheduler chooses a node. So answer A is correct. A node without a matching Pod is preferred, but co-location is still permitted when necessary.

Detailed Explanation

This question asks whether Kubernetes must separate these Pods or only tries to separate them. The important point is that the rule expresses a preference. Kubernetes looks for nodes where a matching WebStore Pod is not already running. It prefers those nodes, but this rule alone does not prevent using another feasible node when needed. The diagram shows three nodes. Node 1 and Node 3 contain matching WebStore Pods, while Node 2 does not. The new Pod is therefore shown on Node 2. I will explain the selector, node boundary, scheduling choice, and what happens after scheduling.

Useful Questions to Ask the Interviewer
  1. Should I explain why option A is correct and why option D is too strict?
  2. Should I assume the nodes shown are otherwise feasible for this Pod?
What scheduling behavior does this preferred Pod anti-affinity rule request? diagram
How to Explain It in an Interview
1. Explain what the rule is asking for

I would start by saying this is preferred Pod anti-affinity. That means Kubernetes should try to keep matching Pods apart, but it is not a hard requirement.

The selector matches Pods with the label app: webstore. So those are the Pods considered by this anti-affinity preference.

This is why option D is too strict. The word preferred means Kubernetes may accept a placement that does not satisfy the preference.

2. Explain the topology boundary

Next, I would point to kubernetes.io/hostname. This topology key makes the comparison happen at the node level because each node has its own hostname value.

In the diagram, Node 1 and Node 3 already contain matching app: webstore Pods. Node 2 has no matching WebStore Pod.

So the rule prefers spreading the matching Pods across different nodes.

3. Explain how scheduling works

For scheduling, Kubernetes first considers nodes that are otherwise feasible for the new Pod. This preferred anti-affinity rule then affects how those feasible nodes are scored.

Node 2 is the preferred choice because its hostname has no matching WebStore Pod. Node 1 and Node 3 are less preferred because each already has a matching Pod in that hostname topology.

The diagram therefore shows the new WebStore Pod scheduled on Node 2. If every feasible node already has a matching Pod, this preference alone does not block scheduling. Kubernetes may still place the Pod on a node with a matching Pod.

4. Explain IgnoredDuringExecution

I would then explain the last part of the rule name. IgnoredDuringExecution means Kubernetes does not later evict a running Pod just because this anti-affinity preference becomes unsatisfied after scheduling.

For example, if another matching WebStore Pod later ends up on the same node, this rule does not make Kubernetes remove the already running Pod.

5. Give the final interview answer

The correct choice is A. Kubernetes tries to place matching WebStore Pods on different hostnames, which here means different nodes. The benefit is better spreading when suitable choices exist. The trade-off is that spreading is not guaranteed. Because this is a soft preference, co-location is allowed when necessary.

Practical Complexity & Trade-offs

The benefit is that Kubernetes can spread matching WebStore Pods across nodes without making that goal a hard scheduling rule. A feasible node with no matching app: webstore Pod is preferred. This can give better placement when several nodes are available. The downside is that separation is not guaranteed. If every feasible node already contains a matching Pod, this preference alone does not stop scheduling. We accept that because the rule is meant to guide placement, not require it. Also, IgnoredDuringExecution means Kubernetes does not later evict a running Pod only because this preference becomes unsatisfied.

Why Interviewers Ask This

Interviewers ask this to see whether you understand the difference between a Kubernetes scheduling preference and a hard requirement. They also want to know whether you can read a label selector and topology key correctly. A strong answer explains why the hostname makes the node the comparison boundary, why option A is correct, and why IgnoredDuringExecution does not mean Kubernetes continuously rearranges running Pods.

Interviewer may ask next
What changes if the rule uses requiredDuringSchedulingIgnoredDuringExecution instead of preferredDuringSchedulingIgnoredDuringExecution?

The important change is that the anti-affinity condition becomes a hard scheduling requirement instead of a preference. I would keep the same selector, app: webstore, and the same kubernetes.io/hostname topology. That still means the comparison happens at the node level.

With the preferred rule in the diagram, Node 2 gets a better scheduling score because it has no matching WebStore Pod. Node 1 or Node 3 can still be used when necessary. With the required form, a node that violates the anti-affinity condition is not an acceptable placement under that rule.

So if every otherwise feasible node conflicts with the required anti-affinity rule, the Pod can remain unscheduled. The scheduler cannot simply ignore that condition. IgnoredDuringExecution still means an already running Pod is not later evicted only because the condition becomes unsatisfied. The downside is lower scheduling flexibility because fewer nodes may qualify.

What happens if every feasible node already has a matching app: webstore Pod?

With the preferred rule shown in the diagram, the Pod can still be scheduled. The scheduler would prefer a feasible node without a matching WebStore Pod, but in this case no such choice exists.

The key point is that preferred Pod anti-affinity influences node scoring. It does not make a conflicting node automatically invalid. Therefore, this preference alone does not block the Pod when every feasible node already contains a match. One of those feasible nodes may still be selected, so two matching WebStore Pods can share a node.

This does not mean scheduling is guaranteed. Other scheduling requirements can still make every node unsuitable. The statement is only that this preferred anti-affinity rule does not itself require the Pod to remain pending. The downside is that the desired spreading may be lost when cluster placement options are limited.

6. How would you reserve dedicated Kubernetes nodes for regulated applications without modifying every existing Deployment?Containers And KubernetesHardApple

Question Details

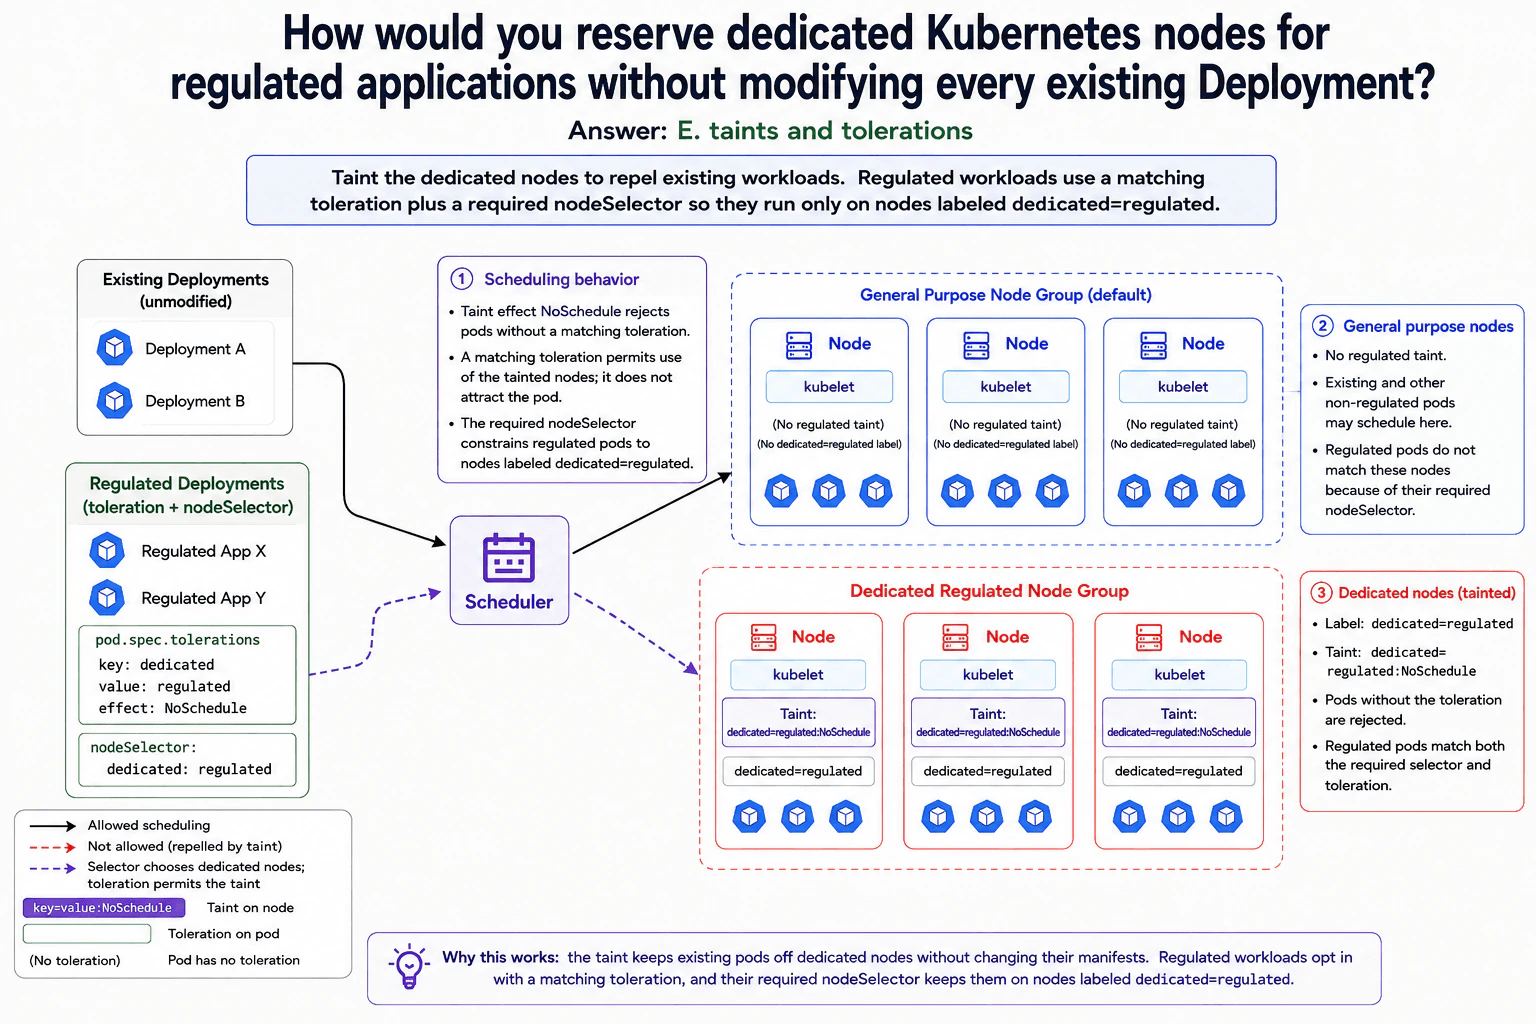
New regulated applications must run on a dedicated node group, and existing applications must not be scheduled there. Existing Deployment manifests cannot all be changed. Choose the mechanism that satisfies the isolation requirement: A. PodPreset; B. Pod affinity; C. LimitRange; D. Pod template; E. taints and tolerations. Explain the node-side and workload-side behavior needed for the selected mechanism.

Short Interview Answer (30-60 seconds)

At a high level, I need to keep existing applications off the regulated nodes without changing their Deployments. The main challenge is that a toleration only permits scheduling. It does not force a pod onto those nodes. I would use the dedicated-node taint plus two workload rules. Regulated pods get the matching toleration and a required nodeSelector. This gives strong scheduling isolation, but regulated pods cannot fall back to general-purpose nodes when dedicated capacity is unavailable.

Detailed Explanation

The goal is to reserve one node group for regulated applications without changing every existing Deployment. Existing applications must keep using the normal nodes. New regulated applications must run only on the dedicated nodes. The difficult part is that Kubernetes needs two different scheduling controls. One control must keep normal pods away from the dedicated nodes. Another must make regulated pods choose those dedicated nodes. The diagram solves this with a taint on the dedicated nodes, a matching toleration on regulated pods, and a required nodeSelector that selects the dedicated node label.

Useful Questions to Ask the Interviewer
  1. Should every regulated workload use the same dedicated node group?
  2. Should regulated pods remain unscheduled when dedicated capacity is unavailable?
  3. Can new regulated workload manifests include both the toleration and nodeSelector?
How would you reserve dedicated Kubernetes nodes for regulated applications without modifying every existing Deployment? diagram
How to Explain It in an Interview
1. Explain the isolation goal

I would start by saying that the isolation must work in both directions. Existing Deployments should remain unchanged, while regulated workloads must use only the dedicated nodes.

The selected mechanism is E, taints and tolerations. A taint is a node-side rule that can reject pods. The dedicated regulated nodes use dedicated=regulated:NoSchedule.

2. Keep existing workloads off dedicated nodes

Existing Deployments do not have the matching toleration. When the Scheduler considers a dedicated node, the NoSchedule taint rejects those pods.

Those existing workloads can still use the General Purpose Node Group. Those nodes do not have the regulated taint. They also do not have the dedicated=regulated label.

This means we do not need to edit every existing Deployment. The node-side taint provides the exclusion rule.

3. Let regulated workloads tolerate the taint

The regulated Deployments include a matching toleration. Their pod configuration uses key dedicated, value regulated, and effect NoSchedule.

That toleration removes the taint-based rejection. It does not attract the pod to those nodes. A toleration means the pod is allowed there, not that it must run there.

This distinction is important because the requirement says regulated applications must use the dedicated group.

4. Force regulated workloads onto the dedicated group

The regulated pods also use a required nodeSelector with dedicated: regulated. Every node in the Dedicated Regulated Node Group carries the matching label dedicated=regulated.

The Scheduler therefore checks both conditions. The nodeSelector restricts the pod to labeled dedicated nodes. The toleration lets the pod pass the NoSchedule taint on those nodes.

General-purpose nodes do not have the required label, so regulated pods do not match them.

5. Explain the trade-off

The benefit is strong scheduling isolation while existing Deployment manifests stay unchanged. Normal workloads cannot newly schedule onto the tainted dedicated nodes, and regulated workloads are constrained to the labeled dedicated group.

The downside is reduced placement flexibility. If no matching dedicated node has capacity, the regulated pod cannot use a general-purpose node. It remains unscheduled until suitable dedicated capacity becomes available. That is acceptable here because isolation is the main requirement.

Practical Complexity & Trade-offs

The benefit is strong scheduling isolation without changing every existing Deployment. The taint keeps normal pods from being newly scheduled onto the dedicated nodes. The matching toleration lets regulated pods pass that taint. The nodeSelector then makes the dedicated labeled nodes their required destination. The downside is less flexibility. If the dedicated nodes are full or unavailable, regulated pods cannot fall back to the general-purpose node group. They stay unscheduled until matching capacity is available. We accept this because keeping regulated applications on the correct nodes is more important than automatic fallback.

Why Interviewers Ask This

The interviewer wants to know whether you understand how Kubernetes scheduling rules work together. A good answer explains that taints repel pods, while tolerations only remove that rejection. It also notices that tolerations do not force placement. Using the nodeSelector for the required destination shows that you can turn a real isolation requirement into correct node-side and workload-side behavior.

Interviewer may ask next
What happens if every dedicated regulated node is full or unavailable?

The regulated pods should remain unscheduled rather than fall back to general-purpose nodes. That keeps the original isolation rule correct.

The Scheduler still looks for nodes matching dedicated=regulated because the regulated workload has a required nodeSelector. The matching toleration also allows the pod to use nodes carrying dedicated=regulated:NoSchedule. If no matching node has capacity, there is no valid placement target.

I would keep those scheduling rules unchanged. Dedicated capacity would need to become available before the pod could run. Removing the selector or sending the workload to normal nodes would break the requirement shown in the diagram.

The benefit is that isolation remains correct during a capacity problem. The downside is lower availability for the regulated application because it may stay unscheduled until dedicated capacity returns.

Why is a matching toleration not enough by itself?

A matching toleration only makes the tainted nodes possible scheduling targets. It does not make them the required targets.

The dedicated nodes have the taint dedicated=regulated:NoSchedule. A regulated pod with the matching toleration is allowed to use those nodes. However, an untainted general-purpose node could still be considered unless another scheduling rule restricts placement.

That is why the diagram also uses nodeSelector with dedicated: regulated. Only the Dedicated Regulated Node Group carries that label. The selector chooses the correct node group, while the toleration removes the taint-based rejection.

The benefit is that regulated workloads stay on the required nodes. The downside is a hard placement rule. If no matching dedicated node is available, the pod cannot run somewhere else.

7. Which Terraform option limits an apply to five concurrent operations?Infrastructure As CodeEasyApple

Question Details

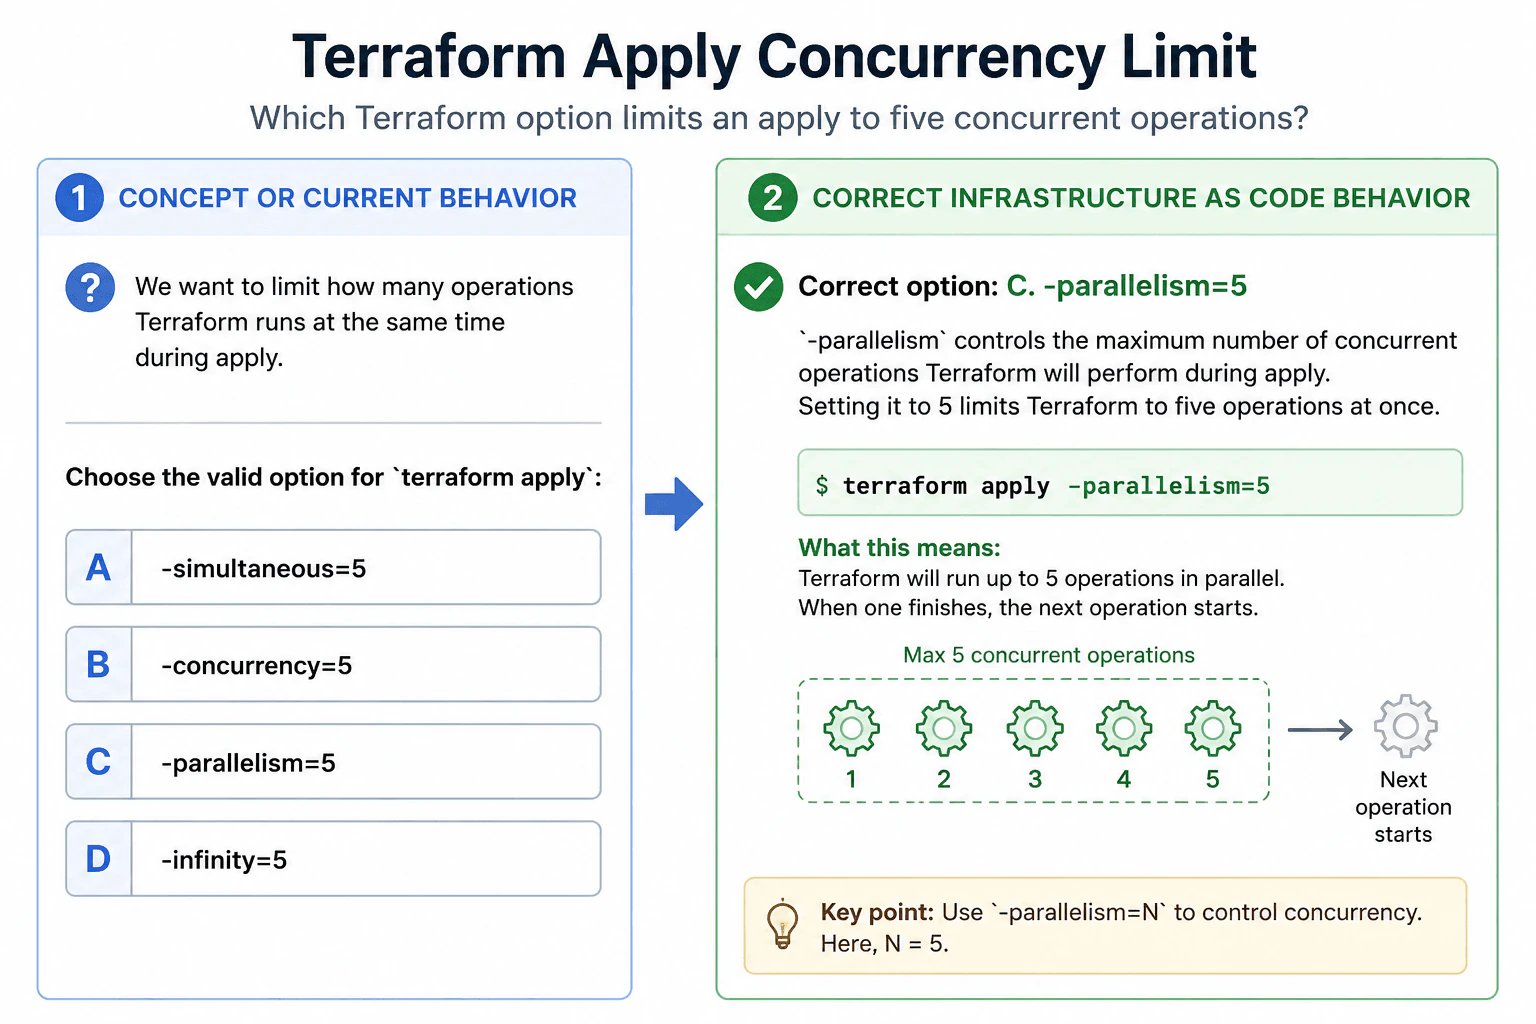
Choose the valid option for terraform apply: A. -simultaneous=5; B. -concurrency=5; C. -parallelism=5; D. -infinity=5.

Short Interview Answer (30-60 seconds)

The correct option is C, -parallelism=5. Running terraform apply -parallelism=5 limits Terraform to at most five concurrent graph operations during the apply. Dependencies can still cause fewer than five operations to run at the same time.

Detailed Explanation

This question asks which setting limits how much work Terraform can perform at the same time. The required limit is five. If five pieces of work are already running, other ready work must wait until capacity becomes available. You only need to choose the valid option from the four choices. The important point is that five is the maximum allowed at one time. It does not mean five pieces of work will always run together, because some work can depend on other work finishing first. The correct choice is C, -parallelism=5.

Useful Questions to Ask the Interviewer
  1. Do you want only the correct option, or should I also explain how the concurrency limit affects Terraform execution?
Which Terraform option limits an apply to five concurrent operations? diagram
How to Explain It in an Interview

The correct answer is C. -parallelism=5.

Terraform executes operations by walking its dependency graph. The -parallelism=n command-line option limits the number of concurrent operations Terraform may perform while walking that graph. Therefore, terraform apply -parallelism=5 sets the maximum concurrency to five operations.

This matches the diagram: Terraform can have up to five eligible operations running in parallel. When capacity becomes available, another ready operation can start. Five is a maximum, not a guarantee that exactly five operations will always run. Dependencies may cause fewer operations to be eligible at a particular moment.

The other choices in the question—-simultaneous=5, -concurrency=5, and -infinity=5—are not the valid Terraform apply option for this purpose.

The tradeoff is controlled concurrency versus execution speed. A lower parallelism value can reduce simultaneous requests to provider APIs or other external systems, but it may make the apply take longer. The setting controls Terraform's own operation concurrency; it does not bypass dependency rules or external platform limits.

Technical Approach
  1. Identify that the question asks for the Terraform apply option that limits concurrent operations.
  2. Recognize -parallelism=n as the valid option.
  3. Substitute 5 for n.
  4. Select C, -parallelism=5.
  5. Explain that five is the maximum concurrency, while dependencies can make the actual number of simultaneous operations lower.
Practical Insights

There is no coding-style time or memory complexity to calculate here. Operationally, lowering parallelism reduces how many Terraform operations can run at once, which can lower simultaneous pressure on provider APIs or other external systems. The tradeoff is that the overall apply may take longer because fewer independent operations can progress concurrently.

Why Interviewers Ask This

This question checks whether the candidate knows the Terraform command-line option that controls the maximum number of operations Terraform can perform concurrently during an apply. It also checks whether the candidate understands that this setting limits Terraform's execution concurrency without changing the infrastructure configuration itself.

Common interview mistakes

A common mistake is choosing -concurrency=5 because the name sounds appropriate, but it is not the Terraform option for this setting. Another mistake is assuming -parallelism=5 forces exactly five operations to run continuously. It only sets the maximum. Dependencies can cause fewer operations to run at once. Also, the option does not override provider or cloud-platform limitations.

Interview tip

Answer the multiple-choice question first: C, -parallelism=5. Then explain in one sentence that it limits Terraform to at most five concurrent graph operations during apply, while dependencies may cause fewer operations to run at a given moment.

Interviewer may ask next
Does -parallelism=5 mean Terraform will always run exactly five operations at the same time?

No. Five is the maximum concurrency. Terraform follows its dependency graph, so operations whose dependencies are not complete cannot start. If only two operations are ready, Terraform may run only those two even though the configured maximum is five.

What is the tradeoff of reducing Terraform parallelism?

Reducing parallelism limits how many Terraform operations can run concurrently. This can reduce simultaneous pressure on provider APIs or other external systems, but the apply may take longer because fewer independent operations can progress at the same time.

8. How many AWS instances in this Terraform configuration are deployed to `us-west-2`?Infrastructure As CodeMediumApple

Question Details

Review the complete configuration and give the number of aws_instance resources that use the aliased us-west-2 provider:

provider "google" {
  project = "your-app"
  region  = "us-central1"
}

provider "aws" {
  region = "us-east-1"
}

provider "aws" {
  alias  = "west"
  region = "us-west-2"
}

resource "aws_instance" "foo" {
  provider = aws
}

Use only the explicit provider association shown; do not assume omitted resources or module mappings.

Short Interview Answer (30-60 seconds)

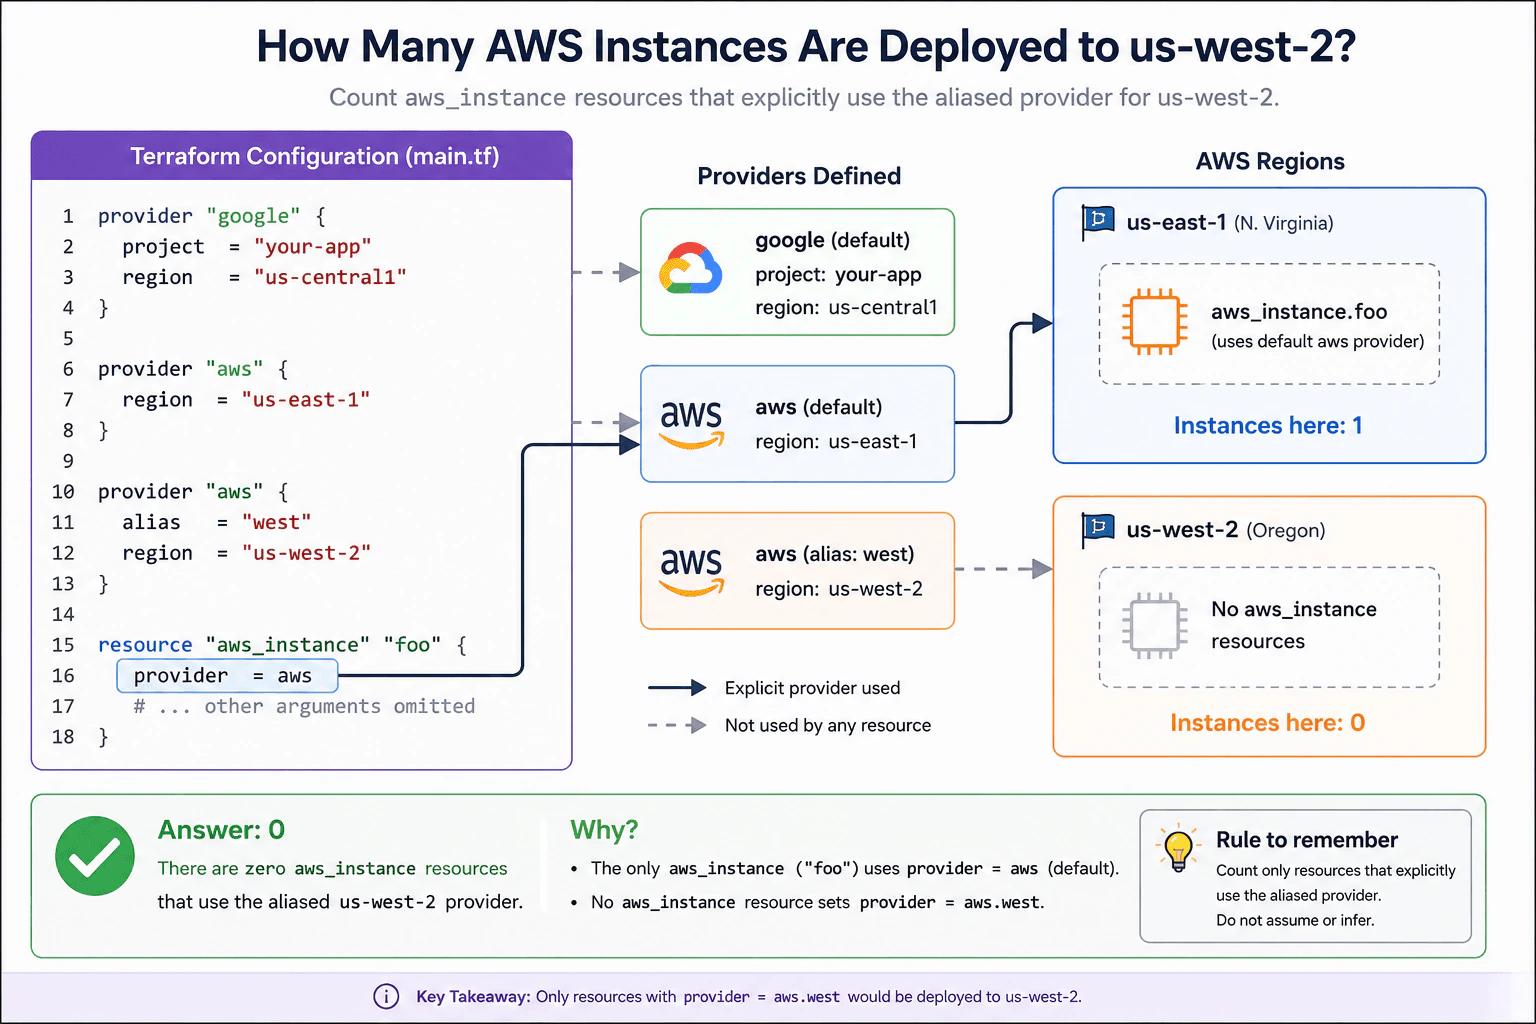
The answer is 0. The only aws_instance, aws_instance.foo, explicitly uses provider = aws, which is the default AWS provider for us-east-1. No aws_instance uses provider = aws.west, so none are deployed to us-west-2.

Detailed Explanation

The configuration shows two AWS locations, but simply listing a location does not place a server there. There is only one AWS server in the complete example. That server is connected to the first AWS setup, which points to the eastern location. The western setup is also defined, but no server is connected to it. Therefore, the number of AWS servers placed in the western location is zero. The key is to follow the connection written for the server instead of assuming every listed location receives one.

Useful Questions to Ask the Interviewer
  1. Should I count only the aws_instance resources explicitly shown in this complete configuration?
  2. Should I rely only on the explicit provider association and ignore omitted resources or module mappings?
How many AWS instances in this Terraform configuration are deployed to `us-west-2`? diagram
How to Explain It in an Interview

There are two AWS provider configurations. The default provider is aws, configured with region = "us-east-1". The aliased provider is aws.west, configured with region = "us-west-2".

The only AWS instance is aws_instance.foo. Its resource block explicitly contains provider = aws. That selects the default AWS provider, so this instance uses us-east-1.

No aws_instance resource contains provider = aws.west. Therefore, zero AWS instances use the aliased us-west-2 provider.

The Google provider is separate and does not affect the AWS-instance count.

The final answer is 0. The rule to remember is: count only resources that explicitly use provider = aws.west when the question asks for resources associated with that aliased provider.

Technical Approach
  1. Identify the AWS provider configured for us-west-2; it is aws.west.
  2. Find every aws_instance resource in the supplied configuration.
  3. Read the explicit provider association on each instance.
  4. Count only instances that use provider = aws.west.
  5. aws_instance.foo uses provider = aws, so the final count is 0.
Practical Insights

For this exact configuration, the check is very small because there is only one AWS instance. More generally, you inspect each aws_instance resource once, so the work grows in direct proportion to the number of instances, or O(n). Only a running count is needed, so extra memory is O(1). No deployment, remote-state operation, or cloud request is required to answer this configuration-reading question.

Why Interviewers Ask This

This question checks whether the candidate can read Terraform provider associations precisely. It tests whether they understand that defining an aliased AWS provider for a region does not automatically place resources in that region. The candidate must trace the provider selected by the resource itself.

Common interview mistakes

A common mistake is counting one instance in us-west-2 just because the aws.west provider is defined. Another mistake is assuming Terraform distributes resources across all configured providers. It does not. Here, aws_instance.foo explicitly uses provider = aws, which is the default us-east-1 provider. The aliased aws.west provider is not used by any aws_instance.

Interview tip

Give the number first: 0. Then point to provider = aws on aws_instance.foo and contrast it with the unused alias aws.west. This shows that you are following the explicit provider association instead of making assumptions about configured regions.

Interviewer may ask next
What would need to change for aws_instance.foo to use the us-west-2 provider?

The resource would need to use provider = aws.west. The alias west belongs to the AWS provider configured with region = "us-west-2", so that explicit association would make the instance use the us-west-2 provider.

Does defining the aliased provider aws.west automatically create or move resources into us-west-2?

No. Defining aws.west only makes that provider configuration available for resources or modules to reference. In the supplied configuration, no aws_instance references aws.west, so the number of AWS instances associated with us-west-2 remains 0.

9. How would you build a standard Linux image?Infrastructure As CodeHardApple

Question Details

Design a reproducible Linux image-building workflow. Define the approved base input, package and configuration sources, build identity, unattended provisioning, hardening and cleanup, validation tests, vulnerability and policy checks, versioning, publication, promotion, rollback, and the evidence that lets an operator reproduce the exact image later.

Short Interview Answer (30-60 seconds)

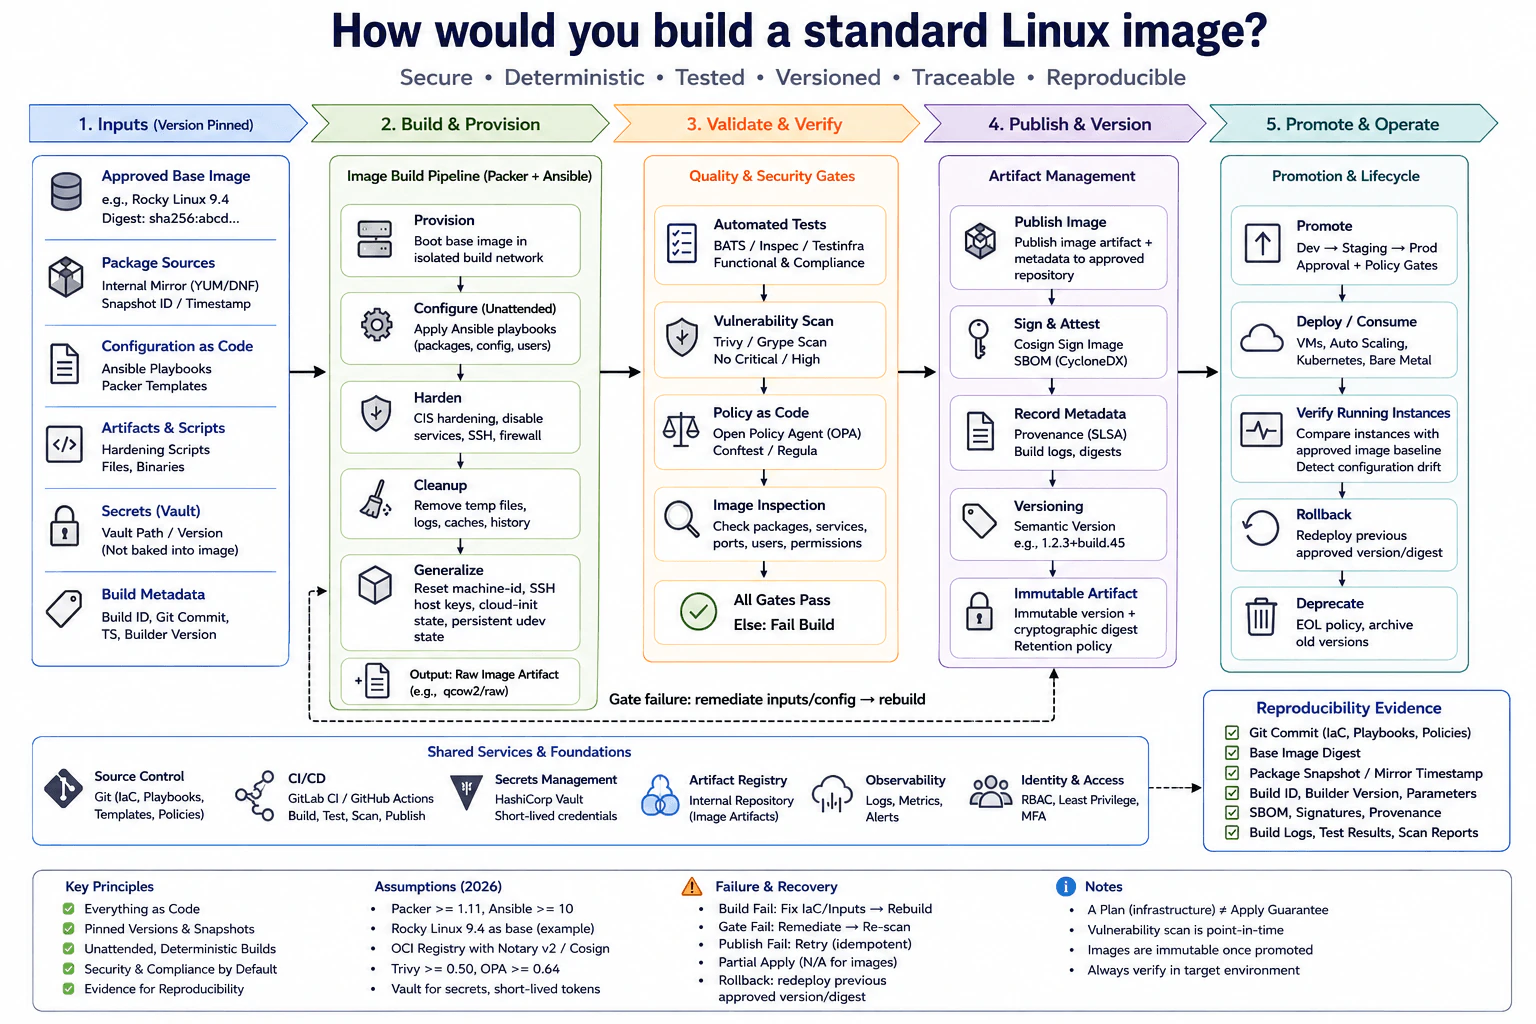
I would build Linux images from pinned inputs using Packer and unattended Ansible provisioning, then harden, clean, generalize, test, scan, sign, version, and publish them as immutable artifacts. Promotion uses approval and policy gates, while rollback redeploys a previous approved version or digest.

Detailed Explanation

A standard Linux image should be built the same way every time instead of being prepared by hand. I would start from an approved starting image, use controlled software sources, keep all setup instructions in source control, and record exactly what went into each build. The process would install and configure the system without human input, remove temporary data, check that the result works, check it for security problems, and publish only approved results. Each released image would have a unique identity and supporting records so another operator can later recreate and verify the same result.

Useful Questions to Ask the Interviewer
  1. Which Linux distributions and image formats must the pipeline support?
  2. Where should approved base images, package mirrors, build evidence, and finished image artifacts be stored?
  3. Which security baseline and vulnerability severity thresholds must block publication?
  4. Which environments require automated checks or human approval before promotion?
  5. How long must old image versions, build logs, SBOMs, provenance, signatures, test results, and scan reports be retained?
How would you build a standard Linux image? diagram
How to Explain It in an Interview

I would treat the image definition as code and the completed Linux image as an immutable, versioned artifact. The repository contains the Packer templates, Ansible playbooks, package manifests, hardening scripts, supporting files, tests, and policy definitions. A CI/CD runner checks out an exact Git commit and performs formatting, linting, security checks, policy checks, and tests before starting a build. The diagram shows Git-based source control and a CI/CD system such as GitLab CI or GitHub Actions, but the workflow is not tied to either product.

The first stage is pinned input selection. I would allow only an approved base image identified by a cryptographic digest rather than relying only on a mutable name. Rocky Linux 9.4 is the example shown in the design. Packages come from a controlled internal YUM or DNF mirror, and I would record the repository snapshot identifier or timestamp together with the resolved package versions. Packer templates, Ansible playbooks, hardening content, policies, scripts, files, and binaries are version controlled as well.

I would give every build a unique identity. At minimum, I would record a build ID, Git commit, timestamp, exact builder versions, input digests, package snapshot, resolved package versions, configuration revision, policy revision, and build parameters. The diagram states 2026 assumptions of Packer 1.11 or later and Ansible 10 or later; in production I would pin the exact repository-tested versions rather than depending on an open-ended minimum version.

Secrets are external inputs, not image content. The pipeline obtains them from a secrets manager such as HashiCorp Vault using short-lived credentials. Secret values must not be committed to Git, embedded in the image, copied into logs, or stored as ordinary build metadata. CI/CD and publishing identities should use least-privilege permissions, with appropriate identity controls such as MFA for human access.

Packer starts the approved base image in an isolated build environment. Ansible then performs unattended and idempotent configuration: it installs packages, writes configuration, creates required users, and configures services. There should be no interactive SSH setup or manual correction in the golden-image path because that would make the result difficult to reproduce.

Next I would harden the system using the approved CIS-based baseline. That can include disabling unnecessary services and applying approved SSH and firewall settings. The exact hardening rules should themselves be version controlled so a particular image can be tied to the exact baseline that produced it.

Before capture, I would clean temporary files, package caches, build logs that should not ship, and shell history. I would then generalize machine-specific state by resetting machine-id, SSH host keys, cloud-init state, and persistent udev state. This prevents cloned instances from inheriting identifiers that should be generated when each new machine starts. The result is the raw image artifact, for example qcow2 or raw when those formats are required.

The validation stage is a hard gate. Automated tests can use BATS, InSpec, or Testinfra for functional and compliance checks. Image inspection verifies expected packages, services, ports, users, permissions, and filesystem state. Vulnerability scanning can use Trivy or Grype. In the diagram, critical or high findings block the image. Policy-as-code checks use OPA with tools such as Conftest or Regula. If a mandatory test, vulnerability rule, inspection, or policy check fails, the image does not proceed to publication; the inputs or configuration are remediated and the image is rebuilt and checked again.

A vulnerability result is point-in-time evidence, not a permanent guarantee. New vulnerabilities can be published after an image passes its original scan, so released images need an ongoing rebuild or rescan policy appropriate to the organization.

After all gates pass, I would publish the image artifact and its metadata to the approved internal artifact repository. The image receives an immutable version plus a cryptographic digest. A human-readable semantic version can include a build identifier, for example 1.2.3+build.45, while the digest provides the strongest immutable artifact identity.

I would also generate supply-chain evidence. The diagram shows a CycloneDX SBOM, Cosign signing, SLSA-style provenance or attestation, build logs, digests, test results, scan reports, and signatures. The exact signing mechanism depends on the chosen artifact format and repository, but the important property is that consumers can verify the artifact identity and the evidence associated with it. Signing keys must be protected outside the image and build source.

Promotion is separate from building. The same immutable artifact moves through development, staging, and production after the required automated checks, policy gates, and approvals. I would not rebuild separately for each environment because that would create different artifacts. Consumers such as VMs, autoscaling fleets, Kubernetes nodes, or bare-metal systems should select the approved artifact by immutable version or digest.

Once machines are running, I would compare them with the approved image baseline and detect configuration drift. That drift belongs to the running instances; it does not mean the already published immutable artifact itself changed. If an intended configuration change is needed, I would update the source-controlled image definition and create a new image version instead of manually turning the old artifact into something different.

Rollback also uses immutable artifacts. If a newly promoted image causes a problem, I would redeploy the previous approved version or digest. I would not rebuild the previous release during the incident because external dependencies such as repositories could have changed. Old approved artifacts therefore need a retention policy that supports the organization's rollback window. When an image reaches end of life, it can be deprecated and eventually archived or removed according to that policy.

Failure recovery should follow the same model. A build failure is repaired in the image definition or inputs and rebuilt. A validation-gate failure is remediated and rescanned or retested. A transient publication failure should be retried through an idempotent publishing step so it does not create conflicting identities. Traditional infrastructure partial-apply recovery is not the main model for this image-build pipeline; the central unit is the completed immutable artifact.

The evidence retained for reproducibility is critical: Git commit, Packer and Ansible versions, base-image digest, package snapshot or timestamp, resolved package versions, build ID, parameters, configuration and policy revisions, SBOM, provenance, signatures, build logs, test results, and scan reports. With those inputs still available, an operator can reconstruct the same build process and verify exactly how the approved image was produced. Where the image format and build environment support fully deterministic output, the resulting digest can also be compared; otherwise the retained evidence still provides precise provenance and repeatability without falsely promising bit-for-bit identity.

The main tradeoff is additional engineering and maintenance. The team must operate package snapshots, builder automation, tests, policies, signing infrastructure, artifact storage, retention rules, logging, metrics, and alerts. In return, the organization gets unattended and repeatable builds, security and policy controls before publication, immutable promotion, predictable rollback, audit evidence, and a clear path for correcting drift through code rather than one-off manual changes.

Technical Approach
  1. Store Packer templates, Ansible playbooks, package manifests, hardening scripts, tests, policies, and supporting artifacts in version control.
  2. Trigger the CI/CD pipeline from an approved change or scheduled rebuild and record the exact Git commit.
  3. Run formatting, linting, static security checks, policy checks, and unit-level tests before building.
  4. Resolve an approved base image by cryptographic digest and a controlled YUM or DNF repository snapshot.
  5. Record the build ID, timestamp, builder versions, input digests, package snapshot, resolved package versions, policy revision, and build parameters.
  6. Retrieve required secrets using short-lived credentials from a secrets manager; never bake secrets into the image.
  7. Use Packer to create the temporary build environment and Ansible for unattended, idempotent provisioning.
  8. Apply the approved CIS-based hardening baseline, including required service, SSH, and firewall settings.
  9. Remove temporary files, caches, history, and other build residue.
  10. Generalize machine-specific state by resetting machine-id, SSH host keys, cloud-init state, and persistent udev state.
  11. Capture the raw image artifact.
  12. Run functional and compliance tests with tools such as BATS, InSpec, or Testinfra and inspect packages, services, ports, users, permissions, and filesystems.
  13. Run vulnerability scanning with Trivy or Grype and policy-as-code checks with OPA-based tooling such as Conftest or Regula.
  14. If any mandatory gate fails, remediate the source-controlled inputs or configuration, rebuild, and rerun the checks.
  15. Generate the SBOM, provenance or attestations, signatures, digests, build logs, test reports, and scan reports.
  16. Assign an immutable version and cryptographic digest and publish the artifact plus metadata to the approved repository.
  17. Promote the exact same immutable artifact from development to staging to production through policy and approval gates.
  18. Verify running instances against the approved image baseline and route intended changes back through the image-build workflow.
  19. Roll back by redeploying a previous approved version or digest rather than rebuilding the previous release.
  20. Deprecate and archive old versions according to the retention and end-of-life policy.
Practical Insights

The cost is mostly operational rather than algorithmic. Each build uses temporary compute, package-download bandwidth, and storage. Testing, vulnerability scanning, policy checking, signing, and publication add build time. Keeping old images, SBOMs, provenance, signatures, logs, test reports, and scan reports increases storage use but supports rollback and auditing. The team must also maintain base-image approvals, internal package snapshots, Packer and Ansible versions, hardening rules, tests, policies, signing keys, secrets integration, retention rules, metrics, logs, and alerts. This is more work than building servers manually, but it greatly reduces configuration inconsistency and makes failures easier to reproduce and investigate.

Why Interviewers Ask This

The interviewer wants to see whether I can turn Linux image creation into a controlled, repeatable engineering workflow rather than a manual server-build process. A strong answer demonstrates deterministic inputs, unattended provisioning, security hardening, automated validation, vulnerability and policy gates, immutable artifact management, controlled promotion, rollback, drift verification, least-privilege access, and traceability. It also tests whether I know what evidence must be retained so an operator can later identify exactly which source revision, base image, package snapshot, tools, configuration, policies, parameters, tests, and security checks produced an approved image.

Common interview mistakes

Common mistakes include using a mutable base-image name without recording its digest; installing packages from an uncontrolled repository without keeping a snapshot or timestamp; failing to record resolved package and builder versions; performing manual or interactive configuration during the image build; storing secrets in Git, the image, logs, or ordinary metadata; forgetting to remove temporary files, caches, history, or build residue; cloning machine-id or SSH host keys into every instance; publishing before functional, vulnerability, inspection, and policy gates pass; treating a vulnerability scan as permanently valid; using only a mutable tag rather than an immutable version and digest; rebuilding separately for each environment instead of promoting the same artifact; treating running-instance drift as mutation of the image artifact; rebuilding an old release during rollback instead of redeploying the retained known-good artifact; and discarding the Git revision, input digests, package snapshot, builder versions, SBOM, provenance, signatures, logs, tests, and scan reports needed for reproduction.

Interview tip

Explain the design as one flow: pinned inputs, unattended build, hardening and generalization, mandatory validation gates, immutable publication, controlled promotion, runtime verification, and rollback by previous digest. Emphasize that the same artifact moves between environments and that retained evidence makes each released image traceable and reproducible.

Interviewer may ask next
How would you prove that a production image can be reproduced later?

I would retain the exact Git commit, base-image digest, package-repository snapshot or timestamp, resolved package versions, build ID, Packer and Ansible versions, build parameters, configuration and policy revisions, image digest, SBOM, provenance or attestations, signatures, build logs, test results, and vulnerability and policy reports. An operator can check out the recorded source revision, resolve the same pinned inputs, use the same builder versions, and run the same unattended workflow. If the image format and build environment are fully deterministic, the resulting cryptographic digest can be compared directly. If some nondeterministic metadata remains, the retained evidence still proves exactly which controlled inputs and process produced the approved artifact without claiming unsupported bit-for-bit reproducibility.

What would you do if a newly promoted image fails in production?

I would stop further promotion and redeploy the previous approved image using its immutable version or digest. I would not rebuild the previous release during the incident because package repositories or other dependencies may have changed. I would preserve the failed image and its build evidence for investigation, compare the affected running instances with the approved baseline, determine whether the problem came from packages, configuration, hardening, policy, or the target environment, update the source-controlled definition, and create a new version through the full build and validation workflow. The known-good artifact remains available according to the retention policy.

10. Where are Kubernetes application logs generated and stored?ObservabilityEasyApple

Question Details

Trace logs written by a containerized application from standard output and standard error through the container runtime and node filesystem. Contrast that path with an application writing its own files, and cover rotation, retention, Pod replacement, node loss, and which log data remains available without an external collection system.

Short Interview Answer (30-60 seconds)

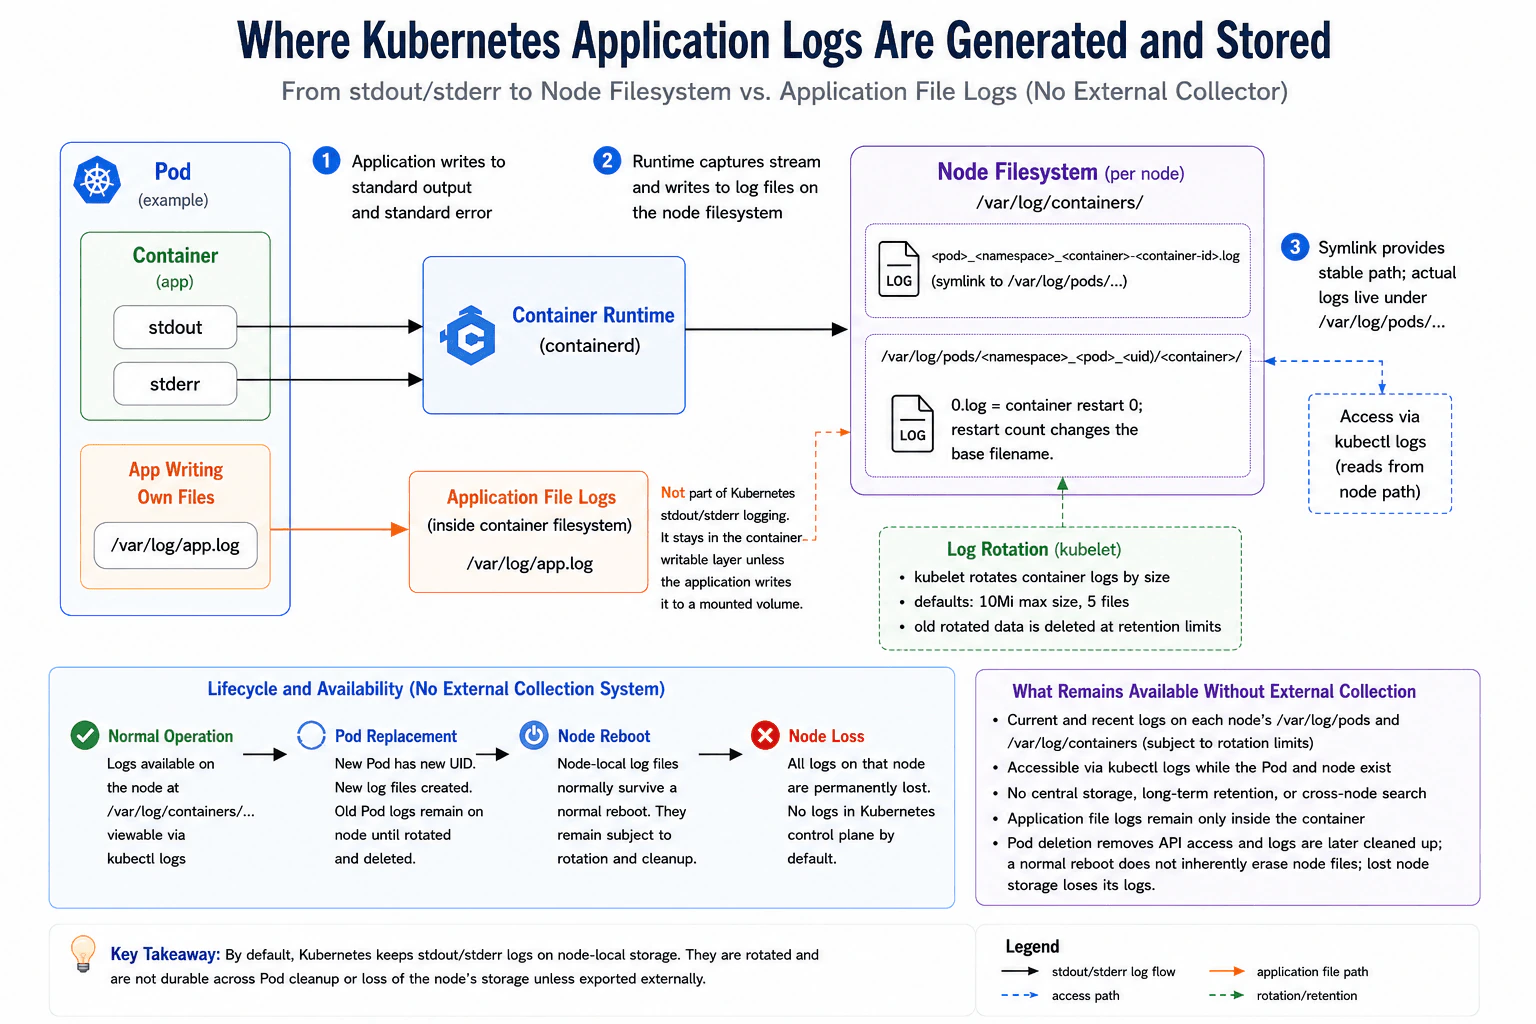
Applications normally write logs to stdout and stderr. The container runtime stores those streams in node-local files under /var/log/pods, with /var/log/containers linking to them. Kubelet rotates the logs, and they are not durable if the node's storage is lost unless exported externally.

Detailed Explanation

A running program usually sends its messages through two normal output channels. The system running that program captures those messages and saves them as files on the machine where the program is running. These files stay only for a limited time because older information can be removed automatically. If the program creates its own separate files, those follow a different storage path. Replacing the running copy creates new records. Restarting the same machine normally keeps existing files, but losing that machine's storage loses its saved information unless copies were sent somewhere else.

Useful Questions to Ask the Interviewer
  1. Should I explain only the default node-local logging path, or also mention external log collection?
  2. Should I contrast stdout and stderr with files written directly by the application?
  3. Should I cover Pod replacement, normal node reboot, and permanent node-storage loss separately?
Where are Kubernetes application logs generated and stored? diagram
How to Explain It in an Interview

The normal Kubernetes application-logging path starts with the application process. The application writes log records to stdout and stderr. The container runtime, such as containerd, captures those streams and writes the container log data to files on the worker node.

The underlying Pod log files are stored under a path shaped like /var/log/pods/<namespace>_<pod>_<uid>/<container>/. Kubernetes also exposes convenient links under /var/log/containers/. A link name is typically shaped like <pod>_<namespace>_<container>-<container-id>.log and points back to the corresponding file under /var/log/pods.

Inside the Pod log directory, the base filename represents the container restart count. For example, 0.log is associated with restart count 0. A later container restart uses a different restart-count filename. This restart numbering should not be confused with log rotation.

kubectl logs gives access to the container logs that Kubernetes can still obtain from the node. It does not mean the Kubernetes control plane permanently stores a copy of every application log.

Kubelet manages container-log rotation. Common kubelet defaults are a maximum log-file size of 10Mi and a maximum of 5 files per container, although these settings are configurable. Rotation keeps node disk usage bounded, but it also means older rotated data is eventually deleted. Therefore, node-local retention is limited.

An application that writes a file such as /var/log/app.log is using a different path. That file is not automatically part of Kubernetes stdout/stderr logging. If the file is written only to the container writable layer, it remains tied to that container and can disappear with it. If the application writes the file to a mounted volume, its lifetime depends on the type and lifecycle of that volume.

Pod replacement also changes the logging location. A replacement Pod receives a new UID and therefore a new Pod-specific log directory. Logs from the previous Pod can remain on its node temporarily, but they are eventually removed through cleanup and retention behavior.

A normal reboot of the same worker node does not inherently erase node-local log files. Existing files can remain on the node filesystem and continue to be subject to rotation and cleanup. Permanent loss of the node's storage is different: logs that existed only on that storage are lost. Kubernetes does not automatically replicate those node-local log files into the control plane.

Without an external collection system, only current and recent node-local logs that have not been rotated or cleaned up remain available. There is no built-in central long-term retention or cross-node search. Production systems that need durable history normally export logs to an external logging backend.

Technical Approach
  1. Identify whether the application writes to stdout/stderr or creates its own files.
  2. Trace stdout/stderr through the container runtime to the worker-node filesystem.
  3. Identify /var/log/pods as the underlying Pod log location and /var/log/containers as the convenient link path.
  4. Explain that restart-count filenames are separate from rotation.
  5. Explain how kubectl logs accesses available node-local container logs.
  6. Describe kubelet rotation and limited retention.
  7. Treat application-written files separately, including the difference between the container writable layer and a mounted volume.
  8. Explain Pod replacement, normal node reboot, cleanup, and permanent node-storage loss independently.
  9. Conclude that durable retention and cross-node search require external collection.
Practical Insights

The default design is simple because logs are written locally on each worker node. The main cost is node disk space and disk activity. Rotation limits that disk usage, but keeping more files or larger files increases storage use. Application-created files use additional storage and may require a volume if they must outlive the container. Without external collection, operating cost is lower, but history is short and there is no central search. External collection adds network, ingestion, storage, and maintenance cost in exchange for longer retention and better search across nodes.

Why Interviewers Ask This

This question checks whether the candidate understands the Kubernetes application-log lifecycle from creation to node-local storage. A strong answer should distinguish stdout and stderr from application-managed files, explain the roles of the container runtime and kubelet, identify /var/log/pods and /var/log/containers, describe kubectl logs, and explain rotation, retention, Pod replacement, normal node reboot, node-storage loss, and the durability limits of running without an external collection system.

Common interview mistakes

Common mistakes include saying Kubernetes permanently stores application logs in the control plane, describing /var/log/containers as a separate durable copy instead of a link path, confusing container restart-count filenames such as 0.log with rotated-file numbering, assuming kubectl logs reads from a central log database, claiming a normal node reboot automatically erases node-local files, assuming application-created files are automatically part of stdout/stderr logging, or claiming node-local logs survive permanent loss of the node's storage.

Interview tip

Explain one simple flow first: application stdout/stderr -> container runtime -> node-local /var/log/pods files -> /var/log/containers links -> kubectl logs. Then contrast application-written files and finish with rotation, retention, Pod replacement, normal reboot, node-storage loss, and why external collection is needed for durable history.

Interviewer may ask next
What happens to Kubernetes application logs when a Pod is replaced?

The replacement Pod receives a new UID, so it gets a new Pod-specific log directory. Logs from the old Pod can remain on its previous node temporarily, but they are eventually removed through cleanup and retention behavior. They are not a durable historical record. If the logs must remain available after Pod cleanup or node loss, they need to be exported to an external logging system.

What is the difference between a normal node reboot and permanent node-storage loss for Kubernetes logs?

A normal reboot of the same node does not inherently erase existing log files on its local filesystem. Those files can remain and continue to be subject to rotation and cleanup. Permanent loss of the node's storage is different: logs stored only on that node are lost. Kubernetes does not automatically replicate node-local application logs into the control plane, so durable retention requires exporting them elsewhere.

More questions load as you scroll

Disclaimer: This interview guide is for educational and informational purposes only. It is designed to help readers prepare, but it does not guarantee any interview result, hiring decision, offer, or outcome. Interview questions, hiring criteria, and preferred answers can vary by employer, interviewer, industry, location, and time. The examples and explanations reflect the authors' research and judgment, are provided without warranties of any kind, and should not be treated as the only correct approach. Diagrams are simplified illustrations intended to highlight the main components and their interactions; actual systems and implementations may be more complex. Alternative approaches may be equally valid or better suited to a particular question, context, or interviewer. To the fullest extent permitted by applicable law, the author, contributors, and publisher are not liable for decisions made, actions taken, or losses incurred based on this guide.

Company Notice: This guide is an independent educational resource and is not affiliated with, endorsed by, sponsored by, or approved by the company named in this guide. Company names are used only to identify interview experiences commonly reported by candidates. Interview practices can change without notice, and inclusion of company-specific content does not mean these questions are official, complete, or guaranteed to be asked. To the fullest extent permitted by law, the author, contributors, and publisher are not responsible for outcomes related to use of this material.

Content Accuracy and Verification: To the fullest extent permitted by applicable law, we do not represent or warrant that interview guides, questions, answers, examples, or diagrams are accurate, complete, current, error-free, or suitable for any particular purpose. You are responsible for independently reviewing and verifying the information before relying on it.