48 top • 14 Boeing • 6 Bosch • 2 Caterpillar • 9 Ford • 6 GE Aerospace • 4 Honeywell • 8 John Deere • 3 Lockheed Martin • 3 Rolls-Royce • 2 Siemens Energy • 4 Tesla
Questions with Detailed ExplanationsWith Detailed Explanations
This interview guide is for educational and informational purposes only. It is designed to help readers prepare, but it does not guarantee any interview result, hiring decision, offer, or outcome. Interview questions, hiring criteria, and preferred answers can vary by employer, interviewer, industry, location, and time. All answers, examples, and explanations in this guide are suggested examples for interview preparation, not definitive answers or instructions for professional practice. They are based on research and judgment, are provided without warranties of any kind, and should be adapted to the question, role, and applicable laws and professional requirements. Diagrams are simplified illustrations intended to highlight the main concepts and their relationships; actual situations, systems, and practices may be more complex. Alternative approaches may be equally valid or better suited to a particular question, context, or interviewer. To the fullest extent permitted by applicable law, the contributors and publisher are not liable for decisions made, actions taken, or losses incurred based on this guide.
State Laws and Professional Responsibilities
Laws and requirements governing an occupation vary by state and jurisdiction. You are responsible for checking the current laws, licensing requirements, and scope-of-practice rules that apply to your location and role, and for ensuring that your answers and actions comply with them. Adapt examples in this guide to those requirements. This guide is not legal advice.
Identity, Image, and Privacy Notice
To respect individual privacy, some names, profile photographs, avatars, biographical details, and other identifying information displayed in this guide may be replaced with pseudonyms, licensed stock images, illustrative avatars, composite images, or representative descriptions. Unless a person is expressly identified as an actual contributor, a displayed name, image, or profile should not be understood as depicting or identifying a specific candidate, interviewer, employee, or other real individual. These representations are provided for editorial and illustrative purposes only and do not imply endorsement, employment, participation, or affiliation with this guide or any company mentioned in it. Any resemblance to an actual person is coincidental.
Company Notice
This guide is an independent educational resource and is not affiliated with, endorsed by, sponsored by, or approved by the company named in this guide. Company names identify reported interview experiences or the employer context of clearly labeled original practice exercises. Interview practices can change without notice, and inclusion of company-specific content does not mean these questions are official, complete, or guaranteed to be asked. To the fullest extent permitted by law, the author, contributors, and publisher are not responsible for outcomes related to use of this material.
Content Accuracy and Verification
To the fullest extent permitted by applicable law, we do not represent or warrant that interview guides, questions, answers, examples, or diagrams are accurate, complete, current, error-free, or suitable for any particular purpose. You are responsible for independently reviewing and verifying the information before relying on it.
Questions or comments?
Contact us for general questions, or share feedback, technical corrections, and comments with the community.
41. How would you implement a change that affects parts already in inventory and products in the field?Engineering Changes And ConfigurationHard
i Question Details
Define cut-in effectivity, segregate stock, decide rework or scrap, assess service retrofit needs, update documentation, and maintain traceability across old and new configurations.
Short Interview Answer (30-60 seconds)
I would start from the released baseline and identify every affected part, assembly, drawing, bill of materials entry, requirement, supplier item, tool, inspection instruction, and service document. I would assess fit, form, function, interchangeability, manufacturing, supplier stock, and service impact, then obtain formal engineering change approval. I would define cut in effectivity by serial number or lot, segregate affected inventory, and disposition it as approved use as is, controlled rework, or scrap. For fielded units, I would determine whether an approved retrofit is required. Then I would release the new revision, update controlled documents, verify implementation, and record configuration by serial number or lot for full traceability.
Detailed Explanation
I would treat this as a configuration control problem involving both the future product definition and every existing unit that may remain on the old configuration. The objective is to prevent an uncontrolled mix of revisions while explicitly controlling inventory and fielded product disposition.
Useful Questions to Ask the Interviewer
How are units identified for effectivity, for example by serial number, lot, or manufacturing date?
Are existing parts interchangeable with the new revision, or does the change affect fit, form, function, or controlled requirements?
Are fielded products expected to remain on their current configuration unless a service action is specifically approved?
How to Explain It in an Interview
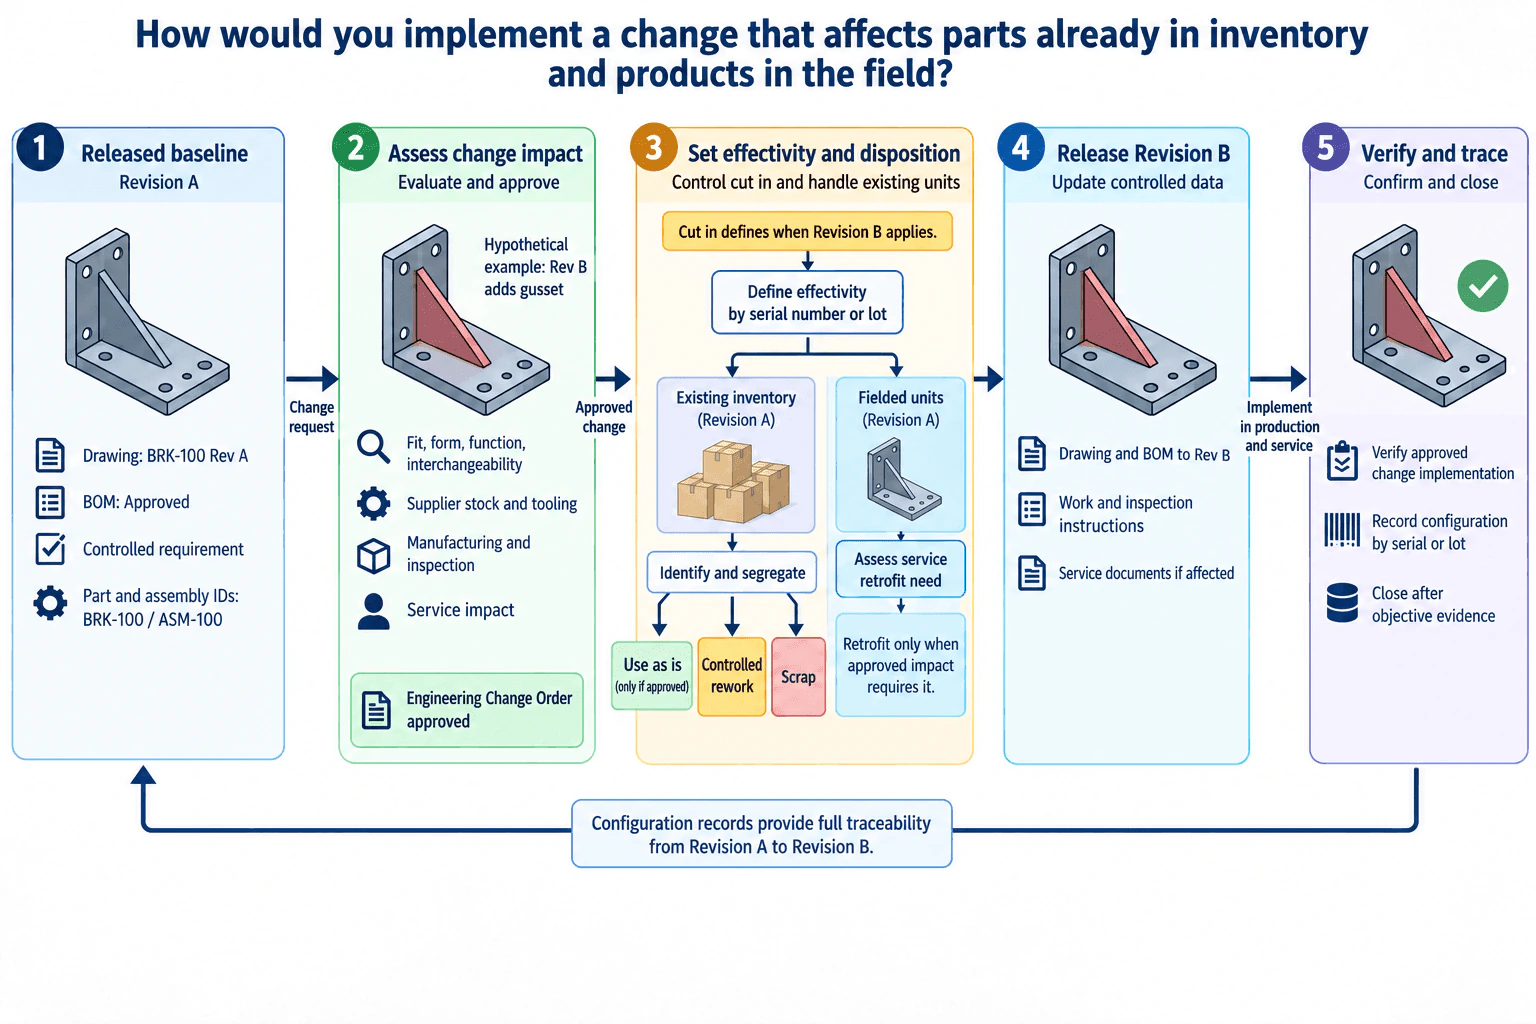
I would first establish the released baseline. I would confirm the current approved drawing revision, bill of materials, part and assembly identifiers, controlled requirements, manufacturing instructions, inspection instructions, and applicable service documentation.
Next, I would perform the change impact assessment. I would check fit, form, function, interchangeability, supplier stock, tooling, manufacturing operations, inspection needs, and service implications. I would also identify affected assemblies and downstream documents. The proposed change would then go through the required engineering change approval process before implementation.
After approval, I would define effectivity. Using the hypothetical diagram example, Rev B adds a gusset to the bracket. The engineering change order could define the first serial number or lot to which Rev B applies. Existing Rev A inventory would be identified and segregated so it cannot be issued unintentionally.
I would then disposition that inventory through the approved process. If Rev A remains acceptable for the intended configuration, it may be approved for use as is. If modification is required, I would issue controlled rework instructions. If the part cannot be accepted or reworked under the approved disposition, it may be scrapped.
For products already in the field, I would separately assess service impact. A retrofit would be performed only when the approved change decision requires it, and the affected serial numbers or lots would be identified in the service records.
Next, I would release Rev B and update the controlled drawing and bill of materials, work and inspection instructions, and service documents if affected. The approved revision and defined effectivity must drive manufacturing, inspection, and service execution.
Finally, I would verify implementation, record the actual configuration by serial number or lot, and close the change only after objective evidence confirms that the approved documentation, inventory disposition, production cut in, and any required service actions were completed. That maintains traceability from the released Rev A baseline to Rev B.
Why Interviewers Ask This
Interviewers want to see whether I can control an engineering change across the complete product configuration, not just revise a drawing. They are evaluating whether I can identify the released baseline, assess affected parts and assemblies, define effectivity, disposition existing inventory, address products already in service, update controlled documentation, coordinate approval, and maintain traceability between old and new configurations.
Common interview mistakes
Common mistakes include revising the drawing without assessing existing stock, failing to define a clear cut in point, assuming old and new parts are interchangeable without checking fit, form, and function, allowing affected inventory to remain unsegregated, forgetting downstream bill of materials or inspection documents, treating production and service effectivity as identical without analysis, retrofitting fielded units without an approved requirement, and closing the change before implementation evidence and configuration records are complete.
Interview tip
Frame the answer around control of the released baseline. Make it clear that approving the design change is only one step. A strong answer connects the approved engineering change order to effectivity, inventory segregation and disposition, field service decisions, controlled document release, implementation verification, and serial number or lot traceability.
Interviewer may ask next
What would you do if the old and new parts appear interchangeable but that has not been formally verified?
I would not assume interchangeability. I would compare the applicable requirements, interfaces, dimensions, tolerances, materials, loads, manufacturing constraints, inspection criteria, and assembly interactions that could affect fit, form, or function. If evidence is incomplete, I would keep the configurations controlled separately and obtain the required verification and approval before allowing substitution or continued use.
How would your approach change if thousands of units were already in the field?
I would make the service impact assessment more explicit. I would identify the affected population through configuration records, evaluate the consequence of leaving each unit on the existing configuration, and compare that with the cost, access, downtime, parts availability, and execution risk of retrofit. The approved change would then define which serial numbers require service action and which may remain on the existing configuration, with traceable records for both groups.
42. When would you refuse a late-cycle design change?Engineering Changes And ConfigurationHard
i Question Details
Reject or defer a change when it alters critical interfaces or invalidates verification without an approved reanalysis and revalidation plan, unless the change is needed to address a greater risk.
Short Interview Answer (30-60 seconds)
I would refuse or defer a late cycle design change when it changes a critical interface or invalidates existing verification and there is no approved reanalysis and revalidation plan. I would first trace the proposed engineering change order from the released baseline through the affected part, assembly, drawing, bill of materials, requirements, supplier stock, tooling, inspection, and service documentation. If leaving the current design creates a greater risk, I would not reject the change automatically. I would route it through authorized change approval with the required evidence, controlled revision, defined effectivity, and verification before implementation.
Detailed Explanation
A late change is not automatically unacceptable. I would base the decision on what changes relative to the released baseline, what verification evidence becomes invalid, and whether the resulting product definition can remain controlled and traceable.
Useful Questions to Ask the Interviewer
Which interfaces, requirements, parts, assemblies, and verification evidence are affected by the proposed change?
Has manufacturing started, and what supplier stock, tooling, inspection instructions, or service documentation use the current revision?
Is there an approved reanalysis and revalidation plan, and what effectivity point is proposed for the new revision?
How to Explain It in an Interview
Engineering Method
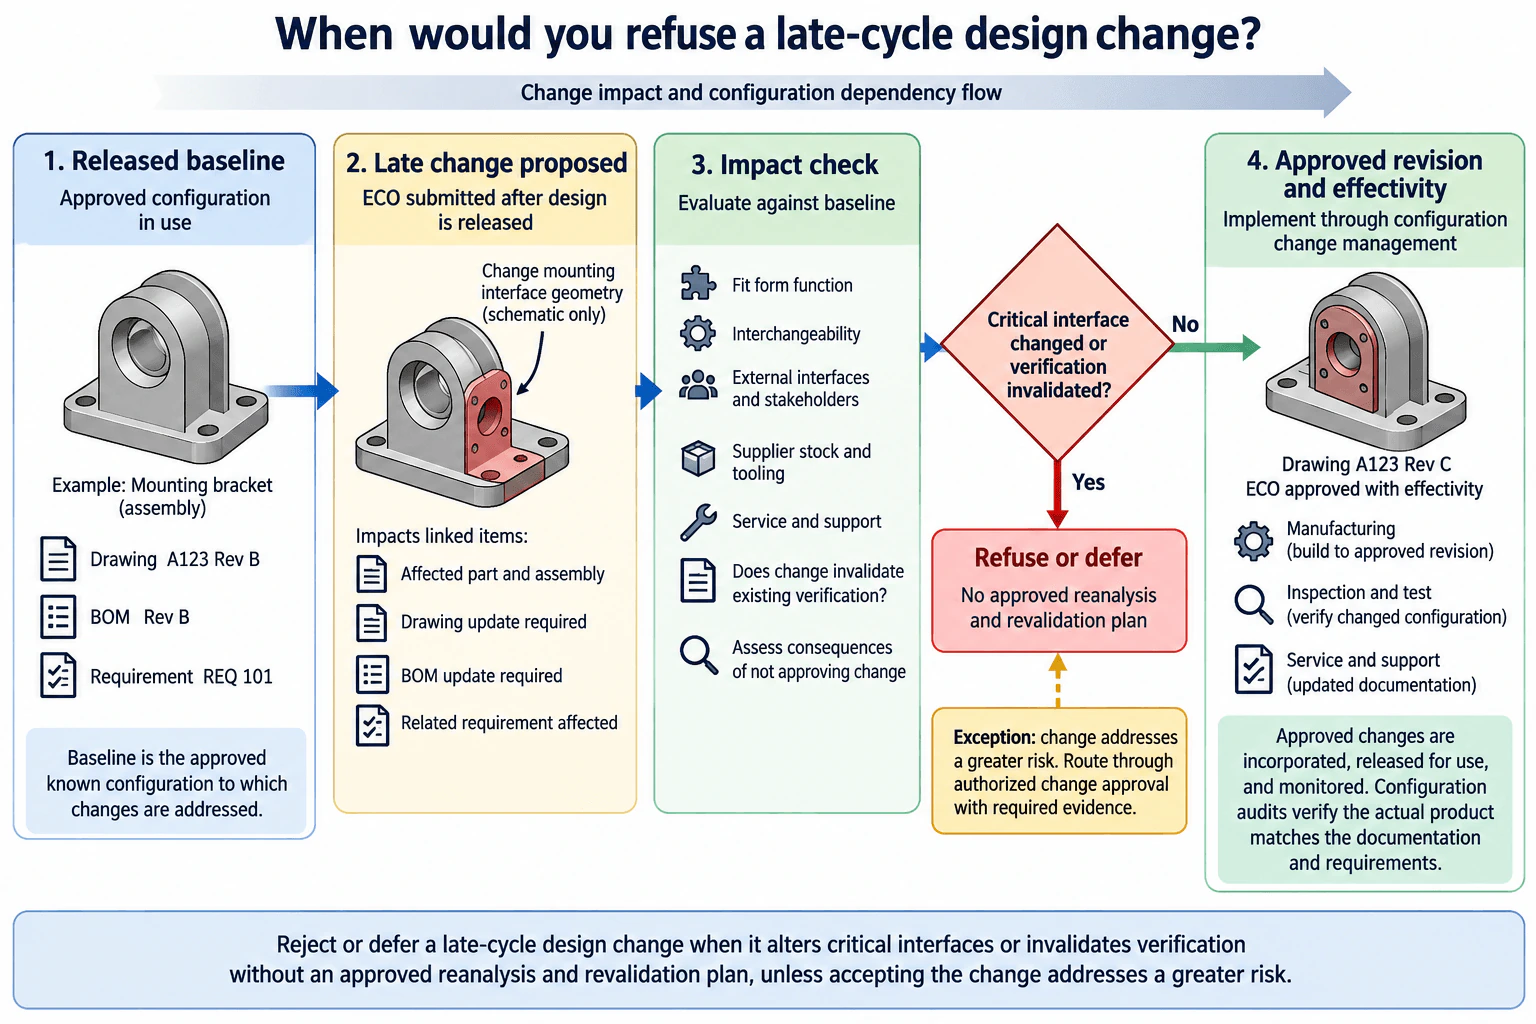
I would start with the released baseline, meaning the approved known configuration against which the change is evaluated. In a hypothetical mounting bracket example, that could include Drawing A123 Revision B, the corresponding bill of materials revision, and Requirement REQ 101.
I would trace the proposed engineering change order through the affected part and assembly, drawing, bill of materials, and requirements. I would then check fit, form, function, interchangeability, external interfaces, supplier stock, tooling, service support, and the consequences of not approving the change.
Assumptions And Checks
The key decision is whether a critical interface changes or existing verification becomes invalid. If either occurs and there is no approved reanalysis and revalidation plan, I would refuse or defer the change. The plan should identify the affected evidence, the analysis or testing that must be repeated, and the configuration that will be verified.
If neither condition occurs, that does not mean the change bypasses approval. It still follows the authorized change process before a new revision is released. The approved change should have defined effectivity so manufacturing, inspection, and service know exactly when the new configuration applies.
Design Reasoning
I would also consider the risk of keeping the current design. If the proposed change addresses a greater risk, automatic rejection could be the worse engineering decision. I would route the exception through authorized change approval with the required evidence rather than bypassing configuration control.
After approval, manufacturing should build to the approved revision, inspection and test should verify the changed configuration, and service should receive updated documentation. Configuration checks should confirm that the physical product matches the released documentation and requirements.
The failure mode I am trying to prevent is mixed configuration, such as manufacturing using one drawing revision while inspection or service uses another. My conclusion is to refuse or defer when critical interfaces or verification are affected without an approved reanalysis and revalidation plan, while allowing justified changes only through controlled approval, revision, effectivity, and verification.
Why Interviewers Ask This
Interviewers are testing whether I can protect a released configuration while making sound engineering judgments under schedule pressure. They want to see whether I understand released baselines, revision control, engineering change orders, bill of materials impact, effectivity, interchangeability, verification evidence, and the consequences for manufacturing, inspection, suppliers, and service.
Common interview mistakes
Common mistakes include approving a change based only on local geometry, failing to trace affected drawings and requirements, overlooking fit, form, function or interchangeability, ignoring supplier stock or tooling, assuming existing verification still applies, releasing a revision without clear effectivity, and allowing manufacturing, inspection, or service to use inconsistent revisions.
Interview tip
Frame the answer around five ideas: the released baseline, change impact, verification consequences, authorized approval, and effectivity. Make clear that being late in the cycle is not itself the reason to refuse a change. The deciding issue is whether the change can be analyzed, approved, verified, released, and implemented without losing configuration control.
Interviewer may ask next
What evidence would make you comfortable approving the change?
I would want traceable evidence showing the affected interfaces, requirements, parts, assemblies, drawings, and bill of materials entries, plus the required reanalysis and revalidation plan. I would also check manufacturing and inspection readiness, supplier stock, tooling impact, service documentation, approved revision status, and the proposed effectivity. Before implementation, the team should confirm that the configuration being built and inspected matches the approved product definition.
What if rejecting the change leaves a greater known risk in the product?
I would compare the consequence of keeping the released configuration with the risk introduced by the proposed change. If the proposed change addresses the greater risk, I would not reject it solely because it is late. I would route it through the authorized engineering change process with the required evidence, reanalysis, revalidation, revision control, approval, and effectivity before implementation.
43. What is root-cause analysis, and how is it different from fixing a symptom?Troubleshooting And Failure AnalysisEasy
i Question Details
Define root cause as the mechanism that explains the observed failure and whose correction prevents recurrence, rather than the visible damage or immediate workaround.
Short Interview Answer (30-60 seconds)
Root cause analysis identifies and verifies the failure mechanism that explains an observed problem and whose correction prevents recurrence. A symptom is the visible indication or damage. For example, abnormal bearing vibration and noise are symptoms. Replacing the damaged bearing may restore function, but if shaft misalignment is increasing bearing loading, the problem can return. I would use evidence such as wear patterns, alignment measurements, and operating and maintenance history to establish the mechanism, then correct it and verify under representative operating conditions that the symptom does not recur.
Detailed Explanation
Root cause analysis asks what physical mechanism produced the observed failure and what evidence supports that conclusion. Fixing a symptom addresses what is immediately visible. It may restore function, but by itself it does not prove that the cause of recurrence has been removed.
Useful Questions to Ask the Interviewer
What symptom, operating condition, and operating or maintenance history are known?
What measurements or physical evidence are available to distinguish competing failure mechanisms?
Under what representative operating conditions should the corrective action be verified?
How to Explain It in an Interview
I would start by separating the observed symptom from the mechanism that produced it.
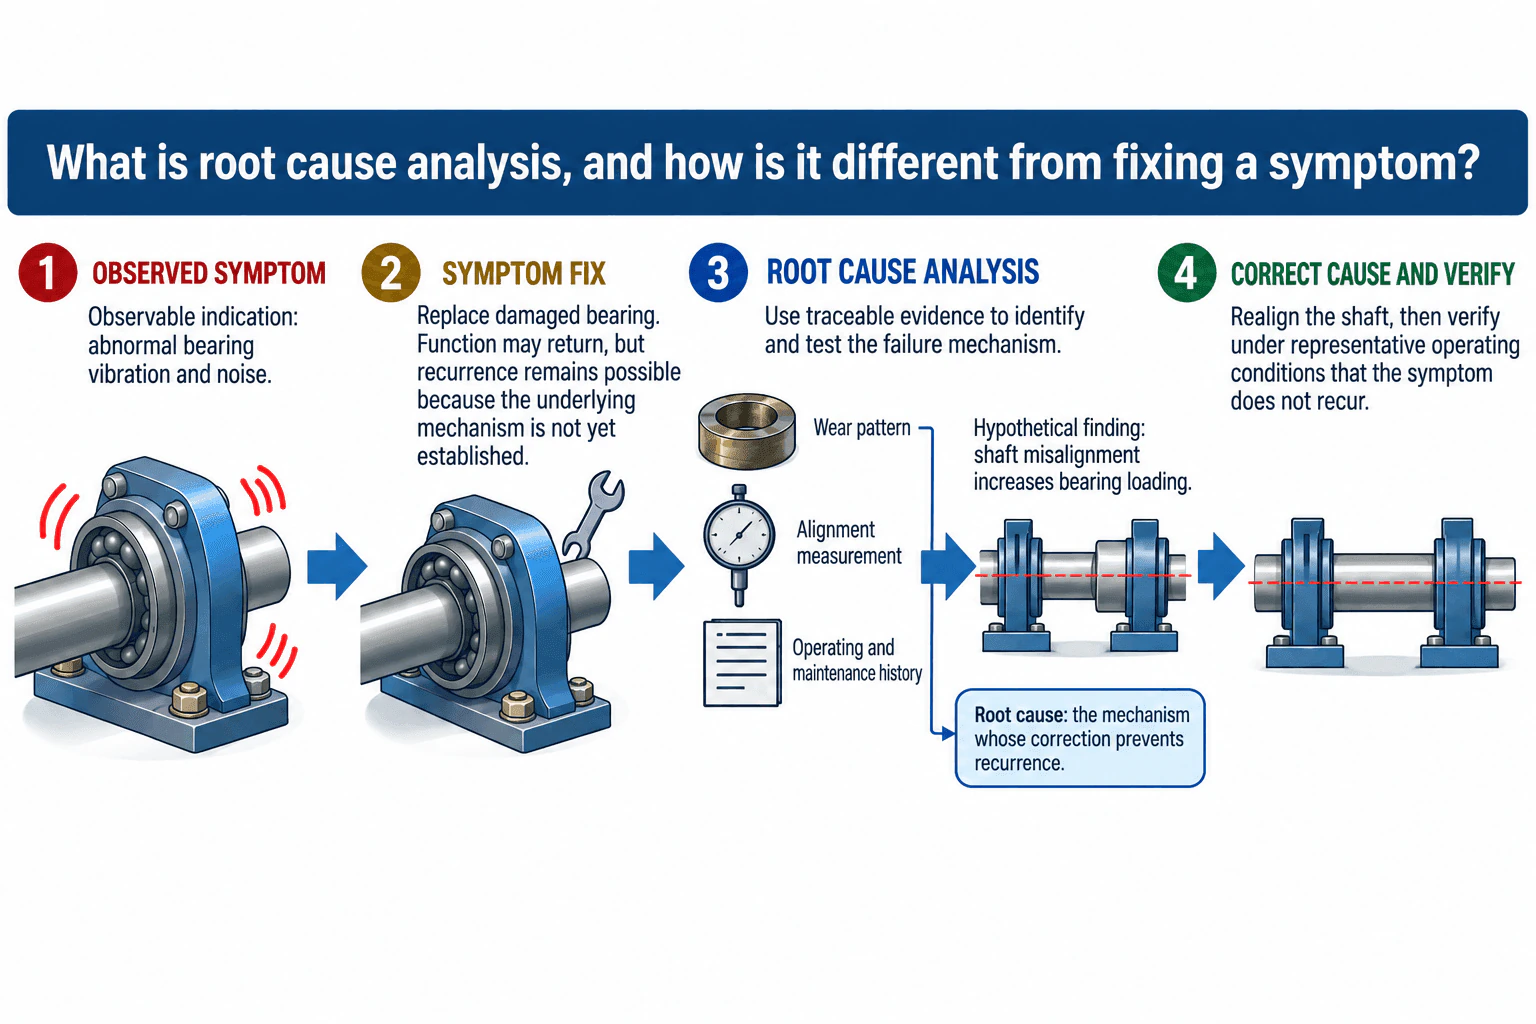
Using the hypothetical bearing example from the diagram, the observed symptom is abnormal bearing vibration and noise. Replacing the damaged bearing is a symptom fix. It may restore function, but recurrence is still possible because the underlying mechanism has not yet been established.
Next, I would gather traceable evidence that can distinguish plausible causes rather than just support a preferred theory. In this example, the useful evidence is the wear pattern, an alignment measurement, and the operating and maintenance history. I would compare that evidence against plausible mechanisms such as misalignment, abnormal loading, looseness, tolerance or assembly problems, and other conditions that fit the observed evidence.
If the evidence supports the hypothetical finding that shaft misalignment increases bearing loading, then the root cause is the verified misalignment mechanism, not merely the vibration or the damaged bearing. The corrective action is to realign the shaft.
Finally, I would verify the correction under representative operating conditions and confirm that the original symptom does not recur. If the symptom persists or the evidence no longer supports the proposed mechanism, I would reopen the investigation and test other hypotheses.
The key distinction is simple: fixing a symptom restores function now, while root cause analysis identifies the mechanism that caused the failure and verifies that correcting that mechanism prevents recurrence.
Why Interviewers Ask This
Interviewers want to see whether I distinguish the visible symptom from the mechanism that created it, use traceable evidence instead of guessing, and verify that corrective action prevents recurrence rather than only restoring function temporarily.
Common interview mistakes
Common mistakes are calling the damaged part the root cause, stopping after replacing the failed component, collecting evidence only to support a preferred theory, ignoring operating and maintenance history, changing several variables at once, and declaring success without verifying the corrective action under representative conditions.
Interview tip
State the symptom first, then name the evidence you would collect, explain how that evidence distinguishes competing mechanisms, identify the root cause only after the evidence supports it, and finish with corrective action verification.
Interviewer may ask next
How would you verify that the proposed root cause is correct?
I would look for independent evidence that connects the proposed mechanism to the observed failure. For a misalignment hypothesis, that could include alignment measurements, compatible wear patterns, and operating or maintenance history. I would correct the suspected mechanism without changing unrelated variables where practical, then verify the equipment under representative operating conditions. If the symptom persists or the evidence does not agree, I would reopen the competing hypotheses.
What if replacing the failed component permanently removes the symptom?
That result is useful evidence, but it does not automatically prove that the failed component itself was the root cause. I would still ask why the component failed and whether the replacement changed another condition. If the component had an isolated defect, replacement may remove the causal mechanism. If loading, alignment, assembly, or operating conditions caused the damage, replacement alone may only delay recurrence.
44. What is the first step when a mechanical prototype fails during testing?Troubleshooting And Failure AnalysisEasy
i Question Details
Preserve the failed hardware and test data, make the situation safe, record the configuration and avoid changing evidence before the failure mode is understood.
Short Interview Answer (30-60 seconds)
My first step is to stop the test, make the situation safe, and preserve the prototype and evidence in the condition found. I would retain the failed hardware and test setup, save the test data and operating history, photograph and document the configuration, location, orientation, and visible damage, and avoid unnecessary cleaning or disassembly. Once the evidence is protected, I can begin root cause analysis using targeted measurements and tests.
Detailed Explanation
The first priority is to stop the test, establish a safe investigation boundary, and preserve the failed condition before unnecessary changes destroy evidence. I would retain the failed hardware and test setup, save available test data and operating history, and document the configuration exactly as found. That includes photographs, component location and orientation, test conditions, and visible evidence such as a fracture surface or wear pattern. If hazardous energy is present, it must be controlled before inspection proceeds.
Useful Questions to Ask the Interviewer
Was the prototype still energized or carrying stored energy when the failure occurred?
What test data and operating history were captured before and during the failure?
Has any part already been moved, cleaned, adjusted, or disassembled?
How to Explain It in an Interview
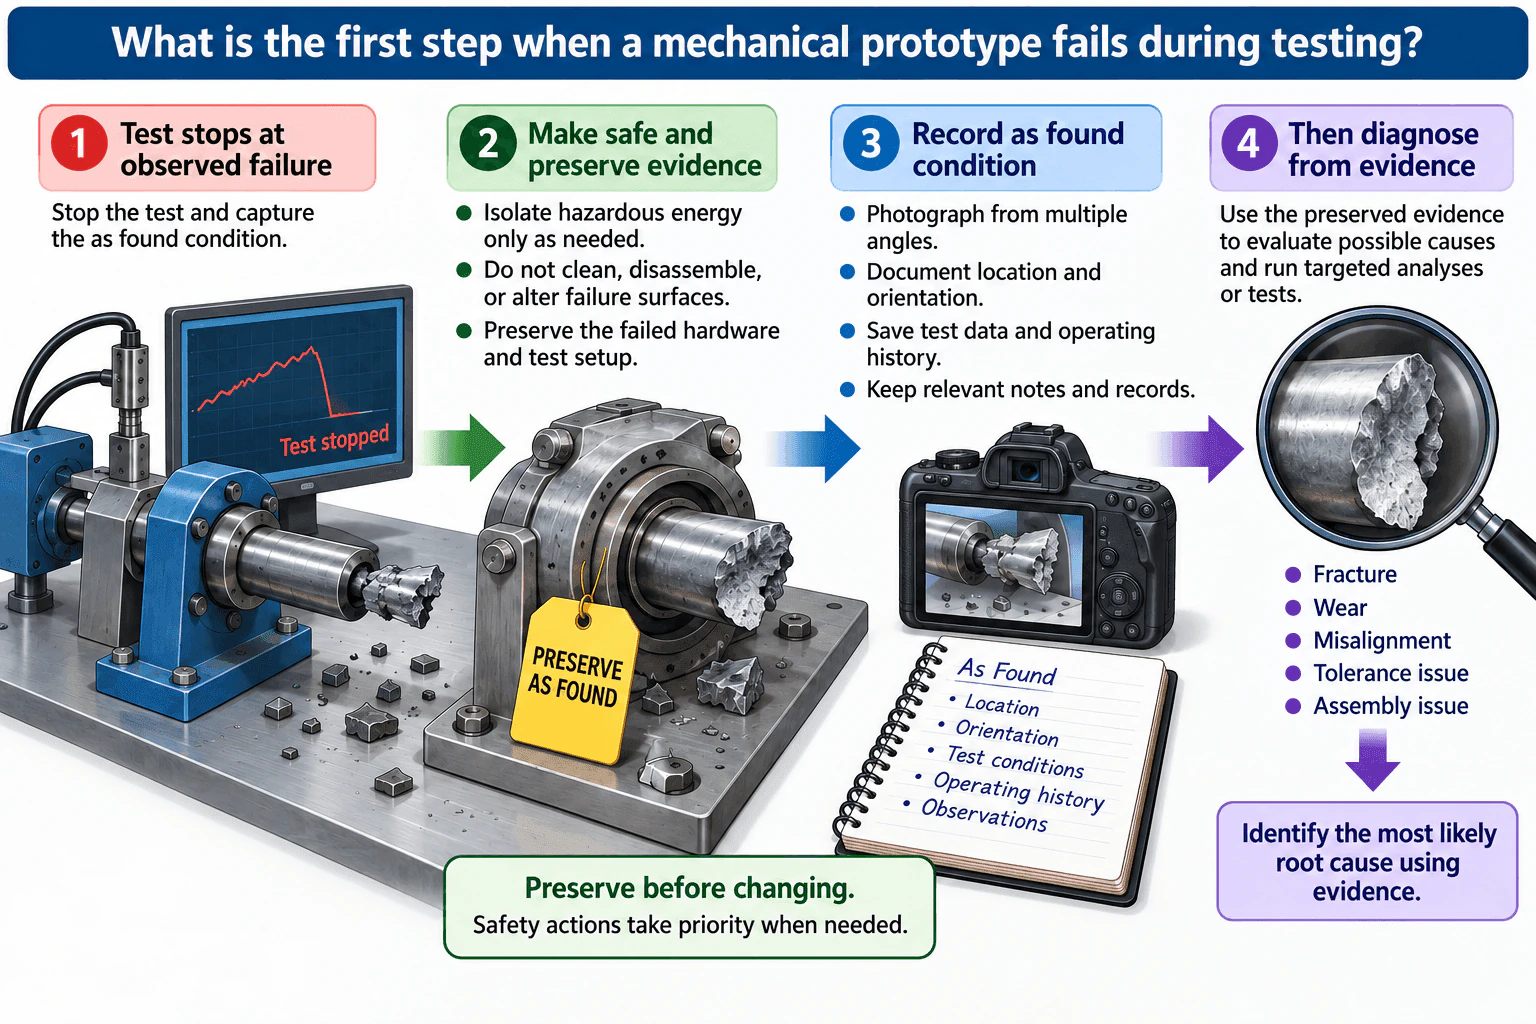
I would begin by stopping the test and making the situation safe. Any required energy isolation or other safety action comes first, but I would avoid changing the failed condition more than necessary.
Next, I would preserve the evidence. I would keep the failed hardware and test setup in their current configuration when practical, save the test data and operating history, and photograph the hardware from useful angles. I would record component location, orientation, test conditions, and observations before cleaning or disassembly.
That matters because the original condition may contain the strongest clues. A fracture surface can help characterize how a part separated. A wear pattern can show where contact occurred. Position, alignment, tolerance, assembly condition, and load path evidence can help distinguish competing explanations.
After preservation and documentation, I would form several plausible failure hypotheses rather than selecting a cause immediately. Depending on the evidence, those hypotheses could involve fracture, wear, misalignment, tolerance effects, assembly issues, or unexpected loading. I would select measurements and controlled tests that distinguish between those possibilities instead of only confirming one preferred theory.
Once the evidence supports a root cause, I would define a corrective action and verify it under representative conditions. I would also check for recurrence and consider any remaining risk. The key sequence is: stop the test, make the situation safe, preserve and document the evidence, diagnose from evidence, then verify the corrective action.
Why Interviewers Ask This
Interviewers want to see whether you protect valuable failure evidence before troubleshooting changes the system. Good judgment means separating necessary safety actions from later diagnosis, documenting the original configuration, preserving physical and recorded evidence, and using that evidence to determine the failure mechanism rather than jumping to a preferred explanation.
Common interview mistakes
Common mistakes include immediately taking the prototype apart, cleaning a fracture surface, adjusting alignment before documenting it, restarting the test without understanding the failure, failing to save test data, losing operating history, and deciding on a root cause before comparing competing explanations against physical evidence.
Interview tip
State the sequence clearly: stop the test, make the situation safe, preserve the hardware and data, record the condition as found, then investigate. Emphasize that safety related changes may be necessary, but unnecessary changes should wait until the evidence has been documented.
Interviewer may ask next
What would you do if the failed prototype had to be moved immediately for safety?
Safety takes priority. I would perform only the actions needed to control the hazard, while documenting the original condition before and during the move whenever practical. I would photograph positions, record what changed and why, retain removed parts, preserve the test data, and clearly distinguish the original condition from changes made for safety.
What would you do after the failed condition has been preserved and documented?
I would form competing root cause hypotheses using the available load path, fracture, wear, alignment, tolerance, assembly, and operating evidence. I would then choose measurements and controlled tests that can distinguish those hypotheses. Once the evidence supports a cause, I would implement a corrective action, verify it under representative conditions, check for recurrence, and assess remaining risk.
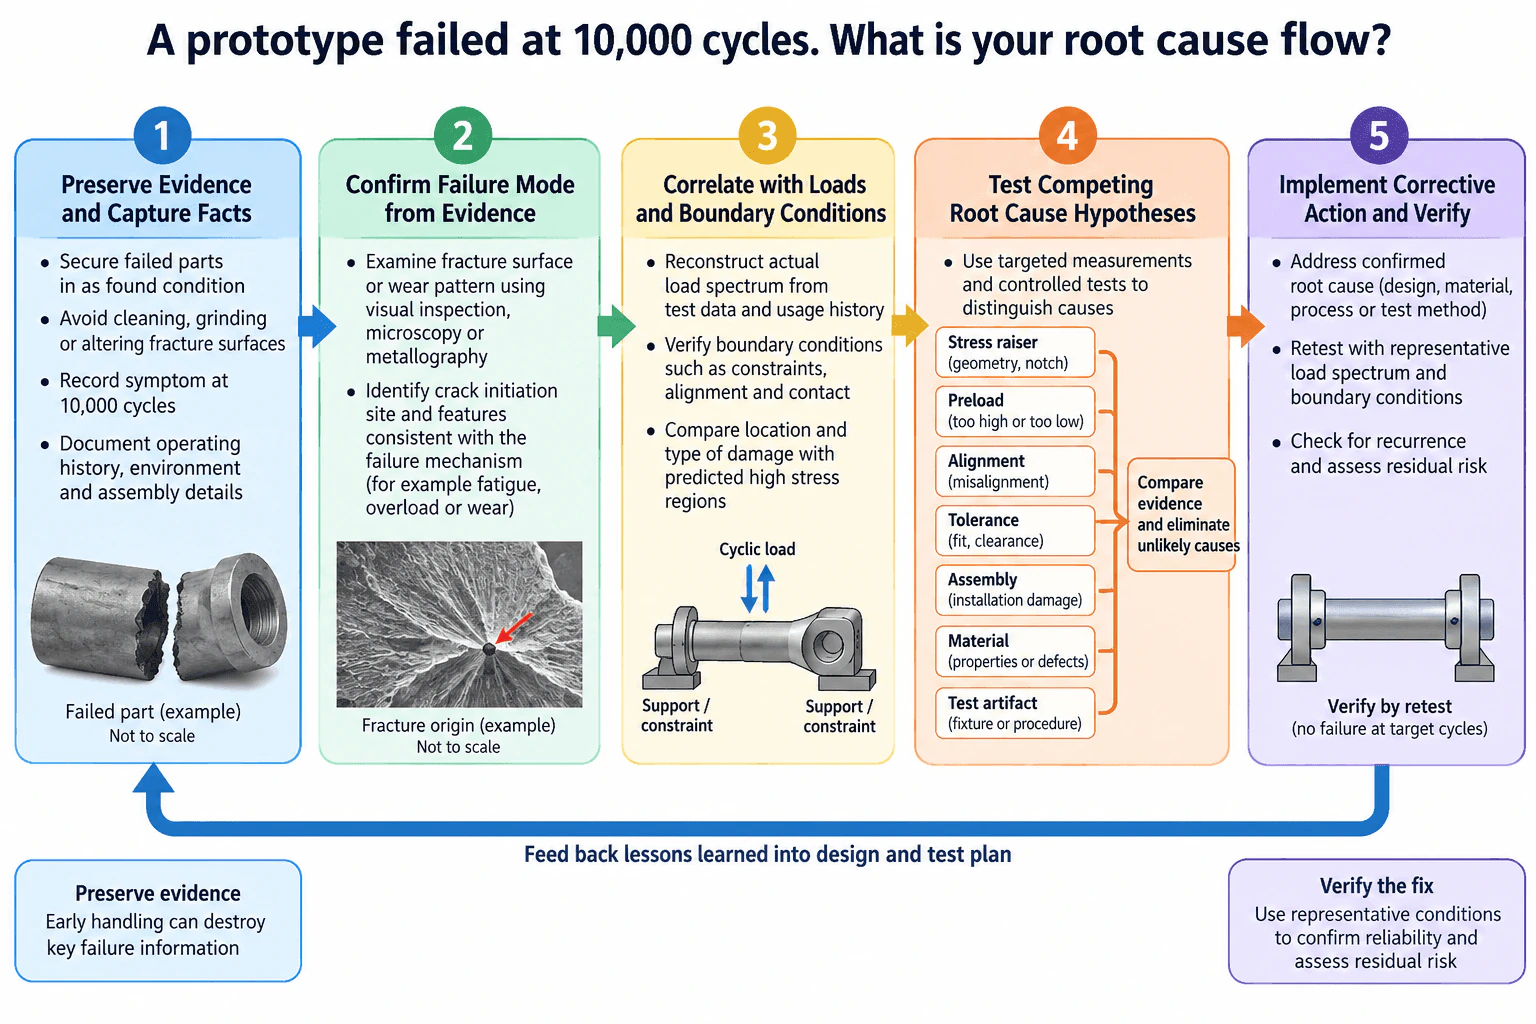
45. A prototype failed at 10,000 cycles. What is your root-cause flow?Troubleshooting And Failure AnalysisMedium
i Question Details
Freeze evidence, confirm the failure mode, correlate it to load spectrum and boundary conditions, inspect stress raisers, preload, alignment, material and test artifacts, then prove the corrective action by retest.
Short Interview Answer (30-60 seconds)
I would first freeze the evidence and document exactly what failed at 10,000 cycles, including the operating history, assembly condition, and investigation boundary. Then I would confirm the failure mode from the fracture surface, wear pattern, deformation, or other physical evidence. Next I would correlate that evidence with the actual load spectrum and boundary conditions. I would form competing hypotheses around stress raisers, preload, alignment, tolerance, assembly, material, and test artifacts, then use targeted measurements or controlled tests to distinguish them. Once the evidence supports a root cause, I would implement the corrective action and retest under representative conditions while checking recurrence and residual risk.
Detailed Explanation
The key is to move from preserved evidence to failure mechanism, then from failure mechanism to root cause, and finally prove the corrective action with a representative retest. I would avoid assuming that the first plausible explanation is the true cause.
Useful Questions to Ask the Interviewer
What part or feature failed, and what physical evidence is available from the failed specimen?
What were the actual load history, duty cycle, environment, and assembly conditions before the failure at 10,000 cycles?
Is the test setup known to represent the intended constraints, alignment, preload, contact, and fixture behavior?
How to Explain It in an Interview
I would begin by preserving the failed hardware in its as found condition and defining the investigation boundary, including what hardware, test data, assembly records, and operating history are frozen for review. I would avoid cleaning, grinding, or otherwise altering fracture or wear surfaces before they are documented.
Next, I would confirm the failure mode from physical evidence. I would inspect the fracture surface, wear pattern, deformation, contact marks, and crack origin using appropriate visual inspection, microscopy, or metallography. The purpose is to distinguish mechanisms such as fatigue, overload, or wear before deciding why that mechanism occurred.
Then I would correlate the observed damage with the actual load spectrum and boundary conditions. I would reconstruct the cyclic loading from available test and usage records and check constraints, alignment, contact, preload, and support conditions. I would compare the damage location and type with the expected load path and predicted high stress regions.
After that, I would form competing root cause hypotheses rather than selecting one prematurely. These could include a geometric stress raiser, incorrect preload, misalignment, tolerance effects, assembly damage, unsuitable material properties, material defects, or a test fixture or procedure artifact.
I would choose measurements and controlled tests that distinguish those hypotheses. Alignment measurements could challenge a misalignment hypothesis, dimensional inspection could test a tolerance issue, and material examination could test a material or defect hypothesis. A fault tree, root cause analysis, or 8D structure can help keep the evidence trail traceable.
Once the evidence supports a root cause, I would implement the corresponding corrective action in the design, material, process, assembly method, or test method. I would then retest using representative load spectrum and boundary conditions, check for recurrence, and assess residual risk. The corrective action is not considered verified until the evidence shows that the identified failure mechanism no longer recurs under the defined retest conditions.
Why Interviewers Ask This
Interviewers want to see whether I can investigate a mechanical failure systematically, preserve evidence, distinguish the observed failure mode from the underlying root cause, test competing hypotheses with traceable evidence, and verify that a corrective action prevents recurrence under representative conditions.
Common interview mistakes
Common mistakes include cleaning or modifying the failed part before documenting it, jumping directly from a visible crack to a presumed root cause, ignoring the actual load history or test boundary conditions, changing several variables at once, choosing tests that only confirm a preferred theory, overlooking fixture or assembly artifacts, and declaring success after a corrective action without representative retesting.
Interview tip
Present the investigation as an evidence chain. Start with known facts, identify the important unknowns, explain how each measurement distinguishes competing causes, and finish with corrective action verification. Do not invent a fracture mechanism, material defect, stress value, or test result that was not provided.
Interviewer may ask next
What if the fracture surface suggests fatigue, but the analytical model predicts relatively low nominal stress?
I would treat that as evidence that an assumption, local condition, or boundary condition may be incomplete rather than dismissing the physical evidence. I would review the actual load spectrum, local stress concentration, surface condition, preload, alignment, residual stress, material condition, manufacturing defects, and fixture effects. I would also confirm that the analysis represents the actual geometry, contacts, and constraints. The goal is to identify what could create the local cyclic stress or reduced fatigue resistance needed to explain the observed mechanism.
What if the corrective action survives 10,000 cycles but there is not enough time for the complete durability program?
I would report only what the completed retest demonstrates and would not call the broader durability program complete. I would compare the retest load spectrum and boundary conditions with the original failure conditions, inspect for early crack initiation or wear, document the remaining uncertainty, and assess residual risk. Any additional accelerated or targeted test would need a justified relationship to the relevant failure mechanism and operating conditions.
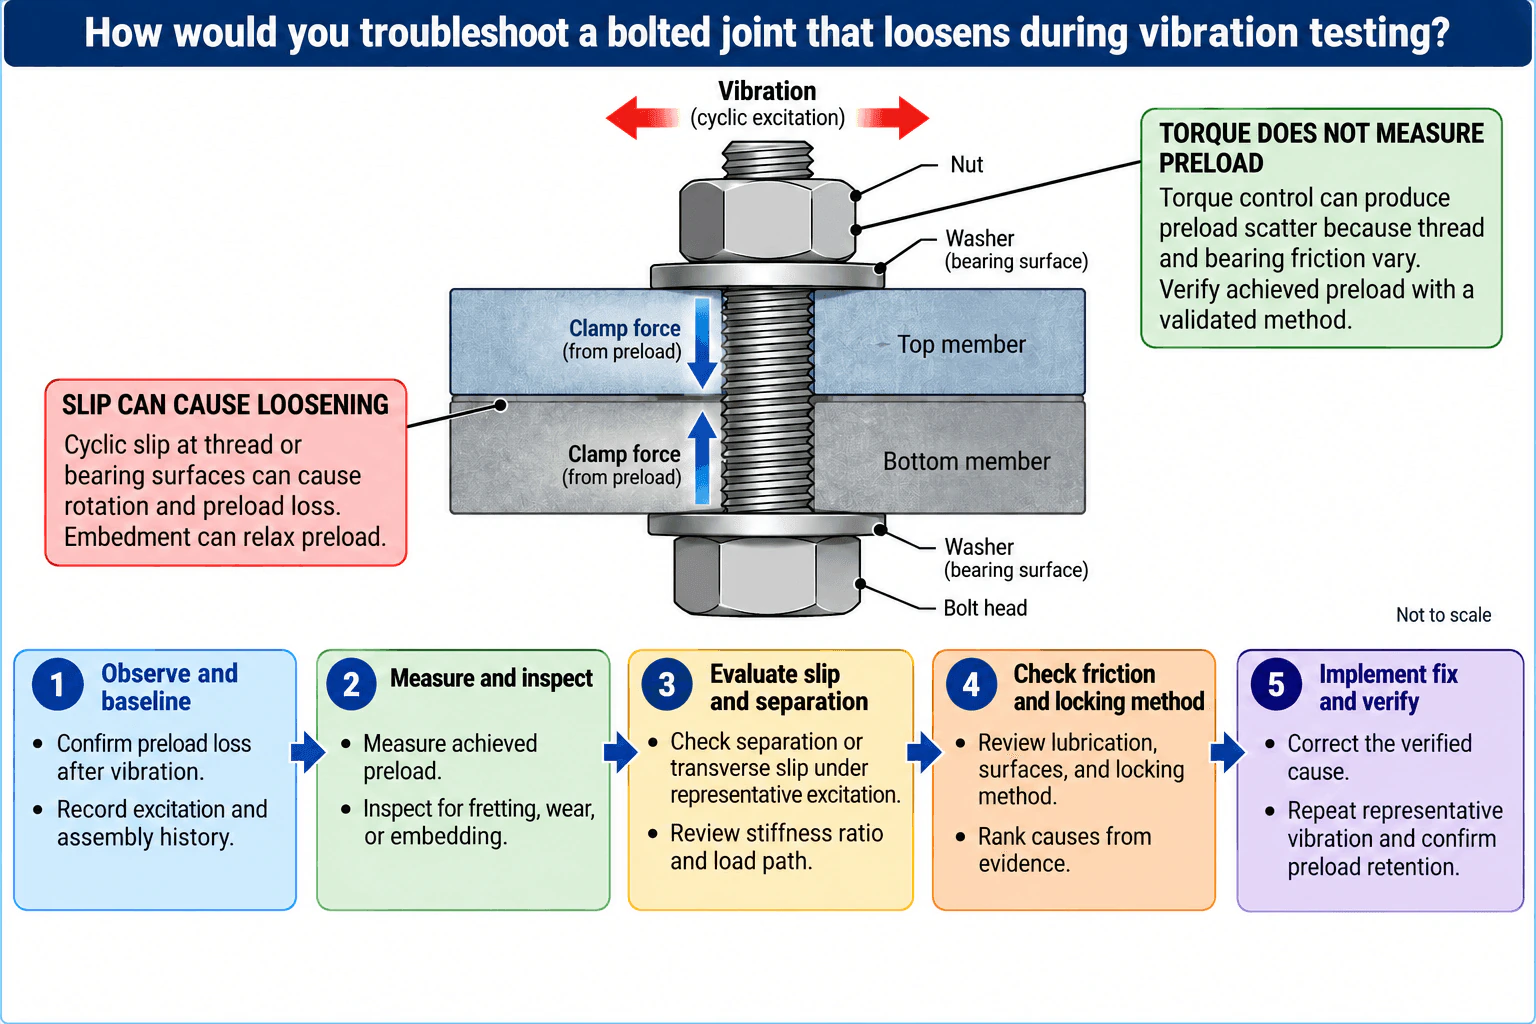
46. How would you troubleshoot a bolted joint that loosens during vibration testing?Troubleshooting And Failure AnalysisMedium
i Question Details
Check achieved preload, joint separation or slip, surface embedding, fastener friction, locking method, stiffness ratio and excitation before changing hardware.
Short Interview Answer (30-60 seconds)
I would first confirm that the joint actually loses preload during vibration and record the excitation and assembly history. Then I would measure achieved preload and inspect the interfaces for fretting, wear, or embedding. Under representative excitation, I would check for joint separation or transverse slip and review the stiffness ratio and load path. I would also review lubrication, surface condition, friction assumptions, and the locking method. I would rank the causes from evidence, correct the verified mechanism, and repeat representative vibration testing to confirm preload retention.
Detailed Explanation
I would treat the loosening as an evidence based root cause problem. The main hypotheses are inadequate achieved preload, preload relaxation from embedding, transverse slip, joint separation, an unfavorable stiffness relationship or load path, friction variation, or an ineffective locking method. I would not assume that the original torque value proves the required preload was achieved because thread and bearing friction affect the relationship between torque and preload.
Useful Questions to Ask the Interviewer
How is the loosening detected, such as preload loss, fastener rotation, witness marks, or another measurement?
What vibration spectrum, direction, duration, and joint loading are applied when the problem occurs?
How was the joint assembled, including the preload method, lubrication, surface condition, and locking method?
How to Explain It in an Interview
I would start by defining the symptom, operating history, and investigation boundary. I would confirm preload loss after vibration and record the excitation and assembly history. Before disturbing the joint, I would document useful evidence such as witness marks, fretting, wear, or surface embedding.
Next I would measure achieved preload with an appropriate validated method rather than infer it only from applied torque. I would inspect the thread and bearing interfaces and the clamped surfaces for fretting, wear, or embedding because embedding can relax clamp load.
Then I would test the competing mechanisms. Under representative excitation, I would determine whether the joint separates or whether the clamped members experience transverse slip. I would review the bolt and clamped member stiffness relationship and the load path because these influence fastener loading, joint separation, and interface behavior.
I would also review lubrication, thread and bearing surface condition, friction assumptions, and the locking method. A locking feature should be evaluated as part of the joint system rather than used to hide inadequate preload or an unstable interface.
I would organize the evidence with root cause analysis or a fault tree. If formal team closure were required, the evidence and actions could be captured through an 8D process. I would rank causes from the measurements rather than choose a preferred theory first.
The corrective action would target the verified mechanism, such as establishing the required preload, controlling lubrication and surface conditions, reducing transverse slip or separation, changing the stiffness relationship or load path, or selecting an appropriate locking method.
Finally, I would repeat representative vibration testing and confirm preload retention. Corrective action verification means checking that the original loosening mechanism does not recur and documenting remaining uncertainty or residual risk.
Why Interviewers Ask This
This tests whether I can separate symptoms from root causes, use physical evidence to distinguish competing failure mechanisms, and verify a corrective action instead of changing hardware by trial and error.
Common interview mistakes
Common mistakes are assuming applied torque equals achieved preload, replacing hardware before identifying the mechanism, adding a locking device without checking slip or separation, ignoring lubrication and bearing surface condition, overlooking embedding or fretting evidence, and declaring success without repeating representative vibration conditions.
Interview tip
Keep the answer evidence driven. State the symptom first, explain how each measurement distinguishes one plausible cause from another, and finish with corrective action verification under representative vibration.
Interviewer may ask next
What would you do if the measured preload is initially correct but drops after the first vibration run?
I would focus on mechanisms that relax or redistribute clamp load after assembly. I would inspect the bearing and joint interfaces for embedding, fretting, wear, or local surface deformation and check whether the excitation causes transverse slip or intermittent separation. I would compare preload before and after controlled vibration runs to determine when the loss occurs, correct the verified mechanism, and repeat the representative test.
What if increasing preload is limited by fastener strength or the clamped material?
I would not increase preload beyond the allowable design range. I would examine whether the load path, stiffness relationship, interface friction, contact condition, surface condition, or locking method can be changed to reduce slip or separation while keeping the fastener and clamped members within their allowable limits. I would then verify the selected change under representative excitation and confirm preload retention.
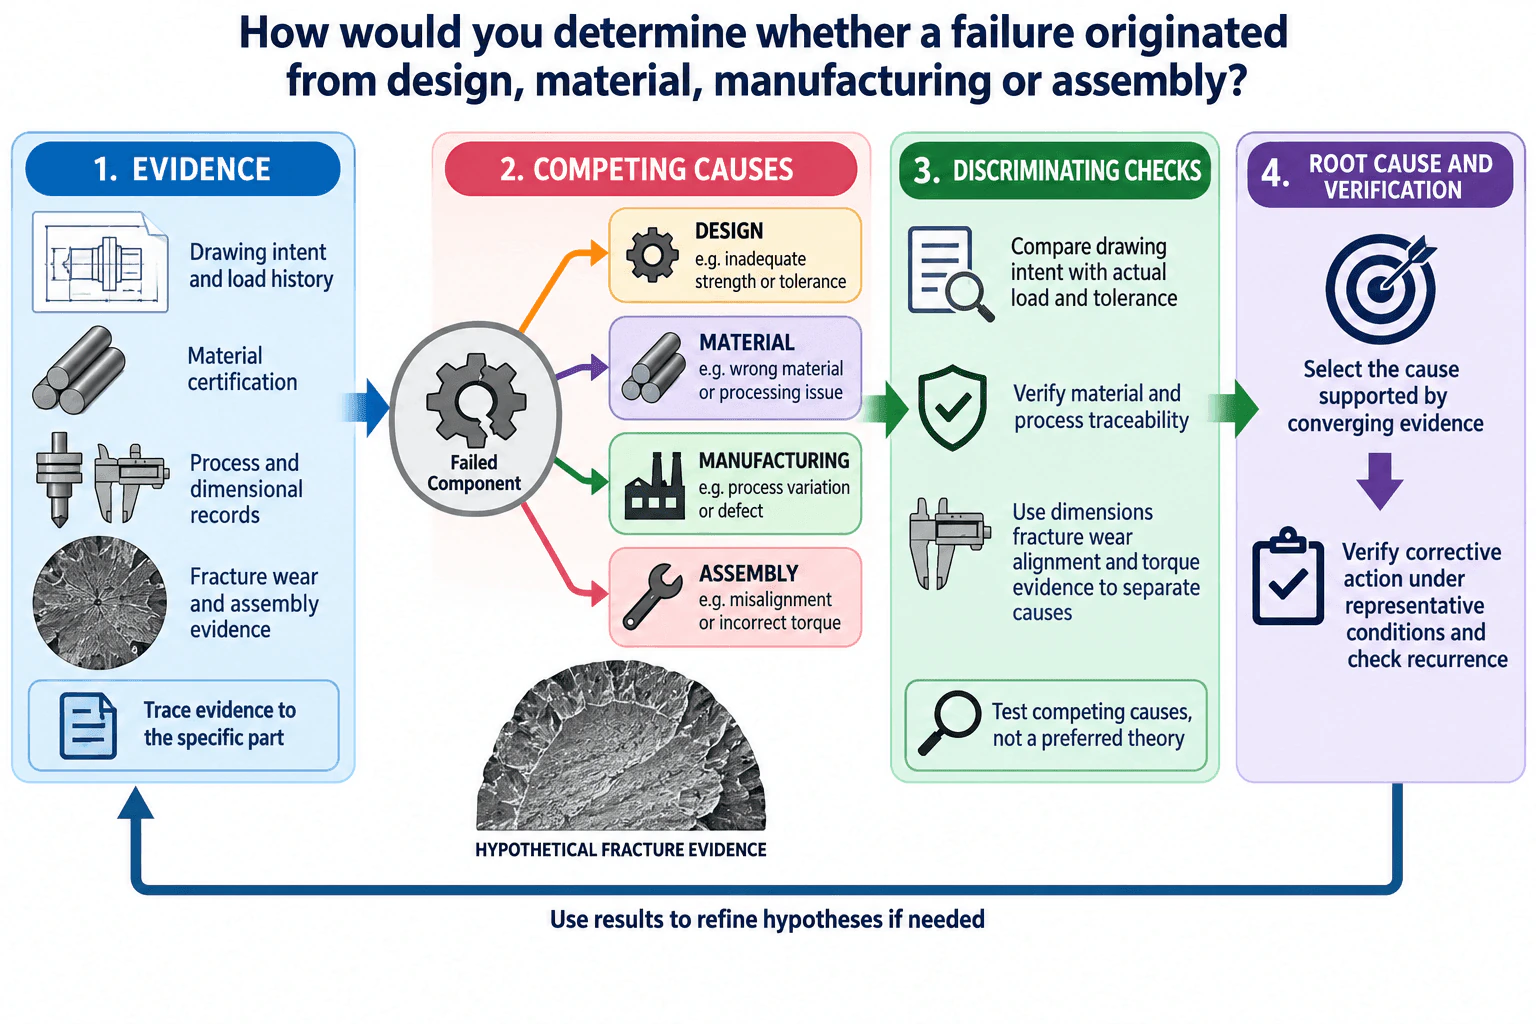
47. How would you determine whether a failure originated from design, material, manufacturing or assembly?Troubleshooting And Failure AnalysisHard
i Question Details
Build a timeline and evidence matrix across drawing intent, material certification, process records, dimensional data, fracture or wear evidence and assembly condition, then test competing causal hypotheses.
Short Interview Answer (30-60 seconds)
I would build a traceable evidence set from drawing intent and load history, material certification, process and dimensional records, and fracture, wear, and assembly evidence. I would treat design, material, manufacturing, and assembly as competing causes, then choose checks that separate those explanations instead of confirming a preferred theory. I would select the cause supported by converging evidence, verify the corrective action under representative conditions, check recurrence, and refine the hypotheses if the evidence remains inconclusive.
Detailed Explanation
The key is to treat design, material, manufacturing, and assembly as competing explanations for the same observed failure. I would define the symptom, operating history, and safe investigation boundary, preserve the failed component, and build a traceable evidence set before deciding on a cause.
Useful Questions to Ask the Interviewer
What failed, what symptom was observed, and what operating or load history is known?
Are the applicable drawing, material certification, manufacturing records, dimensional data, and assembly records available for the failed part?
Is the failed component available for dimensional inspection and fracture or wear examination?
How to Explain It in an Interview
I would start with EVIDENCE. I would trace every record and observation to the specific failed part where possible. The main evidence groups are drawing intent and load history, material certification, process and dimensional records, and fracture, wear, and assembly evidence.
Next I would form four COMPETING CAUSES.
Design: compare the intended geometry, load path, strength assumptions, and tolerances with the actual operating condition.
Material: verify the specified material, certification, condition, and any material related processing evidence.
Manufacturing: review process records, dimensions, surface condition, and other evidence of production variation or defects.
Assembly: examine fit, alignment, torque, and other assembly conditions that could introduce unintended loading.
Then I would use DISCRIMINATING CHECKS. I would compare drawing intent with actual load and tolerance conditions, verify material and process traceability, and use dimensional, fracture, wear, alignment, and torque evidence to separate the competing causes. The purpose is to test competing explanations, not to confirm the theory I already prefer.
Fracture surface and wear pattern evidence can be especially useful when interpreted with the load path and other records, but I would not treat one visual feature as proof by itself. If evidence conflicts, I would refine the hypotheses and choose another independent check.
For ROOT CAUSE AND VERIFICATION, I would select the cause supported by converging evidence and document why the alternatives are less consistent with the observations. I could organize that reasoning with root cause analysis, fault tree reasoning, or an 8D structure.
Finally, I would verify the corrective action under representative conditions and check for recurrence. If the evidence does not clearly separate the causes, I would state the remaining uncertainty and identify the next discriminating test rather than claiming an unsupported conclusion.
Why Interviewers Ask This
Interviewers want to see whether I can distinguish plausible failure origins using traceable physical evidence instead of choosing a cause too early. They are evaluating how I structure root cause analysis, test competing explanations, connect observations to design intent and production records, and verify that corrective action addresses the demonstrated cause.
Common interview mistakes
Common mistakes are deciding the cause before reviewing the evidence, treating correlation as proof, testing only a preferred theory, examining fracture or wear evidence without comparing it with load history, ignoring drawing revision or part traceability, assuming an out of tolerance dimension automatically caused the failure, overlooking alignment or torque, and declaring success without verifying the corrective action under representative conditions.
Interview tip
Present the investigation as competing causes connected to specific evidence. Explain which observation would support or weaken each cause, then name the measurement or check that would separate them. Finish by showing how you would verify the corrective action and check recurrence.
Interviewer may ask next
What would you do if the fracture evidence suggests one cause but the process or dimensional records suggest another?
I would treat that as conflicting evidence rather than selecting the result I prefer. I would first verify part identity, specimen orientation, drawing revision, record traceability, and measurement validity. Then I would choose another independent discriminating check, such as material verification, additional dimensional inspection, alignment measurement, or examination of another comparable component. I would refine the competing hypotheses until the evidence can be reconciled or clearly document the remaining uncertainty.
How would your approach change if destructive examination of the failed component were not allowed?
I would rely more heavily on traceable records and nondestructive evidence. I would preserve the component, document its condition, perform permitted dimensional and alignment checks, review drawing intent and load history, verify material certification and process records, and examine available surface, wear, and assembly evidence. If destructive examination would be required to distinguish two remaining causes, I would state that limitation and identify exactly what conclusion remains uncertain.
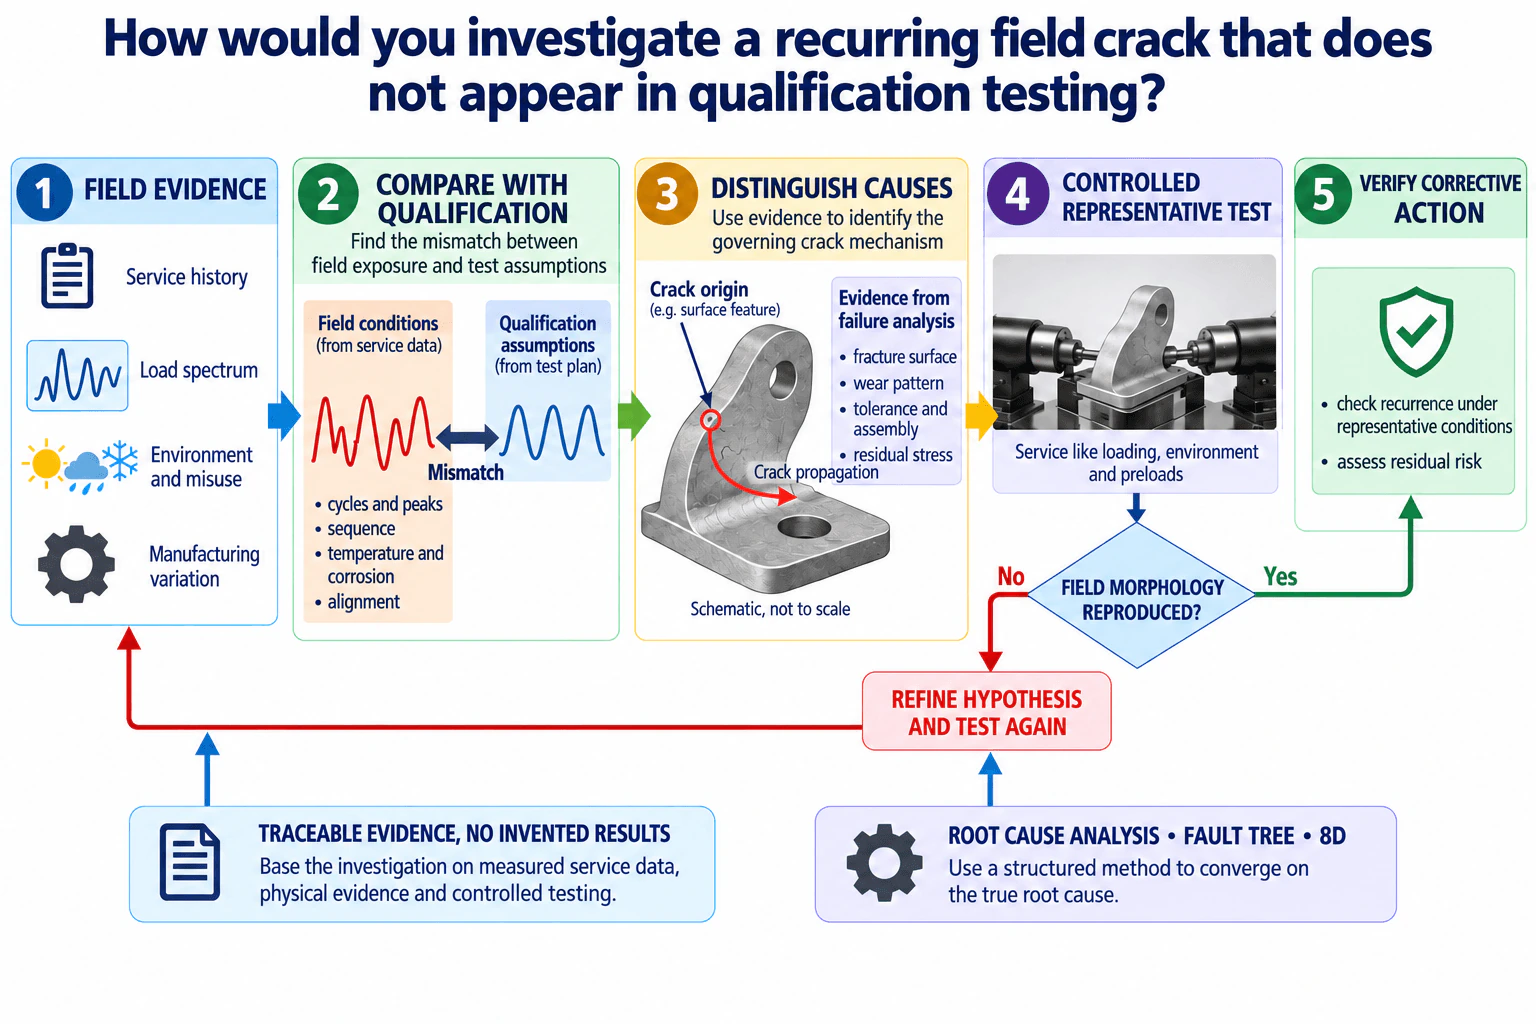
48. How would you investigate a recurring field crack that does not appear in qualification testing?Troubleshooting And Failure AnalysisHard
i Question Details
Compare field load spectra, environment, misuse, manufacturing variation, service history and crack morphology with qualification assumptions, then reproduce the governing condition in a controlled test.
Short Interview Answer (30-60 seconds)
I would first define the recurring crack, service history, and safe investigation boundary. Then I would collect traceable field evidence, including load spectrum, environment, possible misuse, and manufacturing variation, and compare it with the qualification assumptions for cycles, peaks, sequence, temperature, corrosion, and alignment. I would use fracture surface, wear, tolerance, assembly, and residual stress evidence to distinguish competing causes. Next I would reproduce the suspected governing condition in a controlled representative test and compare the resulting crack morphology with the field failure. If the morphology does not match, I refine the hypothesis and test again. If it does match, I verify the corrective action under representative conditions and assess recurrence and residual risk.
Detailed Explanation
The important point is that a passed qualification test does not by itself explain why a recurring field crack exists. I would treat the problem as an evidence driven comparison between actual service conditions and the assumptions represented by qualification testing. I would define the observed symptom, relevant operating history, and a safe investigation boundary before changing hardware or test conditions.
Useful Questions to Ask the Interviewer
What service history is available for failed and unaffected units, including loads, cycles, environment, misuse, maintenance, and assembly history?
What loading, environmental, alignment, preload, and manufacturing assumptions were represented in the qualification test?
Is failed hardware available for fracture surface examination, dimensional inspection, and comparison with unaffected units?
How to Explain It in an Interview
I would organize the investigation as field evidence, qualification comparison, failure mechanism, controlled reproduction, and corrective action verification.
First, I would collect traceable field evidence. That includes service history, the actual load spectrum, environmental exposure, possible misuse, and manufacturing variation. I would separate measured facts from assumptions and unknowns.
Next, I would compare the field conditions with qualification assumptions. I would examine cycles and peaks, loading sequence, temperature and corrosion exposure, alignment, and other supported setup differences. A qualification test can miss a failure mechanism when the real service condition contains a different combination or sequence of variables.
Then I would form competing hypotheses instead of committing to one preferred cause. I would examine the fracture surface for crack origin and propagation features, review wear patterns, check tolerance and assembly evidence, and consider residual stress where appropriate. I would use root cause analysis, a fault tree, or an 8D structure to keep evidence and hypotheses traceable. If specialized fractography or material characterization is needed, I would coordinate that work with the appropriate specialists.
I would then design a controlled representative test around the most plausible governing condition. The test should reproduce the supported service loading, environment, and preload or alignment conditions without introducing unsupported variables. The key decision is whether the resulting crack morphology matches the field failure. If it does not, I would refine the hypothesis and test again.
If the field morphology is reproduced and the evidence supports the proposed mechanism, I would apply the corrective action and verify it under representative conditions. I would check for recurrence within the tested conditions, assess residual risk, document remaining uncertainty, and avoid claiming broader proof than the evidence supports.
The conclusion should follow the evidence chain from field conditions to reproduced mechanism to corrective action verification, rather than relying on the earlier qualification result alone.
Why Interviewers Ask This
Interviewers want to see whether I can investigate a field failure without assuming that qualification testing represented every service condition. They are evaluating whether I can collect traceable evidence, compare field conditions with qualification assumptions, form competing root cause hypotheses, use physical failure evidence to distinguish causes, reproduce the governing condition in a controlled test, and verify corrective action while accounting for recurrence and residual risk.
Common interview mistakes
Common mistakes include assuming qualification conditions were fully representative, choosing a preferred root cause too early, ignoring service load sequence or environmental exposure, overlooking alignment or assembly variation, treating fracture appearance without operating history as proof of cause, changing several test variables at once so causes cannot be distinguished, accepting a laboratory crack that does not match field morphology, and declaring a corrective action successful without representative recurrence testing and residual risk assessment.
Interview tip
Keep the answer evidence driven. Explain what you would measure, which competing hypotheses each measurement helps distinguish, what test outcome would make you change direction, and how you would verify that the corrective action addresses the reproduced failure mechanism. Do not invent material properties, stresses, dimensions, tolerances, or test results that the interviewer did not provide.
Interviewer may ask next
What would you do if the controlled test does not reproduce the field crack morphology?
I would treat that result as evidence against the current test hypothesis, not as proof that the field failure is random. I would compare the test specimen with field hardware and revisit load spectrum, sequence, environment, preload, alignment, manufacturing variation, assembly, service history, and the fracture evidence. I would identify which assumptions remain unsupported, design the next test to distinguish the remaining causes, and continue the loop until the evidence supports a reproducible mechanism or the remaining uncertainty is explicitly documented.
How would your investigation change if only a small percentage of field units crack?
I would place more emphasis on variation between failed and unaffected units. I would compare dimensions, tolerance stack, assembly condition, manufacturing records where available, residual stress indicators, service severity, alignment, and environmental exposure. A low occurrence rate can indicate an interaction between service conditions and manufacturing or assembly variation. I would reproduce both the nominal condition and the suspected variation so the controlled test can determine which combination is necessary for the observed crack morphology.
Disclaimer: This interview guide is for educational and informational purposes only. It is designed to help readers prepare, but it does not guarantee any interview result, hiring decision, offer, or outcome. Interview questions, hiring criteria, and preferred answers can vary by employer, interviewer, industry, location, and time. All answers, examples, and explanations in this guide are suggested examples for interview preparation, not definitive answers or instructions for professional practice. They are based on research and judgment, are provided without warranties of any kind, and should be adapted to the question, role, and applicable laws and professional requirements. Diagrams are simplified illustrations intended to highlight the main concepts and their relationships; actual situations, systems, and practices may be more complex. Alternative approaches may be equally valid or better suited to a particular question, context, or interviewer. To the fullest extent permitted by applicable law, the contributors and publisher are not liable for decisions made, actions taken, or losses incurred based on this guide.
State Laws and Professional Responsibilities: Laws and requirements governing an occupation vary by state and jurisdiction. You are responsible for checking the current laws, licensing requirements, and scope-of-practice rules that apply to your location and role, and for ensuring that your answers and actions comply with them. Adapt examples in this guide to those requirements. This guide is not legal advice.
Content Accuracy and Verification: To the fullest extent permitted by applicable law, we do not represent or warrant that interview guides, questions, answers, examples, or diagrams are accurate, complete, current, error-free, or suitable for any particular purpose. You are responsible for independently reviewing and verifying the information before relying on it.