12 Boeing Mechanical Engineer Interview Questions & Answers

boeing icon

Questions with Detailed ExplanationsWith Detailed Explanations

(Last Updated: September 13, 2026)

1. Describe (using STAR) a time you used structural analysis to complete an engineering task or project.Engineering MechanicsMediumBoeing

Question Details

Use the situation, task, action, and result format for an example from your structural-analysis work.

Short Interview Answer (30-60 seconds)

In one mechanical design project, I was responsible for checking a load-carrying component before the design moved forward. I defined the supports and loads, drew the free-body diagram, solved the reactions using static equilibrium, and evaluated the critical bending, shear, stress, and deformation behavior. I documented assumptions, kept the units consistent, and checked equilibrium and boundary conditions. Where a detailed structural model was used, I compared its behavior with hand calculations rather than accepting the simulation by itself. The analysis identified the critical areas and gave the team an engineering basis for the design and subsequent validation.

Detailed Explanation

A strong structural-analysis answer shows how I converted a real mechanical problem into a defensible mechanics model, checked the model with first principles, and used the result to support an engineering decision. The key is not simply saying that I ran a simulation. I should explain the load path, supports, assumptions, calculations, validation, and limitations.

Useful Questions to Ask the Interviewer
  • What type of structure or component would you like the example to focus on?
  • Would you like me to emphasize hand calculations, numerical structural analysis, or how I used both together?
  • Should I focus more on stress and strength, deformation and stiffness, or the validation process?

For the example, I would first define the physical boundary of the component and identify the applied forces, moments, supports, and connection points. I would establish a coordinate system and state whether the loading could reasonably be treated as static. I would then create a free-body diagram and use static equilibrium, with ΣF = 0 and ΣM = 0, to determine reactions and confirm the basic load path.

Next, I would determine the internal loading at the critical sections. Depending on the geometry, that could include axial force, shear force, bending moment, or torsion. I would then evaluate the relevant stress and deformation behavior using mechanics relationships appropriate to the component. I would keep strength and stiffness separate: stress helps evaluate load-carrying demand, while deflection helps determine whether the component is sufficiently stiff for its function.

If the geometry or load path required a more detailed numerical model, I would use the hand calculations as an independent check rather than replacing first-principles reasoning. I would pay particular attention to boundary conditions because an unrealistic fixed support or load application can produce misleading stress and deformation results. I would also review whether a reported local peak stress represented a physically meaningful structural concern or a modeling artifact such as an idealized constraint or geometric singularity.

I would validate the analysis by checking that reactions balance the applied forces and moments, that units and signs are consistent, that deformation occurs in a physically reasonable direction, and that the order of magnitude agrees with simplified calculations or limiting cases. For a numerical model, I would additionally review material properties, contacts, load application, and mesh sensitivity where relevant.

The limitation is that a structural calculation or simulation is still a model. Its conclusion depends on assumptions about loads, restraints, geometry, material behavior, and operating conditions. I would therefore identify what additional inspection, test, measurement, or design evidence is needed before implementation rather than claiming that a design is safe solely because the analysis passes.

How to Explain It in an Interview

I would present the example in STAR order. In the Situation, I would describe the load-carrying component and the structural question that had to be resolved. In the Task, I would explain that I was responsible for determining whether the design could meet its structural requirements and for identifying the critical load path or failure concern. In the Action, I would describe how I defined the loads and boundary conditions, created the free-body diagram, solved the reactions, evaluated critical stress and deformation behavior, and checked any detailed structural model against first-principles calculations. In the Result, I would explain that the analysis identified the critical areas and gave the team a defensible engineering basis for the design decision and subsequent validation. I would avoid inventing numerical results if they were not part of the actual project example.

Technical Approach

1. Define the physical boundary of the component or assembly and identify the supports, connections, external forces, moments, and coordinate system. 2. State the operating condition and assumptions, including whether the loading can reasonably be treated as static. 3. Draw a free-body diagram and solve the support reactions using static equilibrium: ΣF = 0 and ΣM = 0. 4. Determine the internal loading at critical sections, such as axial force, shear force, bending moment, or torsion, as applicable. 5. Select the mechanics relationships appropriate to the geometry and loading, and evaluate stress and deformation without confusing strength with stiffness. 6. Examine relevant stress concentrations, connections, boundary conditions, and potential failure modes rather than relying only on a nominal stress value. 7. If a numerical structural model is needed, use realistic material properties, loads, and restraints and compare its global behavior with first-principles calculations. 8. Verify units, signs, reaction balance, order of magnitude, and limiting behavior. 9. Document assumptions and uncertainty and identify what physical validation or additional evidence is required before implementation. 10. Communicate the critical result, its engineering meaning, and the design decision it supports.

Practical Insights

The main tradeoff is model fidelity versus confidence and effort. A simple hand calculation is transparent and useful for checking load paths and order of magnitude, but it may not capture complex geometry or local stress concentrations. A detailed structural model can represent those effects better, but its result is only meaningful if the loads, material properties, mesh, contacts, and boundary conditions represent the real structure. The strongest approach is to use first-principles calculations and detailed analysis together, then validate important conclusions with appropriate physical evidence.

Why Interviewers Ask This

Interviewers are evaluating whether I can turn a real mechanical structure into a defensible mechanics model, select appropriate structural-analysis methods, recognize important assumptions and boundary conditions, check the results independently, and communicate the engineering basis for a design decision.

Common interview mistakes

Common mistakes include starting a simulation before understanding the load path, using unrealistic fixed restraints, omitting important forces or moments, mixing units, confusing stress with deformation, reporting a high-precision result from uncertain inputs, looking only at the maximum stress without checking whether it is physically meaningful, and declaring a design safe solely because a simplified calculation or simulation passes.

Interview tip

Keep the STAR story focused on your engineering judgment. Explain what structural question had to be answered, how you established loads and boundary conditions, which first-principles checks you performed, how you validated the analysis, and how the result influenced the project. Avoid turning the response into a list of software features.
Interviewer may ask next
How did you validate that your structural-analysis results were reasonable?

I would validate the result at several levels. First, I would check that the support reactions satisfy force and moment equilibrium. Second, I would verify units, signs, deformation direction, and order of magnitude. Third, I would compare critical results with simplified hand calculations or limiting cases. For a numerical model, I would also review boundary conditions, load application, material properties, contacts, and mesh sensitivity where relevant. Finally, I would identify the physical test or measurement needed to validate the important design conclusion before treating the analysis as sufficient evidence for real equipment.

What would you do if the loading changed from primarily static to significant cyclic loading?

I would not simply reuse the static conclusion. I would first characterize the load range, mean load, number of cycles, and any dynamic effects. The static analysis would still help establish the load path, but I would then evaluate fatigue-relevant stresses and stress concentrations using appropriate material data and design criteria. I would also determine whether vibration or resonance could amplify the loads. That change in constraint could alter the critical location and the acceptable geometry even if the peak static stress appeared reasonable.

2. Explain what the stress-strain curve is.Materials And Material SelectionEasyBoeing

Short Interview Answer (30-60 seconds)

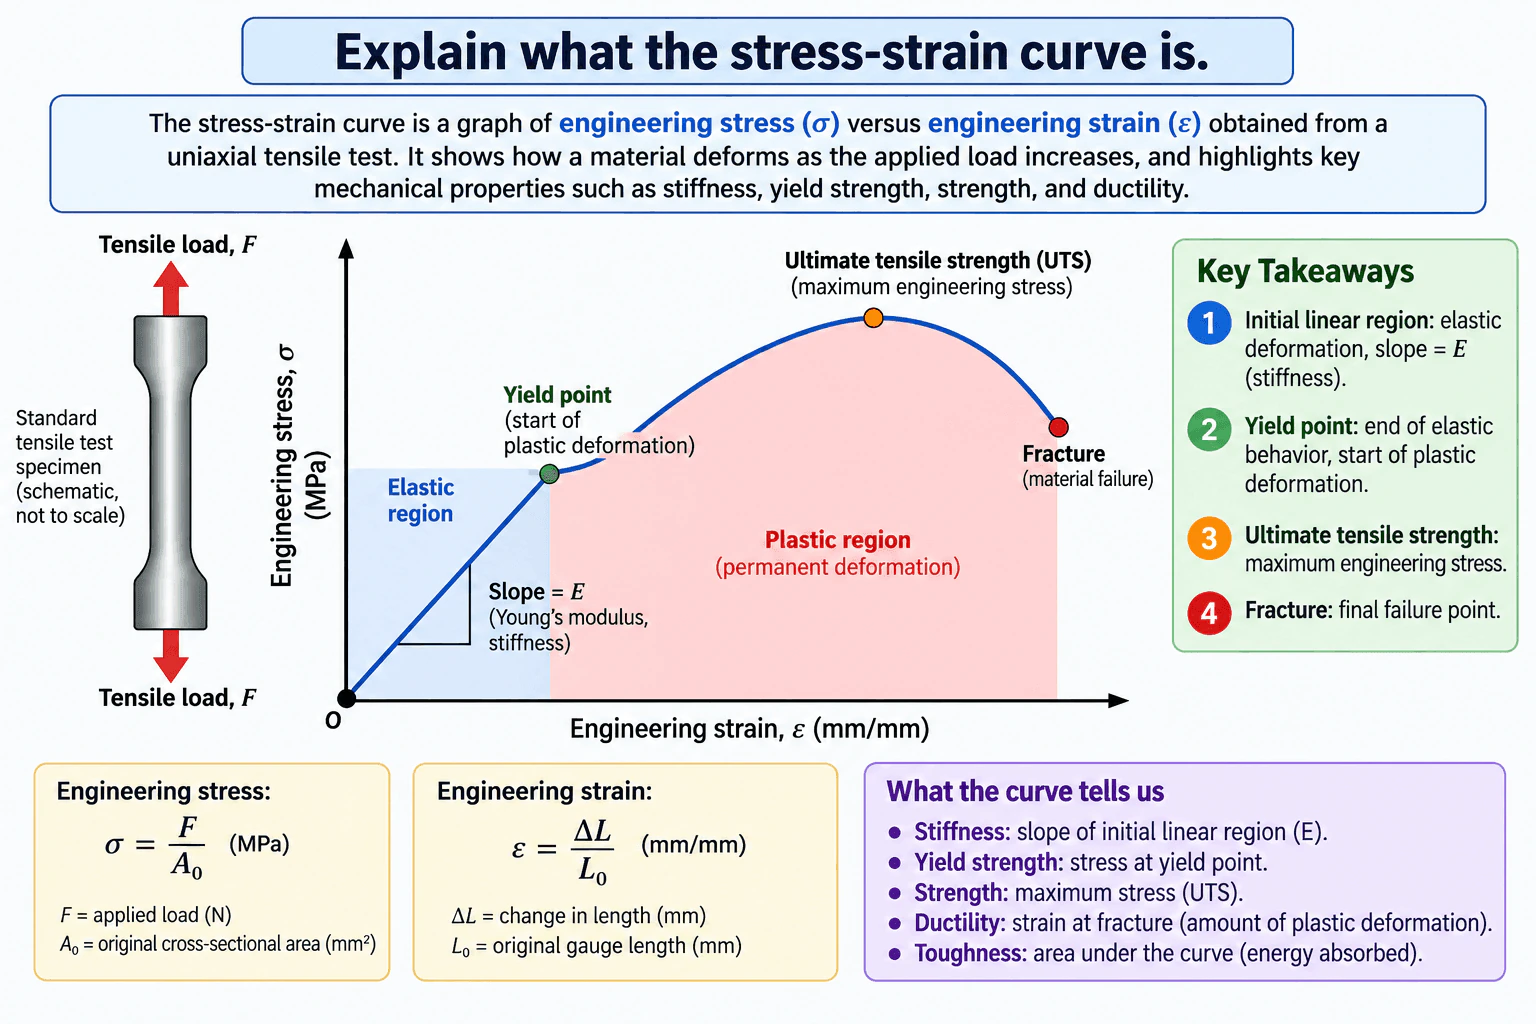
The stress-strain curve shows how a material deforms as tensile loading increases. Engineering stress, σ = F/A₀, is plotted against engineering strain, ε = ΔL/L₀. The initial linear region is elastic, and its slope is Young’s modulus, E, which represents stiffness. At the yield point, permanent plastic deformation begins. For a typical ductile material, the stress then rises toward the ultimate tensile strength, or UTS, and after necking begins the engineering stress falls until fracture. The curve helps us understand stiffness, yield strength, strength, ductility, and toughness.

Detailed Explanation

A stress-strain curve is a graph obtained from a tensile test that describes how a material responds as it is stretched. It connects applied load and deformation to useful material properties.

For an engineering stress-strain curve:

  • Engineering stress is σ = F/A₀, where F is the applied tensile force and A₀ is the original cross-sectional area. Stress is commonly reported in MPa.
  • Engineering strain is ε = ΔL/L₀, where ΔL is the change in gauge length and L₀ is the original gauge length. Strain is dimensionless and may be written as mm/mm.

The curve starts at the origin. In the initial linear elastic region, stress is approximately proportional to strain, so σ = Eε. The slope, E, is Young’s modulus. A larger Young’s modulus means the material is stiffer; it does not by itself mean the material is stronger or tougher. If the load is removed while the material remains in the elastic range, the deformation is recoverable.

At the yield point, significant permanent plastic deformation begins. The corresponding stress is the yield strength. Beyond yield, the material remains plastically deformed after unloading. For a typical ductile metal, additional plastic deformation can be accompanied by strain hardening, causing the engineering stress to increase until it reaches the ultimate tensile strength, or UTS. The UTS is the maximum engineering stress on the curve.

After the UTS, localized necking can occur. Because engineering stress continues to use the original area A₀ rather than the progressively smaller local area, the plotted engineering stress typically decreases as necking progresses until the specimen fractures.

The curve therefore provides several different properties. Young’s modulus describes stiffness. Yield strength indicates the onset of significant plastic deformation. UTS describes the maximum engineering tensile stress. Strain at fracture gives an indication of ductility. The area under the stress-strain curve to fracture represents energy absorbed per unit volume and is associated with toughness.

The exact shape depends on the material and its condition. A ductile metal often shows a substantial plastic region, while a brittle material may fracture after relatively little plastic strain. Heat treatment, microstructure, temperature, strain rate, material orientation, and prior processing can also affect the measured response, so comparisons should use data measured under compatible conditions.

Useful Questions to Ask the Interviewer
  1. Are we discussing the engineering stress-strain curve or the true stress-strain curve? Engineering stress uses the original area A₀, while true stress uses the instantaneous cross-sectional area.
  2. Should I assume a typical ductile metal? The familiar yield, strain-hardening, necking, and fracture sequence is most representative of ductile materials and is not identical for every material class.
  3. Are there specific service temperatures, environments, or loading rates to consider? These conditions can change material properties and therefore affect how tensile-test data should be used for selection.
Explain what the stress-strain curve is. diagram
How to Explain It in an Interview

I would start with the axes and definitions: stress is force divided by original area, and strain is change in length divided by original gauge length. Then I would move from left to right along the curve. First comes the elastic region, where deformation is recoverable and the slope gives Young’s modulus. Next is yielding, where permanent deformation begins. For a typical ductile material, the material can then strain-harden until it reaches its maximum engineering stress, the UTS. After that, necking occurs and the engineering stress decreases until fracture. I would finish by explaining that the curve lets engineers distinguish stiffness, strength, ductility, and toughness rather than treating them as the same property.

Technical Approach
  1. Identify the graph axes: engineering stress, σ, on the vertical axis and engineering strain, ε, on the horizontal axis.
  2. Define engineering stress as σ = F/A₀ and engineering strain as ε = ΔL/L₀.
  3. Read the curve from the origin through the initial linear elastic region and identify its slope as Young’s modulus, E.
  4. Identify yielding as the transition to significant permanent plastic deformation.
  5. For a typical ductile material, follow the plastic region toward the maximum engineering stress, the ultimate tensile strength.
  6. Recognize the post-UTS region as necking in a typical ductile tensile specimen, followed by fracture.
  7. Use the curve to interpret stiffness, yield strength, tensile strength, ductility, and toughness.
  8. Before comparing materials, verify that test condition, material condition, temperature, orientation, and stress-strain definitions are comparable.
Practical Insights

There is no software complexity for this concept. The main engineering tradeoff is that one curve contains several different properties that should not be confused. A high Young’s modulus means high stiffness, while high yield or tensile strength means the material can sustain higher stress before a specified deformation or maximum engineering stress is reached. Ductility describes how much plastic deformation occurs before fracture, and toughness depends on the energy absorbed before fracture. Material condition, heat treatment, temperature, strain rate, anisotropy, and environment can affect the measured behavior, so curves should be compared under equivalent test conditions.

Why Interviewers Ask This

Interviewers use this question to check whether a mechanical engineer understands the basic relationship between load, deformation, and material behavior. They are looking for the ability to distinguish stiffness from strength, recognize the transition from elastic to plastic deformation, interpret yield strength and ultimate tensile strength, and explain how a tensile-test curve supports material selection and failure assessment.

Common interview mistakes

Common mistakes are saying that stiffness and strength are the same property; calling the UTS the yield strength; assuming every material has the same ductile-metal curve shape; forgetting that engineering stress uses the original area A₀; describing all deformation before fracture as elastic; assuming stress falls after UTS because the material suddenly becomes intrinsically weaker without explaining necking and the engineering-stress definition; and treating a single tensile curve as sufficient for material selection without considering temperature, environment, material condition, orientation, strain rate, corrosion, or other service requirements.

Interview tip

Explain the curve from left to right and keep each property distinct: slope gives stiffness, yield marks the start of significant permanent deformation, UTS is the maximum engineering stress, fracture ends the test, strain at fracture indicates ductility, and the area under the curve relates to toughness. Defining σ = F/A₀ and ε = ΔL/L₀ early makes the rest of the explanation much easier to follow.

Interviewer may ask next
How would you validate that two stress-strain curves can be compared for material selection?

I would first confirm that both curves use the same stress and strain definitions, such as engineering stress and engineering strain. Then I would check material condition and heat treatment, specimen orientation, test temperature, strain rate, specimen geometry, and relevant test method. I would also verify that the properties come from traceable data and represent the service environment. Only after those conditions are compatible would I compare quantities such as Young’s modulus, yield strength, UTS, elongation, and toughness.

How would the interpretation change if the component needed high stiffness but also had to avoid permanent deformation?

I would look at both Young’s modulus and yield strength because they answer different questions. Young’s modulus controls elastic deformation under load, so a higher modulus generally reduces elastic strain for the same uniaxial stress. Yield strength controls how much stress the material can sustain before significant permanent deformation begins. I would therefore select a material and section geometry that satisfy both the stiffness or deflection requirement and the allowable-stress requirement, while also checking density, toughness, corrosion resistance, temperature capability, manufacturing compatibility, and the required safety or design factors.

3. Elaborate what you did in your finite element analysis class during undergrad.Simulation And Engineering AnalysisMediumBoeing

Question Details

Identify the software you know and discuss key considerations for running a model.

Short Interview Answer (30-60 seconds)

In my undergraduate FEA class, I worked through the full finite element modeling process: defining the problem, simplifying geometry, assigning materials, choosing elements, applying loads and boundary conditions, meshing, solving, and interpreting stresses and displacements. A major lesson was that solver convergence alone does not prove the model is correct. I would check reactions and equilibrium, compare important results with a hand calculation, study mesh convergence, and make sure high stresses were physical rather than numerical singularities. The source does not give the software name, so in an actual interview I would identify the exact FEA package I used in the course rather than fabricate one.

Detailed Explanation

Finite element analysis is a numerical method for approximating how a physical system responds to loads, constraints, temperature, vibration, or other conditions. In an undergraduate FEA course, the important part is not just pressing the solve button. The key is understanding how a continuous structure is converted into finite elements and whether the resulting mathematical model is a reasonable representation of the real structure.

My workflow would begin with the engineering question. For example, am I trying to predict displacement, nominal stress, a local stress concentration, natural frequencies, buckling behavior, or temperature? That decision determines how much model fidelity is necessary and what type of analysis is appropriate.

I would then define the geometry and simplify features that do not materially affect the result of interest. The goal is not always to create the most detailed model. It is to create the simplest model that still captures the physics needed for the engineering decision.

Next, I would define the material behavior. For a basic structural analysis, that may mean a linear-elastic material model using properties such as elastic modulus and Poisson's ratio. If the expected response includes plasticity, large deformation, temperature dependence, or another nonlinear effect, a linear model may no longer be appropriate. I would not add nonlinear physics unless the problem required it.

Element selection is another important decision. Different geometries and structural behaviors can justify solid, shell, beam, or other element formulations. The choice affects both computational cost and accuracy. I would make sure the element formulation is appropriate for the geometry and the behavior I am trying to capture.

Boundary conditions and loads are especially important because even an excellent mesh cannot correct an unrealistic model. I would ask what is actually supporting the component, how the load enters the structure, whether a constraint is preventing motion that would physically occur, and whether contacts between parts need to be represented. Over-constraining a model can artificially increase stiffness and distort stresses and reactions.

I would then create the mesh. Rather than assuming that a very fine mesh automatically produces a trustworthy answer, I would use sufficient refinement in regions with important gradients, such as holes, fillets, contacts, or other geometric transitions, while keeping less critical regions coarser when appropriate.

For an important result, I would perform a mesh convergence study. I would refine the mesh and monitor the quantity that actually matters to the engineering decision, such as displacement, reaction force, strain energy, or a physically meaningful stress away from a mathematical singularity. If that quantity stabilizes as the mesh is refined, I have stronger evidence that discretization error is under control.

I would also perform basic verification. For a structural model, I would check whether applied loads and support reactions satisfy equilibrium within appropriate numerical tolerance. I would compare the simulation against a simple hand calculation whenever a suitable analytical approximation exists. If the model predicted a displacement or load path that did not make physical sense, I would investigate before trusting detailed stress contours.

One concept I would specifically watch for is a stress singularity. For example, an idealized point load, perfectly sharp re-entrant corner, or idealized fixed boundary can produce a computed local stress that continues increasing as the mesh is refined. In that situation, reporting the highest displayed stress as a meaningful physical value would be misleading. I would determine whether the peak represents a physically meaningful stress concentration or a numerical consequence of the idealization and then evaluate a suitable quantity or improve the representation of the load, geometry, contact, or boundary condition.

Finally, I would distinguish verification from validation. Verification asks whether I solved the chosen mathematical model correctly, including numerical convergence and consistency checks. Validation asks whether that model represents the real physical system accurately enough for its intended use. Experimental measurements or established test data are valuable for validation when available.

For software, the supplied information does not identify the specific FEA package used in the class. I therefore would not invent one. In a real interview, I would name the exact package I actually used and describe what I personally did with it, such as geometry preparation, material assignment, element and mesh selection, load and constraint definition, solving, and post-processing.

Useful Questions to Ask the Interviewer
  • What types of simulation are most common in this role: static structural, nonlinear, thermal, modal, buckling, fatigue-related, or coupled analyses?
  • How does the team normally verify and validate simulation models against hand calculations or physical testing?
  • Which FEA solvers and pre/post-processing tools are used most frequently?
  • How much responsibility does an engineer have for defining loads, boundary conditions, contacts, and material models versus receiving those inputs from another group?
How to Explain It in an Interview

I would explain the class as a progression from theory to engineering judgment. I would first say that I learned how the finite element method discretizes a continuous structure into elements and solves for approximate field variables such as displacement. Then I would describe the practical workflow: define the engineering question, simplify geometry appropriately, choose materials and elements, apply defensible loads and constraints, mesh the model, solve it, and interpret the results.

I would emphasize that the most important lesson was model credibility. I would mention checking equilibrium, comparing with a hand calculation, performing mesh convergence on the result that matters, examining sensitivity to assumptions, and distinguishing real stress concentrations from singularities. I would finish by naming only the software I genuinely used and clearly describing my level of experience with it.

Technical Approach
  1. Define the engineering decision and the result that must be predicted, such as displacement, stress, natural frequency, buckling load, or temperature.
  2. Identify known inputs, assumptions, and unknowns before building the model.
  3. Simplify the geometry only where the simplification does not remove physics important to the result.
  4. Select an analysis type and material model consistent with the expected physical behavior.
  5. Choose element types appropriate for the geometry and structural behavior.
  6. Apply loads, supports, contacts, and other boundary conditions based on the physical system rather than convenience.
  7. Create a mesh with suitable quality and targeted refinement in regions important to the engineering decision.
  8. Solve the model and confirm that the numerical solution process completed appropriately.
  9. Check equilibrium, reactions, deformation shape, and other physical sanity checks.
  10. Compare important results with a hand calculation or other independent estimate when possible.
  11. Perform a mesh convergence study on a meaningful output rather than blindly comparing the maximum displayed stress.
  12. Investigate singularities, unrealistic constraints, contact behavior, and sensitivity to uncertain assumptions.
  13. Validate the model against experimental or established physical evidence when available.
  14. Communicate the result together with assumptions, limitations, and the evidence supporting confidence in the model.
Practical Insights

FEA involves a tradeoff between model fidelity, computational cost, and the accuracy required for the engineering decision. A more detailed geometry, finer mesh, nonlinear material model, or more realistic contact definition can increase computational effort substantially, but additional complexity is only useful when it represents physics that materially affects the result. A simpler model can often be more useful when its assumptions are well understood and it can be checked against analytical calculations. The important question is not whether the model is as complex as possible, but whether it is sufficiently accurate and credible for its intended purpose.

Why Interviewers Ask This

The interviewer is evaluating whether I understand FEA as an engineering analysis process rather than simply knowing how to operate simulation software. They want to hear that I can define a model appropriately, choose reasonable assumptions, apply realistic boundary conditions and loads, select suitable elements and mesh density, recognize numerical artifacts such as stress singularities, verify the numerical solution, and judge whether the results are physically credible.

Common interview mistakes

Common mistakes include treating the FEA software as a black box; applying unrealistic fixed constraints; distributing loads incorrectly; choosing elements without considering geometry and behavior; assuming a finer mesh automatically makes the entire model correct; reporting the maximum stress without checking for a singularity; trusting solver convergence as proof of physical accuracy; skipping equilibrium and reaction-force checks; failing to compare with a hand calculation; adding unnecessary nonlinear complexity; and claiming software experience beyond what was actually used.

Interview tip

Do not make the answer a list of software commands. Describe one coherent engineering workflow and show that you understand why each modeling decision matters. If asked which software you know, name only tools you genuinely used and state what you personally did with them. Because the supplied information does not identify the course software, do not fabricate a package name. A strong answer should emphasize boundary conditions, mesh convergence, hand-calculation checks, stress singularities, and the difference between numerical verification and physical validation.

Interviewer may ask next
How would you determine whether you can trust an FEA result?

I would build confidence in several layers. First, I would check the model setup: units, material properties, element types, loads, constraints, contacts, and expected deformation direction. Second, I would verify basic physics by checking force and moment equilibrium and comparing reactions with the applied loads where applicable. Third, I would compare an important result with a simple analytical or hand-calculation estimate when possible. Fourth, I would perform a mesh convergence study on the quantity that matters to the decision. I would also investigate unexpectedly high stresses to determine whether they are physical or numerical singularities. Finally, if the model is being used to represent real hardware, I would compare predictions with appropriate experimental or test evidence. Solver convergence is necessary in many analyses, but by itself it does not demonstrate that the physical model is valid.

What would you change if a more detailed FEA model increased solve time dramatically?

I would first ask whether the added detail changes the engineering result I care about. If not, I would simplify the model rather than paying the computational cost without gaining useful accuracy. Possible approaches include removing nonessential geometric features, using appropriate beam or shell idealizations instead of solids where justified, refining the mesh locally instead of globally, exploiting symmetry when the geometry, loads, boundary conditions, and response permit it, and starting with a linear model if nonlinear behavior is not important. I would compare the simplified and higher-fidelity models on key outputs to understand the tradeoff. The objective is sufficient fidelity for the engineering decision, not maximum model complexity.

4. How would you troubleshoot the following problem?Troubleshooting And Failure AnalysisMediumBoeing

Question Details

1 out of 8 test rigs are not responding.

Short Interview Answer (30-60 seconds)

Since only 1 of 8 rigs is not responding, I would first make the affected rig safe and clarify whether "not responding" means no power, no communication, no commanded motion, or no feedback. I would preserve the initial condition and compare the failed rig with one of the seven healthy rigs. Then I would work through the chain logically: power and utilities, wiring and connectors, communications, controller channel, interlocks, sensors, actuators, and finally mechanical restrictions. I would measure expected versus actual conditions and use controlled swaps only when they can safely isolate whether the fault follows the rig or the interface. Once I find the failure mode, I would determine its root cause, correct it, and repeat the original test to verify reliable operation.

Detailed Explanation

The key clue is that 7 of the 8 test rigs are responding. That does not prove the problem is inside the eighth rig, but it makes a system-wide failure less likely and gives me several known-good references for comparison. I would avoid assuming that a non-responsive rig has a bad component. "Not responding" is only the symptom. The failure mode could be loss of electrical power, missing utility supply, an open safety interlock, a communication failure, an incorrect control state, a failed sensor or actuator, damaged wiring, or a mechanical condition preventing the expected response.

My first action would be to establish a safe condition and preserve evidence. I would record the rig state, alarms, indicator states, controller status, recent maintenance or configuration changes, and the exact command that failed before resetting, disconnecting, or replacing anything. If the rig contains stored mechanical, electrical, hydraulic, pneumatic, thermal, or other hazardous energy, I would follow the applicable isolation requirements before intrusive inspection.

Next, I would define the system boundary and trace the response path from input to output. A useful sequence is: commanded test input -> controller or interface -> required interlocks and permissives -> electrical or utility supply -> actuator or driven component -> physical rig response -> sensor feedback. At each boundary I would ask, "What should be present here, and what is actually present?"

Because seven rigs work, I would compare the failed rig against a healthy rig under the same intended test state. I would look for differences in supply voltage or utility condition, connector seating, cable continuity where appropriate, communication status, controller configuration, enabled channels, interlock states, sensor readings, actuator commands, unusual vibration, binding, overheating, leakage, wear, or visible damage. I would use measured differences rather than visual inspection alone.

I would then split the problem into competing hypotheses. For example:

  1. The failed rig is not receiving the required power or utility.
  2. The command is not reaching the rig because of wiring, connector, network, or controller-channel problems.
  3. A safety interlock or permissive is intentionally preventing operation.
  4. The command reaches the rig, but an actuator or local component does not respond.
  5. The actuator responds, but a mechanical restriction prevents the expected motion or load response.
  6. The rig physically responds, but the feedback sensor or data-acquisition path makes it appear unresponsive.

I would test these hypotheses from the highest-level boundary toward the failed component. If a command is visible at the controller but absent at the rig interface, I would focus on the connection or output path. If the command reaches the actuator but there is no physical response, I would investigate the actuator, its energy supply, and the mechanical load. If the rig moves correctly but the monitoring system still reports no response, I would investigate the sensor, signal conditioning, channel assignment, and data-acquisition path.

A controlled comparison or swap can be powerful when it is safe and permitted. For example, if equivalent interfaces are designed to be interchangeable, moving the suspect connection to a known-good channel can help determine whether the failure follows the rig or stays with the channel. I would change only one variable at a time and document the original configuration so the test remains interpretable. I would not perform a swap that could damage equipment, bypass a safety function, invalidate calibration, or create an uncontrolled condition.

Once I isolate the failed element, I would still distinguish failure mode, mechanism, and root cause. For example, finding an open connector is a failure mode; determining that repeated vibration caused inadequate retention and intermittent separation would be closer to a physical mechanism and root cause. Similarly, replacing a failed sensor restores operation, but I would still ask why the sensor failed: damage, contamination, misalignment, overheating, wiring strain, incorrect installation, or another supported cause. I would use methods such as Five Whys, a simple fault tree, or FMEA when the issue warrants deeper investigation.

Corrective action should address the supported root cause rather than only the symptom. After the repair, I would return the rig to the intended configuration and repeat the same command or test condition that originally failed. I would confirm the full response chain: correct command, correct physical response, valid feedback, no abnormal alarms, and repeatable operation. Where appropriate, I would compare the repaired rig's measurements with the healthy rigs to check that it is not merely operating, but behaving consistently.

Finally, I would document the evidence, measurements, identified failure mode, root cause, corrective action, and verification result. If the root cause could affect the other seven rigs, I would recommend inspecting the same feature across the fleet rather than assuming the problem is isolated.

Useful Questions to Ask the Interviewer
  • What specifically does "not responding" mean: no power, no communication, no commanded motion, or no sensor feedback?
  • Are all eight rigs nominally identical and operating from the same controller, utilities, software configuration, and test procedure?
  • Did the failed rig previously work, and did anything change immediately before the failure, such as maintenance, calibration, wiring, software configuration, or test setup?
  • Are there any alarms, fault codes, tripped protection devices, open interlocks, or abnormal sensor values?
  • Does the problem remain with the same physical rig after a restart or approved controlled comparison?
  • Are there hazardous or stored-energy conditions that limit what can be inspected or swapped while the rig is energized?
How to Explain It in an Interview

I would explain that I am using the seven healthy rigs as reference systems while avoiding the assumption that the eighth rig itself must be defective. I would start safely, preserve the initial evidence, define what "not responding" actually means, and follow the signal and energy path from command to physical response and back through feedback. I would compare expected and actual measurements at each boundary and test one hypothesis at a time. If an approved controlled swap is useful, I would use it to determine whether the problem follows the rig or remains with a controller channel or connection. After isolating the failure, I would identify why it occurred rather than stopping at the failed part, correct the supported root cause, and repeat the original test under representative conditions to verify that the repair is reliable.

Technical Approach
  1. Establish a safe equipment state and preserve the failed condition before resetting or replacing components.
  2. Define exactly what "not responding" means and identify the expected input, physical response, and feedback.
  3. Record alarms, controller states, interlocks, recent changes, and other initial evidence.
  4. Use one of the seven operating rigs as a known-good comparison under equivalent conditions.
  5. Trace the complete response path: command, controller/interface, permissives and interlocks, power or utilities, actuator, mechanical response, sensor, and feedback path.
  6. At each boundary, compare the expected condition with a measurement or observable actual condition.
  7. Form competing hypotheses such as supply failure, communication failure, open interlock, actuator failure, mechanical restriction, or feedback failure.
  8. Test the hypotheses one variable at a time, using safe controlled comparisons or approved swaps where they provide clear isolation evidence.
  9. Identify the failure mode, then investigate the physical or procedural mechanism that produced it and determine the supported root cause.
  10. Apply corrective action that addresses the root cause rather than only replacing the failed item.
  11. Restore the intended configuration and repeat the original test under representative conditions.
  12. Verify repeatability, compare the repaired rig with healthy rigs, document the result, and determine whether the same root cause should be checked on the other rigs.
Practical Insights

The main tradeoff is between diagnosing quickly and preserving enough evidence to find the real cause. Since seven rigs are working, comparison testing can narrow the search efficiently, but uncontrolled swapping can hide the original fault or introduce a new one. Measurements should therefore progress from broad system boundaries toward individual components, with one controlled change at a time. More intrusive testing may provide stronger evidence but can require equipment shutdown, energy isolation, recalibration, or additional test time. The goal is not simply to make the eighth rig respond once; it is to identify why it failed and demonstrate that the correction is repeatable.

Why Interviewers Ask This

The interviewer is evaluating whether I can diagnose an equipment problem systematically rather than jump to a component replacement. They want to see that I preserve evidence, establish safe conditions, separate the visible symptom from the actual failure mode and root cause, use the seven functioning rigs as comparison data, make measurements to test competing hypotheses, isolate the fault efficiently, and verify that the corrective action truly restores repeatable operation.

Common interview mistakes

Common mistakes are immediately power-cycling the rig and erasing useful evidence; assuming the eighth rig itself is faulty simply because the other seven work; replacing components without measurements; bypassing an interlock instead of determining why it is open; changing several variables at once so the diagnostic result becomes ambiguous; treating the failed component as the root cause without asking why it failed; ignoring mechanical problems because the symptom appears electrical or software-related; and declaring success after one response without repeating the original test and confirming stable feedback.

Interview tip

Use the phrase "compare the failed rig with a known-good rig and isolate the fault one boundary at a time." Then show the interviewer that you distinguish the symptom, failure mode, mechanism, and root cause. Emphasize measurements before replacement, one controlled change at a time, preservation of evidence, and a repeatable verification test after the correction.

Interviewer may ask next
What would you do if the failed rig starts working again before you can reproduce the problem?

I would treat it as an intermittent failure rather than assume it is fixed. I would preserve logs, alarms, connector conditions, environmental conditions, vibration or load history, and recent configuration changes. I would compare those conditions with the seven healthy rigs and look for variables that can produce intermittent behavior, such as loose connections, wiring strain, intermittent sensors, thermal effects, vibration-sensitive contacts, marginal utility supply, or an unstable communication path. I would avoid indiscriminately disturbing the setup because that could remove the evidence. Where safe, I would perform a controlled reproduction test by varying only supported operating conditions and monitoring the relevant signals. The repair would not be considered verified until the suspected mechanism is supported by evidence and the rig completes representative repeated tests without recurrence.

How would your approach change if several of the eight rigs stopped responding at the same time?

I would move shared resources much higher in the fault tree. A simultaneous failure of several rigs increases the likelihood of a common-cause problem such as shared electrical power, utility supply, controller hardware, communication infrastructure, configuration, safety interlock, or another common interface. I would first identify what the affected rigs share and what the still-operating rigs do not share. Then I would measure the common boundary before opening individual rigs. I would still preserve evidence and verify each hypothesis, but the fastest diagnostic path would shift from comparing one abnormal rig with seven healthy rigs to partitioning the system by shared dependencies and finding the smallest common element that explains all affected rigs.

5. Where do you see yourself in 10 years?NEWBehavioralEasyBoeing

Question Details

Discuss your own goals over that ten-year horizon.

Interview tip:

Use STAR to structure your answer: briefly explain the Situation and Task, make Action the most detailed part, and finish with the Result. For example, describe how your current mechanical engineering experience has shaped your long term goals, what skills and responsibilities you want to build over the next ten years, how you plan to keep learning and supporting your team, and what kind of engineer you hope to become.

Situation

In my recent mechanical engineering work, I have had opportunities to contribute to design decisions, review technical details, solve practical problems, and work with people from different engineering functions. Those experiences have helped me understand which parts of the profession I want to keep developing over the long term.

Task

My goal is to build a career where I become a strong technical engineer first and then take on broader responsibility as my judgment and experience grow. Over the next ten years, I want to deepen my knowledge of mechanical design, analysis, testing, manufacturing, and system level tradeoffs while becoming someone teammates can trust with difficult engineering decisions.

Action

I plan to reach that goal in stages. In the near term, I want to keep strengthening my technical fundamentals by working on real products, learning from experienced engineers, and understanding why design decisions succeed or fail in testing and production. I also want to become better at connecting analysis with physical results, because a good mechanical engineer should understand both the calculations and what actually happens to the hardware. As I gain experience, I want to take ownership of larger technical problems, lead design reviews, help coordinate work across engineering functions, and mentor newer engineers. I would also continue learning new tools and methods as the field changes, while keeping strong fundamentals in mechanics, materials, thermal behavior, manufacturing, and reliability. I do not see leadership as moving away from engineering. I would want any leadership responsibility to grow from strong technical judgment, clear communication, and a record of helping teams make sound decisions.

Result

In ten years, I would like to be a senior technical contributor or engineering leader who can take a complex mechanical problem from early requirements through design, testing, and production. I want to be known as someone who makes careful decisions, communicates clearly, supports the team, and continues learning. The exact title is less important to me than having meaningful responsibility and being able to contribute to safe, reliable, and well designed products.

Why Interviewers Ask This

Interviewers ask this question to understand whether the candidate has realistic long term goals, a clear interest in continued professional growth, and expectations that can align with the opportunities of the role. A strong answer shows ambition without focusing only on titles and explains how technical growth, responsibility, learning, and leadership may develop over time.

Interviewer may ask next
What would you focus on during the first few years to move toward that ten year goal?

I would focus first on becoming very strong in the technical work. I would learn the product, design process, analysis methods, testing practices, and manufacturing constraints in detail. I would also ask for feedback from experienced engineers and use test or production results to improve my judgment. Once I had a strong foundation, I would gradually take ownership of larger problems and more coordination responsibility.

Would you prefer a technical expert path or a people management path?

My first priority would be technical depth because I want my future decisions to be based on real engineering experience. Over time, I would be open to either a senior technical role or a leadership role depending on where I can contribute most. If I move into leadership, I would still want to stay close enough to the engineering work to understand the important technical decisions and support the team well.

6. Why do you want to work for Boeing?NEWBehavioralEasyBoeing

Question Details

Explain your interest in joining this employer.

Interview tip:

Use STAR to structure your answer: briefly explain the Situation and Task, make Action the most detailed part, and finish with the Result. For example, describe how you evaluated Boeing as a place to grow as a mechanical engineer, connected your engineering interests with the work, considered how you could contribute through careful design and collaboration, and decided why the opportunity fits your long term goals.

Situation

As I considered the next step in my mechanical engineering career, I wanted to join an organization where the engineering work has real technical depth and where careful design decisions matter to the safety and performance of complex products.

Task

My goal was to identify an employer where I could use my mechanical engineering skills, continue learning from experienced engineers, and contribute to products that require strong design discipline, testing, teamwork, and attention to detail.

Action

I became interested in Boeing because the company works on complex aerospace products where mechanical engineers must think carefully about structures, materials, manufacturing, reliability, testing, and safety. That type of work matches what I enjoy about mechanical engineering. I like understanding how a design will behave in the real world, reviewing risks before they become problems, and working with other engineering groups to reach a practical solution. I am also interested in an environment where a mechanical engineer has to balance technical performance with manufacturability, maintainability, quality, and safety. Those responsibilities would allow me to apply the engineering judgment I have developed while continuing to learn from teams working on large and technically demanding systems. I would want to contribute by asking clear technical questions, documenting my reasoning, supporting design reviews, and working closely with manufacturing, analysis, testing, and other engineering teams.

Result

After looking at the type of engineering work and responsibility involved, Boeing stands out to me as a place where I could contribute as a mechanical engineer while continuing to develop my technical judgment. I am interested in the opportunity because the work combines challenging engineering, collaboration, and a strong need for reliable decisions, which are all areas I want to build my career around.

Why Interviewers Ask This

Interviewers ask this question to understand whether the candidate has a clear and genuine reason for choosing Boeing and whether the role fits the candidate's professional goals. A strong answer shows that the candidate understands the nature of mechanical engineering work in aerospace, can connect personal interests with the responsibilities of the role, and is motivated by more than simply finding any available job.

Interviewer may ask next
What part of Boeing's mechanical engineering work interests you most?

I am most interested in work where mechanical design has to satisfy several needs at the same time, such as structural performance, manufacturability, reliability, testing, and safety. I enjoy looking beyond whether a part works in theory and thinking about how it will be built, inspected, tested, maintained, and used as part of a larger system.

How would you contribute to a Boeing engineering team?

I would contribute by being careful with technical details, communicating my reasoning clearly, and working closely with the people responsible for analysis, manufacturing, testing, and quality. I would ask questions when requirements or assumptions are unclear, document important decisions, and use review and test results to improve the design rather than treating engineering as an individual activity.

7. Describe an experience when you had to deliver bad news to your manager or team.NEWBehavioralHardBoeing

Question Details

Focus on communicating unwelcome information to your supervisor or colleagues.

Interview tip:

Use STAR to structure your answer: briefly explain the Situation and Task, make Action the most detailed part, and finish with the Result. For example, describe a project where you discovered a serious design or test issue, confirmed the facts before raising it, explained the technical and schedule impact clearly, proposed practical options, and helped the team respond constructively.

Situation

During a previous mechanical design project, I was reviewing test results for a structural component before the design was released. The results showed that the component was experiencing more stress than expected in one operating condition. Continuing with the existing design could have created a reliability risk, but changing it would also affect the planned schedule.

Task

I was responsible for reviewing the test data and supporting the design decision. I needed to tell my manager and the wider team that the current design should not move forward as planned. My goal was to communicate the problem early, explain the evidence clearly, and help the team decide on a safe path forward.

Action

I first checked the test setup and reviewed the calculations to make sure the result was real and not caused by an instrumentation or setup problem. I compared the measured behavior with our analysis and found that both pointed to the same weak area. I then prepared a simple summary showing what we expected, what we observed, why the difference mattered, and which design area needed attention. I spoke with my manager as soon as I had enough evidence instead of waiting for the next scheduled review. I explained that the design had a technical risk and that I did not recommend releasing it in its current form. I also explained the likely schedule impact so there were no surprises. Rather than only presenting the problem, I brought several practical options. These included strengthening the affected area, reviewing the load path, and performing focused analysis before repeating the test. During the team discussion, I stayed focused on the data and avoided blaming anyone for the issue. I answered questions openly and made clear which conclusions were confirmed and which still needed investigation. After the team selected a path, I worked with the other engineers to update the analysis and prepare the revised design for another review.

Result

The team agreed to address the issue before release. The revised design removed the concern identified during testing, and the project moved forward with better confidence in the component. I learned that delivering bad news is easier for a team to act on when I communicate it early, separate facts from assumptions, explain the impact clearly, and bring useful options instead of only reporting a problem.

Why Interviewers Ask This

Interviewers ask this question to understand whether a candidate can communicate difficult information with honesty, judgment, and professionalism. A strong answer shows that the candidate verifies the facts, raises important risks early, explains the impact clearly, avoids blame, and helps the team move toward a practical solution.

Interviewer may ask next
How did you make sure your manager understood the seriousness of the issue without creating unnecessary alarm?

I focused on verified evidence and explained the issue in simple terms. I showed what the design was expected to do, what the test actually showed, and why that difference created a reliability concern. I also separated confirmed findings from items that still needed investigation. That helped my manager understand that the issue was serious, but also that we had a clear process for resolving it.

What would you do differently if you faced a similar situation again?

I would use the same approach of verifying the facts and communicating early, but I would try to identify the decision options even sooner. In this case, preparing possible design changes helped the discussion become productive. In a similar situation, I would involve the right analysis and test engineers as early as possible so we could present the problem and the most practical next steps together.

8. Give an example of a time you led a team.NEWBehavioralMediumBoeing

Question Details

Use an example of your own leadership.

Interview tip:

Use STAR to structure your answer: briefly explain the Situation and Task, make Action the most detailed part, and finish with the Result. For example, describe a mechanical engineering project where you led a small team, clarified responsibilities, coordinated technical decisions, handled different opinions, kept the work moving, and helped the team deliver a reliable result.

Situation

During a previous project, I was part of a small mechanical engineering team responsible for improving a component that was showing reliability concerns during testing. The work involved design review, analysis, drawing updates, and coordination with manufacturing. Because several activities depended on each other, the team needed clear direction and communication.

Task

I was asked to lead the engineering effort and coordinate the team through the redesign. My responsibility was to make sure we understood the problem, divided the work clearly, made sound technical decisions, and kept everyone aligned until the updated design was ready for validation.

Action

I started by bringing the team together to review the test observations and agree on the main problem we needed to solve. I wanted us to work from the same facts before discussing solutions. I then divided the work based on each person's strengths. One team member reviewed the test data, another checked manufacturing constraints, and I focused on the design changes and overall coordination. I set clear checkpoints so we could compare findings before anyone moved too far in one direction. When different design ideas came up, I asked each person to explain the benefit, risk, and effect on manufacturing. This kept the discussion focused on engineering evidence instead of personal preference. I also made sure quieter team members had a chance to share concerns because they often had useful details from their part of the work. After we selected the best approach, I coordinated the drawing updates, confirmed that the proposed changes addressed the original failure concern, and worked with the team to prepare the design for another round of testing. Throughout the project, I kept the group informed about decisions, open issues, and who was responsible for each next step.

Result

The team completed the redesign in an organized way, and the updated component performed reliably during the next validation work. The project also improved how the team communicated because everyone understood their role and the reason behind the major decisions. I learned that good leadership is not about making every decision myself. It is about creating clarity, listening to the team, using evidence to guide decisions, and helping people work toward the same goal.

Why Interviewers Ask This

Interviewers ask this question to understand how a candidate leads people, makes decisions, communicates expectations, and takes responsibility for a shared result. A strong answer shows that the candidate can guide technical work while also listening to others, resolving different viewpoints, and keeping a team focused on a clear goal.

Interviewer may ask next
How did you handle different opinions within the team?

I asked each person to explain the technical benefit, risk, and manufacturing impact of their idea. That gave us a common way to compare the options. I also made sure everyone had a chance to speak before we decided. This helped us choose the design based on evidence rather than seniority or personal preference.

What did you learn from leading that team?

I learned that leadership works best when responsibilities and decisions are clear. I also learned that I do not need to provide every answer myself. My job as the lead was to bring the right information together, encourage useful discussion, make sure concerns were addressed, and help the team move toward a sound engineering decision.

9. Tell me a time when you had to make a compromise within a group or project.NEWBehavioralHardBoeing

Question Details

What was the compromise?

Interview tip:

Use STAR to structure your answer: briefly explain the Situation and Task, make Action the most detailed part, and finish with the Result. For example, describe a project where the team disagreed about a mechanical design choice, how you compared the important technical and schedule needs, communicated the tradeoffs, agreed on a practical compromise, and helped the group deliver a reliable design.

Situation

During a previous project, my team was designing a mounting bracket for a mechanical assembly. One group member wanted a thicker custom bracket to maximize stiffness, while another wanted to keep the existing standard material so the part could be manufactured more easily and without delaying the project.

Task

I was responsible for the mechanical design and needed to help the group reach a decision that protected the important structural requirements while also respecting the manufacturing and schedule concerns.

Action

I first made sure I understood why each person preferred their approach instead of treating the discussion as only a design disagreement. I reviewed the expected loads, the critical areas of the bracket, and the available standard material. I then compared the two options with the team. The custom thickness gave us additional stiffness, but the analysis showed that we did not need that full increase across the entire part. I proposed a compromise that kept the standard material thickness and added local reinforcement near the highest load area. I explained that this approach would preserve the simpler manufacturing path while putting additional strength where it was actually needed. I updated the design, reviewed the load path and stress concentration areas, and shared the reasoning with the group so everyone could challenge the assumptions before we moved forward. After discussing the remaining concerns, the team agreed that this solution balanced the technical requirement with manufacturing practicality.

Result

We moved forward with one design that the engineering and manufacturing sides both supported. The compromise avoided unnecessary complexity while still meeting the important mechanical needs of the assembly. I learned that a good compromise does not mean choosing the middle of two opinions. It means understanding the real priorities behind each position and finding a solution that protects the requirements that matter most.

Why Interviewers Ask This

Interviewers ask this question to understand how a candidate handles disagreement, balances competing priorities, and works toward a decision without losing sight of engineering requirements. A strong answer shows practical judgment, respectful communication, willingness to consider other viewpoints, and the ability to reach a compromise that the team can support.

Interviewer may ask next
How did you make sure the compromise did not create a technical risk?

I checked the expected loads and focused on the areas where stiffness and stress were most important. I also reviewed the revised load path and stress concentration areas before asking the team to accept the design. That allowed us to simplify the part without compromising the mechanical requirement that drove the design.

What would you do if one team member still disagreed with the compromise?

I would ask which specific requirement or risk was still causing concern and review that point with the same technical criteria we used for the design. If the concern was valid, I would revise the solution or gather additional analysis before proceeding. I would keep the discussion focused on requirements and evidence rather than on whose original idea should win.

10. Describe a time where you adapted to a substantial change while working on a project or school assignment.NEWBehavioralMediumBoeing

Question Details

Cover the context, your response, and the result.

Interview tip:

Use STAR to structure your answer: briefly explain the Situation and Task, make Action the most detailed part, and finish with the Result. For example, describe a mechanical engineering project where an important requirement changed after work had already started, how you reassessed the design, communicated the impact, adjusted your priorities, and helped the team deliver a reliable result.

Situation

During a previous mechanical engineering project, my team was designing a small test fixture for a component. We had already completed much of the initial design when the test requirements changed. The fixture now had to support a different loading direction and allow easier access for measurements. That meant our original concept was no longer suitable.

Task

I was responsible for part of the fixture design and for making sure my section still met the updated requirements. I needed to adapt quickly without ignoring the work already completed or creating unnecessary delays for the rest of the team.

Action

I first reviewed the new requirements and compared them with the assumptions behind our original design. I identified which parts could still be used and which parts needed to change. Instead of redesigning everything, I focused on the areas affected by the new load path and measurement access. I updated the geometry, checked how the revised forces would transfer through the fixture, and reviewed the connection points to make sure the design remained practical to manufacture and assemble. I then shared the changes with the team and explained why they were necessary. I also asked for feedback from the people working on the other sections so that my changes would not create new interference or assembly problems. As we worked through the update, I kept the revised requirements visible in our design review so we did not continue making decisions based on the old assumptions.

Result

The team was able to adjust the fixture without starting the project again from the beginning. The revised design supported the new test setup and gave better access for measurements. I learned that adapting well to a major change means understanding exactly what changed, preserving useful work where possible, and communicating early so the whole team can move in the same direction.

Why Interviewers Ask This

Interviewers ask this question to understand how a candidate responds when project requirements change after work has already started. A strong answer shows flexibility, practical judgment, clear communication, ownership, and the ability to adjust technical work without losing sight of the main project goal.

Interviewer may ask next
How did you decide which parts of the original design could still be used?

I compared each part of the original design with the updated requirements. If a feature was not affected by the new loading direction or measurement access, I tried to keep it. For the affected areas, I checked the load path, connections, and physical access before deciding whether a change was needed. That helped me avoid unnecessary redesign while still addressing the important technical changes.

What would you do differently if a similar change happened on another project?

I would identify the changed assumptions even earlier and document them clearly for the whole team. I would also review the interfaces between different parts of the design as soon as the new requirement appeared. That would make it easier to find secondary effects before detailed redesign work begins.

More questions load as you scroll

Disclaimer: This interview guide is for educational and informational purposes only. It is designed to help readers prepare, but it does not guarantee any interview result, hiring decision, offer, or outcome. Interview questions, hiring criteria, and preferred answers can vary by employer, interviewer, industry, location, and time. All answers, examples, and explanations in this guide are suggested examples for interview preparation, not definitive answers or instructions for professional practice. They are based on research and judgment, are provided without warranties of any kind, and should be adapted to the question, role, and applicable laws and professional requirements. Diagrams are simplified illustrations intended to highlight the main concepts and their relationships; actual situations, systems, and practices may be more complex. Alternative approaches may be equally valid or better suited to a particular question, context, or interviewer. To the fullest extent permitted by applicable law, the contributors and publisher are not liable for decisions made, actions taken, or losses incurred based on this guide.

State Laws and Professional Responsibilities: Laws and requirements governing an occupation vary by state and jurisdiction. You are responsible for checking the current laws, licensing requirements, and scope-of-practice rules that apply to your location and role, and for ensuring that your answers and actions comply with them. Adapt examples in this guide to those requirements. This guide is not legal advice.

Company Notice: This guide is an independent educational resource and is not affiliated with, endorsed by, sponsored by, or approved by the company named in this guide. Company names identify reported interview experiences or the employer context of clearly labeled original practice exercises. Interview practices can change without notice, and inclusion of company-specific content does not mean these questions are official, complete, or guaranteed to be asked. To the fullest extent permitted by law, the author, contributors, and publisher are not responsible for outcomes related to use of this material.

Content Accuracy and Verification: To the fullest extent permitted by applicable law, we do not represent or warrant that interview guides, questions, answers, examples, or diagrams are accurate, complete, current, error-free, or suitable for any particular purpose. You are responsible for independently reviewing and verifying the information before relying on it.