10 Lockheed Martin Mechanical Engineer Interview Questions & Answers

lockheed-martin icon

Questions with Detailed ExplanationsWith Detailed Explanations

(Last Updated: September 13, 2026)

1. What is mass moment of inertia?Engineering MechanicsEasyLockheed Martin

Short Interview Answer (30-60 seconds)

Mass moment of inertia is a measure of how a body's mass is distributed relative to a chosen axis of rotation. It describes the body's resistance to angular acceleration about that axis. Mathematically, I = ∫r² dm, so mass farther from the axis has a larger effect because its contribution grows with the square of the perpendicular distance. The SI unit is kg·m². For a uniform solid cylindrical disk about its central axis, I = 1/2 MR².

Detailed Explanation

Mass moment of inertia is the rotational counterpart to the way mass represents resistance to linear acceleration. It is not determined by total mass alone; it also depends on where that mass is located relative to the chosen rotation axis. For a specified axis, the general definition is I = ∫r² dm, where dm is a small element of mass and r is its perpendicular distance from the axis. Because the distance is squared, moving the same amount of mass farther from the axis increases its contribution strongly. The SI unit follows directly from the definition: kg·m².

For the solid cylindrical disk shown about its central z-axis, let M be the total mass, R the disk radius, and h the disk height. For a uniform solid cylindrical disk, the mass moment of inertia about that central axis is I = 1/2 MR². The height h describes the geometry but does not appear explicitly in this final expression when the total mass M and radius R are already specified. The important boundary condition is the selected central z-axis; choosing a different axis generally changes the mass moment of inertia.

Useful Questions to Ask the Interviewer
  • Which axis of rotation should the moment of inertia be calculated about?
  • Is the body uniform, or does its density vary with position?
  • Are the total mass and geometry known, or should the result remain symbolic?
  • Is the problem asking for a standard rigid-body result or a first-principles integration?
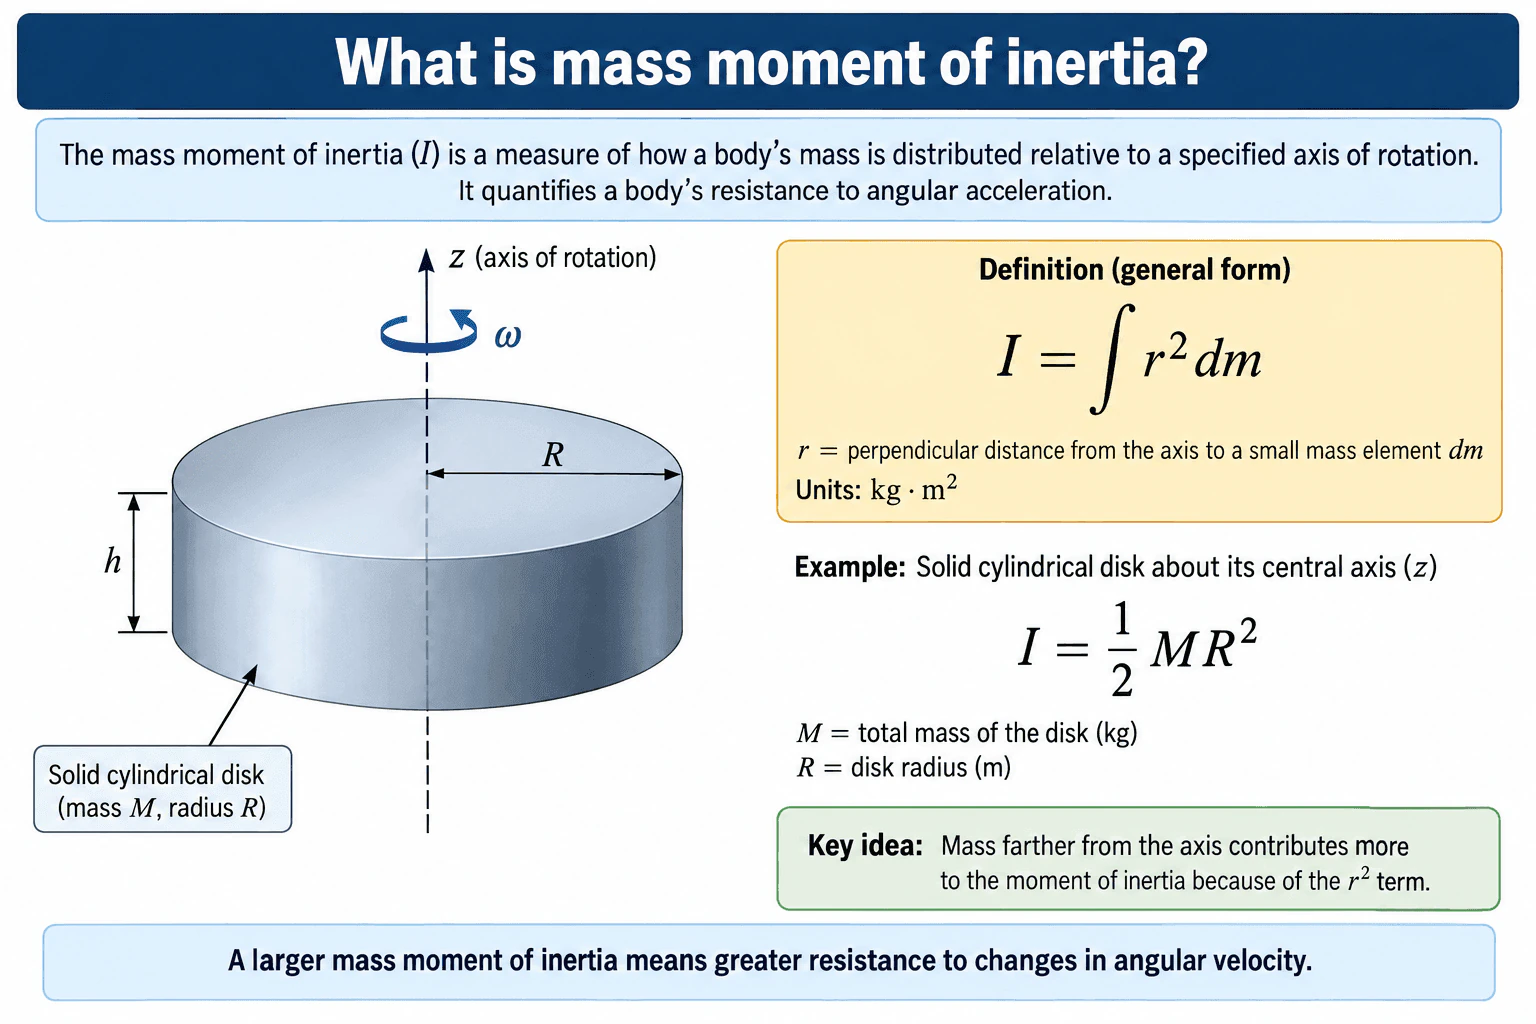
What is mass moment of inertia? diagram
How to Explain It in an Interview

Start with the physical meaning: mass moment of inertia tells us how difficult it is to change a rigid body's angular motion about a specified axis. Then state the first-principles definition, I = ∫r² dm, and define r as the perpendicular distance from the axis to each mass element. Point out the key insight that the r² term makes mass farther from the axis contribute more strongly. Check dimensions: r² contributes m² and dm contributes kg, giving kg·m². For a uniform solid cylindrical disk about its central z-axis, the standard result is I = 1/2 MR². Finally, emphasize that moment of inertia is axis-dependent, so changing the rotation axis or redistributing the mass changes the value.

Technical Approach
  1. Identify the rigid body and specify the exact axis of rotation.
  2. Define r as the perpendicular distance from that axis to an elemental mass dm.
  3. Use the first-principles relation I = ∫r² dm.
  4. Express dm from the body's mass distribution when integration is required, or use an appropriate standard rigid-body result when its assumptions match the geometry.
  5. Integrate over the complete mass of the body.
  6. Verify that the result has units of kg·m² and that increasing the distance of mass from the axis increases I.
  7. For a uniform solid cylindrical disk about its central z-axis, verify the result I = 1/2 MR².
Practical Insights

The main engineering tradeoff is mass placement. For the same total mass, concentrating more mass near the rotation axis reduces the mass moment of inertia, while moving more mass outward increases it because of the r² weighting. A larger mass moment of inertia means greater resistance to changes in angular motion for a given applied moment. The calculation is simple for standard uniform shapes but requires integration when the geometry or density varies. The result is also specific to the chosen axis.

Why Interviewers Ask This

Interviewers use this question to check whether the candidate understands a fundamental rigid-body dynamics property, can distinguish mass moment of inertia from mass alone, recognizes that the value depends on the selected axis and mass distribution, and can connect the definition I = ∫r² dm to a standard mechanical component such as a solid cylindrical disk.

Common interview mistakes

Common mistakes include treating moment of inertia as depending only on total mass, forgetting that it is defined about a particular axis, using ordinary distance instead of perpendicular distance to the axis, forgetting the squared distance in I = ∫r² dm, confusing mass moment of inertia with area moment of inertia, using the wrong standard formula for the selected axis, and reporting units other than kg·m².

Interview tip

Give the physical meaning first, then the equation. Say that I depends on both mass and its distance from the chosen axis, define I = ∫r² dm, explain why the r² term makes outer mass more influential, and finish with the example I = 1/2 MR² for a uniform solid cylindrical disk about its central axis.
Interviewer may ask next
How would you validate a calculated mass moment of inertia?

First check the units: the result must have dimensions of mass times length squared, such as kg·m². Then check the mass and geometry assumptions, the selected rotation axis, and the perpendicular-distance definition used in the integral. A useful limiting check is that moving mass farther from the axis should increase I, while concentrating it nearer the axis should decrease I. For a standard uniform geometry, compare the derived result with the known closed-form expression; for the central axis of a solid cylindrical disk, that reference result is I = 1/2 MR².

What happens if the same disk's mass is redistributed farther from the rotation axis while total mass stays constant?

Its mass moment of inertia increases. From I = ∫r² dm, each mass element is weighted by the square of its perpendicular distance from the axis. Moving mass outward therefore raises its contribution even though the total mass is unchanged. The body consequently has greater resistance to changes in angular motion about that same axis.

2. What factors determine the torque for each of six bolts in a pattern?NEWMechanical DesignMediumLockheed Martin

Short Interview Answer (30-60 seconds)

I would first determine the clamp load the joint needs from the external loads, gasket or interface requirements, and joint stiffness. Then I would determine how that load is shared by the six bolts. For a symmetric pattern with uniform axial loading, each bolt typically carries about one-sixth of the required total clamp load. I would convert the required preload per bolt to tightening torque using the approximate relationship T = KFd, where K represents thread and under-head friction, F is desired preload, and d is bolt diameter. I would also check bolt size, thread pitch, material strength, lubrication or coating, washer and surface conditions, and use a calibrated torque tool with a staged opposing tightening sequence to obtain even preload.

Detailed Explanation

The important idea is that the six-bolt pattern does not directly determine the torque. Torque is an installation input used to create bolt preload, and the required preload comes from the joint's mechanical requirements.

A useful first-order relationship is:

T = KFd

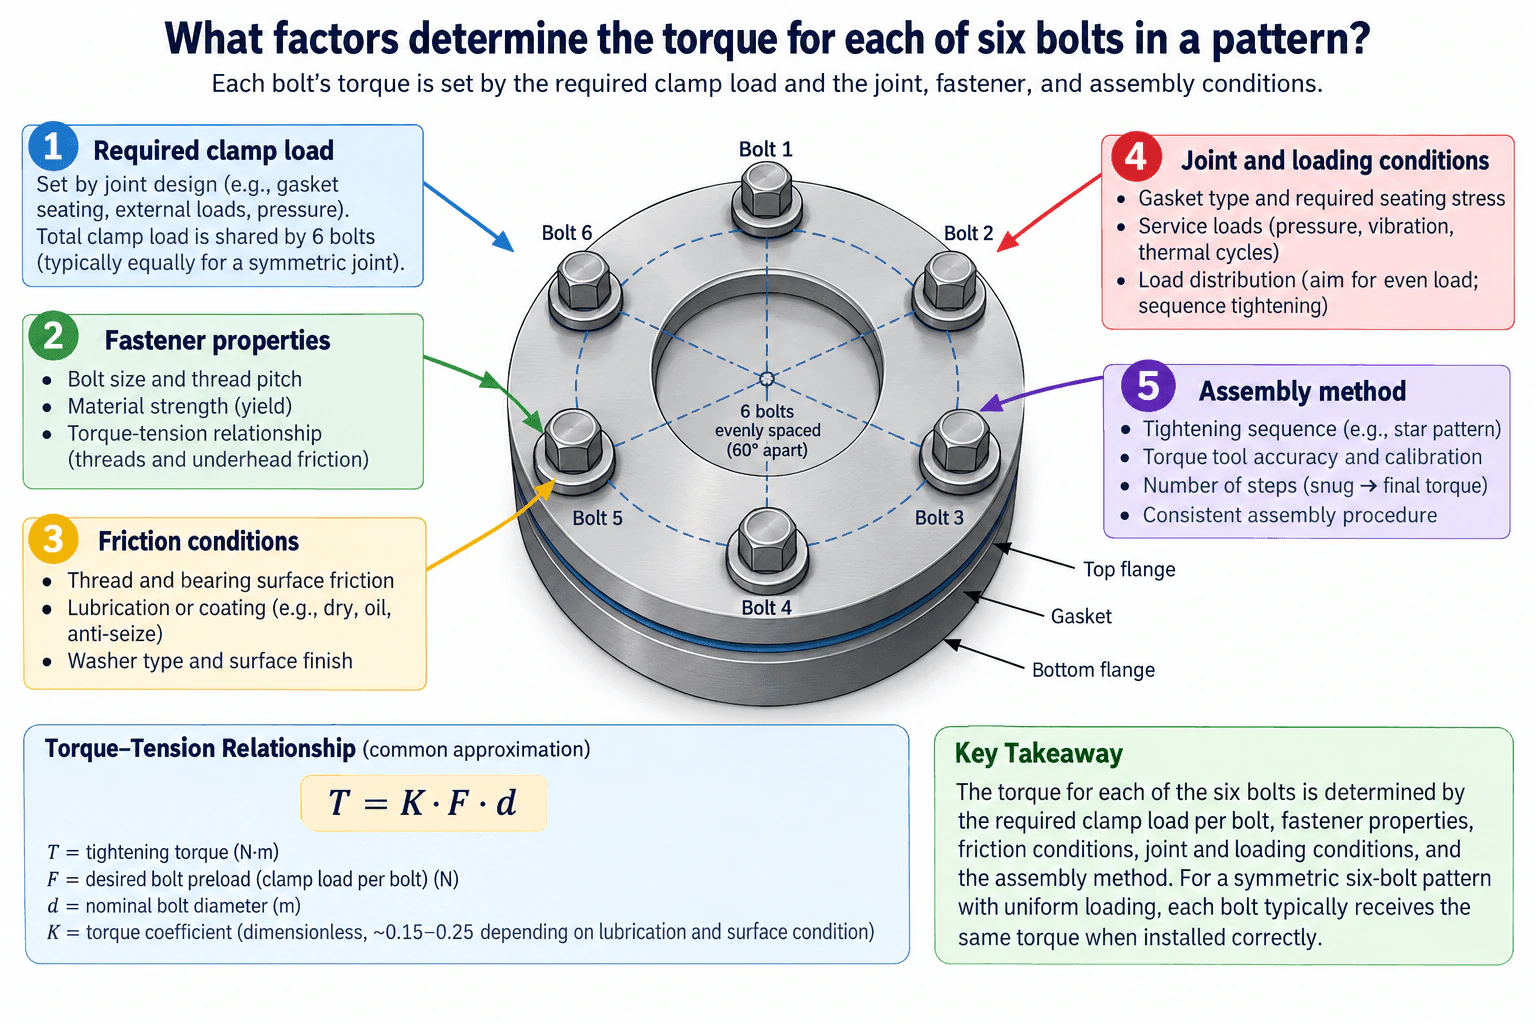
where T is tightening torque in N·m, F is the desired bolt preload in N, d is the nominal bolt diameter in m, and K is a dimensionless torque coefficient that represents the combined effects of thread and bearing-surface friction. The approved diagram shows about 0.15–0.25 as an illustrative common range for K depending on lubrication and surface condition. That range is not universal; the value used for design or assembly must match the actual fastener, lubrication, coating, washer, and surface condition.

For a symmetric six-bolt pattern with identical bolts, uniform joint stiffness, and a centered axial load, a reasonable starting assumption is equal preload in all six bolts. If the total required clamp load is F_total, the nominal preload target is approximately F_total/6 per bolt. The same bolt diameter and friction condition would then lead to the same target torque for all six bolts.

That equal-load assumption changes when the joint is not symmetric. An eccentric external load or applied moment can increase the required load on bolts on one side of the pattern. Nonuniform flange stiffness, gasket compression, surface variation, or different friction conditions can also make individual bolt preload requirements or achieved preload unequal.

The main factors are therefore:

  1. Required clamp load. The joint must have enough preload to maintain the interface, seat a gasket when applicable, resist relevant service loads, and avoid unwanted separation or slip.
  2. Fastener properties. Bolt size, thread pitch, material strength, and allowable preload limit how much tension the fastener can safely carry.
  3. Friction conditions. Thread friction and under-head or washer-bearing-surface friction strongly affect how much preload is produced by a given torque. Lubrication, coatings, washers, and surface finish can change this relationship.
  4. Joint and loading conditions. Gasket type and required seating stress, flange stiffness, pressure, vibration, thermal cycles, axial load, eccentric loading, and applied moments influence the required clamp load and its distribution.
  5. Assembly method. Tightening sequence, torque-tool accuracy and calibration, number of tightening steps or passes, and assembly consistency influence how evenly preload is established around the six-bolt pattern.

A practical design path is to determine the joint load cases first, establish the required total clamp load, calculate or otherwise determine the required preload for each bolt, verify that the selected bolts can carry those preloads with appropriate design margin, and then establish the torque or other tightening-control method. For a symmetric joint, I would normally tighten opposing bolts in a star-style sequence and use multiple passes, such as a snug pass followed by progressively higher passes to the final target. This reduces the chance that tightening one bolt substantially relaxes or redistributes preload in previously tightened bolts.

The main tradeoff is that higher preload can improve resistance to separation, slip, and gasket leakage, but excessive preload can cause bolt yielding, thread damage, excessive gasket compression, or joint deformation. Too little preload can allow separation, interface movement, leakage, vibration-related loosening, or fatigue loading of the bolts. Torque control also has uncertainty because much of the applied torque is consumed by friction rather than becoming bolt tension.

Validation should therefore confirm both the tightening process and the joint response. At minimum, I would confirm the correct fastener and surface condition, verify torque-tool calibration, use the specified tightening sequence and passes, and inspect the joint after assembly. For a critical design, I would use an appropriate preload-verification method or representative joint test rather than assuming that calculated torque alone guarantees the intended bolt tension.

Useful Questions to Ask the Interviewer
  • Is the six-bolt pattern symmetric, and are all six fasteners identical?
  • What external axial loads, shear loads, moments, pressure, vibration, and thermal loads act on the joint?
  • Is there a gasket or another interface with a required seating or compression load?
  • Are the bolts dry, lubricated, coated, or installed with specified washers?
  • What bolt size, thread pitch, material or strength grade, and allowable preload are specified?
  • Is torque control required, or may preload be controlled by another approved tightening method?
What factors determine the torque for each of six bolts in a pattern? diagram
How to Explain It in an Interview

I would say that I do not begin by assigning a torque just because there are six bolts. I start with the required joint clamp load and the load distribution around the bolt pattern. If the geometry and loading are symmetric, I can initially divide the required total clamp load approximately equally among the six bolts. I then check bolt size, thread pitch, material strength, and allowable preload, and use the torque-preload relationship T = KFd with friction conditions that represent the actual threads and bearing surfaces. Finally, I specify a controlled opposing tightening sequence with multiple passes and verify the assembly process. If there is eccentric loading, a moment, unequal stiffness, or different friction conditions, I would not assume that all six bolts require or achieve the same preload.

Practical Complexity & Trade-offs

The calculation itself can be simple for a symmetric joint, but the engineering difficulty is choosing the correct preload and accounting for uncertainty. More preload can keep the joint closed and improve resistance to slip or leakage, but too much can yield the bolt, damage threads, over-compress a gasket, or deform the joint. Torque is also an imperfect measure of preload because thread and bearing-surface friction vary between assemblies. A simple equal-load model is useful for a symmetric six-bolt joint, while eccentric loads, moments, nonuniform stiffness, or critical service may require a more detailed joint analysis and better preload verification.

Why Interviewers Ask This

Interviewers want to see whether you understand that bolt torque is not chosen from the number of bolts alone. They are testing whether you can start from the joint load case, determine the required clamp load and how it is distributed, relate preload to torque while accounting for friction and fastener properties, and recognize that tightening sequence, tool accuracy and calibration, gasket behavior, and joint stiffness affect the achieved preload.

Interviewer may ask next
How would you validate that applying the calculated torque actually produced the intended preload?

I would first control the variables that affect the torque-preload relationship: correct fasteners, thread condition, lubrication or coating, washers, bearing surfaces, calibrated tooling, tightening sequence, and number of passes. For a critical joint, I would not rely on the torque value alone. I would use an appropriate preload-verification method or a representative joint test to confirm that the assembly procedure produces the required bolt tension and acceptable clamp-load distribution. If the measured preload differs from the target, I would investigate friction assumptions, joint relaxation, tool accuracy, and tightening sequence before changing the torque specification.

What changes if an external moment or eccentric load acts on the six-bolt pattern?

I would no longer assume that each bolt carries one-sixth of the required load. The external moment creates a nonuniform load distribution around the bolt circle, so bolts on one side can require greater preload or experience greater service-load changes than bolts on the opposite side. I would determine the bolt-group load distribution using the joint geometry and stiffness, calculate the required preload for the most highly loaded bolts, verify fastener and joint limits, and then decide whether identical target preload is still appropriate or whether the joint design itself should be changed. The final tightening procedure would still need controlled friction conditions, calibrated tooling, and an opposing multi-pass sequence.

3. Describe the difference between welding and bolting.NEWManufacturingEasyLockheed Martin

Short Interview Answer (30-60 seconds)

Welding creates a permanent metallurgical joint by fusing materials, while bolting creates a mechanical joint by clamping parts together with threaded fasteners. Welding can produce a compact and continuous connection, but it introduces heat, possible distortion, residual stress, and weld-inspection requirements. Bolting avoids welding heat and is easier to assemble, inspect, maintain, and disassemble, but it needs holes, fasteners, installation access, and controlled preload. I would choose between them based on material, loading, geometry, production needs, inspection requirements, serviceability, and cost.

Detailed Explanation

Welding and bolting both join components, but they do it in fundamentally different ways. Welding creates a metallurgical bond between materials, typically by locally heating and fusing the joint region, although some welding processes create the bond without melting the base material. Bolting creates a mechanical connection by using fastener preload to clamp separate parts together.

For welding, the main manufacturing advantages are that the joint can be continuous, compact, and free of separate fastener hardware. It can also eliminate drilled fastener holes in the joined region. However, fusion welding introduces localized heat. That can create a heat-affected zone, residual stresses, distortion, and changes in local material properties depending on the materials and process. Weld quality also depends on joint preparation, process control, welder or automated-process capability, access, and inspection.

For bolting, the parts normally remain separate components that are clamped together. Bolted joints avoid the thermal effects associated with welding and are usually easier to disassemble for maintenance, replacement, inspection, or repair. They can also simplify some production and field-assembly operations. Their limitations include the need for holes, added fastener weight and part count, tool access, controlled tightening, and suitable joint geometry. Poor preload or joint design can allow loosening, slip, separation, or fatigue problems under service loading.

From a manufacturing perspective, I would not select either process from strength alone. I would consider material compatibility, joint geometry, load path, environmental exposure, required tolerances, distortion sensitivity, access for tooling and inspection, expected production volume, cycle time, scrap risk, maintenance requirements, and total cost. For production, I would also make sure the selected process is repeatable and inspectable. Critical weld characteristics may require defined welding parameters and appropriate inspection, while critical bolted joints may require controlled torque or another validated preload method.

No calculation is necessary for this general comparison because the question does not provide joint dimensions, materials, loads, or acceptance criteria. Those details would be needed before making a design-specific recommendation.

Useful Questions to Ask the Interviewer
  • What materials are being joined, and are they suitable for the proposed welding process?
  • Is the joint expected to be permanent, or must it be removed for maintenance or replacement?
  • What types of loading does the joint experience, such as static, cyclic, vibration, or impact loading?
  • Are distortion or tight dimensional tolerances important after joining?
  • Is there enough access for welding equipment, inspection, fastener installation, and tightening tools?
  • What production volume, cycle-time target, and inspection requirements apply?
How to Explain It in an Interview

I would start with the basic distinction: welding creates a metallurgical bond, while bolting creates a mechanical clamped joint. Then I would explain the main tradeoff. Welding can give a compact, continuous, permanent connection, but fusion welding introduces heat, possible distortion, residual stress, and weld-quality controls. Bolting avoids those thermal effects and supports easier assembly and service, but it adds holes, fasteners, access requirements, and preload control. I would finish by saying that the correct manufacturing choice depends on the materials, load path, geometry, tolerances, production rate, inspection strategy, serviceability, and cost rather than assuming one method is always better.

Technical Approach
  1. Identify the materials being joined and determine whether the proposed welding process is metallurgically and practically suitable.
  2. Define the joint geometry, load path, service environment, and whether disassembly is required.
  3. Compare welding effects such as heat input where applicable, distortion, residual stress, joint preparation, process access, and inspection with bolting effects such as holes, fastener count, preload, installation access, and possible loosening or slip.
  4. Evaluate manufacturing considerations including tooling, fixtures, cycle time, operator or automation capability, inspection access, scrap risk, and production volume.
  5. Compare maintenance and repair requirements, including whether components must be separated or replaced.
  6. Select the process that best satisfies structural, manufacturing, inspection, serviceability, and cost requirements.
  7. Validate the chosen process with appropriate production controls and inspection before release.
Practical Insights

The tradeoff is mainly between a metallurgically joined connection and a removable mechanical connection. Welding can reduce separate hardware and create a compact connection, but fusion welding can add distortion, heat-related material effects, specialized equipment, and inspection effort. Bolting is usually easier to assemble and service and avoids welding heat, but it adds holes, fasteners, tightening operations, tool-access requirements, and preload control. Production volume also matters because fixtures, automation, cycle time, inspection, and scrap can make the lowest-cost choice different from the simplest prototype choice.

Why Interviewers Ask This

Interviewers are evaluating whether the candidate understands that joining-process selection is an engineering tradeoff rather than simply a choice between two ways of attaching parts. A strong answer should distinguish the physical joining mechanisms and discuss manufacturability, structural behavior, inspection, assembly access, maintenance, production consistency, and cost.

Common interview mistakes

Common mistakes include saying that welding is always stronger than bolting, treating all welded or bolted joints as equivalent, ignoring heat-affected-zone and distortion effects when they apply to the welding process, ignoring preload and loosening in bolted joints, selecting a process without considering material compatibility, overlooking tool and inspection access, and comparing only initial fabrication cost while ignoring maintenance, repair, cycle time, scrap, and quality-control requirements.

Interview tip

Give the physical difference first: welding forms a metallurgical bond, while bolting forms a mechanical clamped joint. Then compare heat effects where applicable, permanence, inspection, assembly access, serviceability, production control, and cost. Avoid saying that one process is universally better; show that you would choose the joining method from the actual material, load, geometry, manufacturing, and maintenance requirements.

Interviewer may ask next
How would you validate that the selected joining process is suitable for production?

I would first confirm the actual materials, joint geometry, loads, tolerances, environmental conditions, and acceptance requirements. For welding, I would verify that the chosen process and joint preparation can repeatedly produce acceptable joints while controlling relevant effects such as distortion, and I would define appropriate inspection for critical characteristics. For bolting, I would verify fastener selection, hole quality, installation access, and a controlled method for achieving the required preload. In either case, I would use representative production parts or trials, inspect the critical characteristics, confirm dimensional results, and establish documented process controls before relying on the joint in regular production.

How would your choice change if the assembly had to be removed regularly for maintenance?

Regular removal would generally favor a bolted connection because it is designed to be assembled and disassembled without cutting apart the joint. I would still check whether the fasteners and surrounding material can tolerate repeated service, whether access is adequate, and whether the preload can be restored consistently after reassembly. A welded joint would be less attractive for a routinely removable interface because separating it usually requires destructive work followed by repair or rewelding.

4. Describe the experiments you ran for your graduate-school project.Testing And ValidationMediumLockheed Martin

Question Details

Explain the setup, the problems you encountered, and how you resolved them.

Short Interview Answer (30-60 seconds)

The exact graduate-school project details are not provided here, so I would not invent a specific experiment or result. In the interview, I would describe the real project by first explaining the engineering question I was testing, then the experimental setup, controlled and measured variables, instrumentation, and data-acquisition method. I would explain any problems I encountered, such as measurement noise, calibration issues, fixture effects, or inconsistent repeatability, only if those actually occurred. Then I would describe how I isolated the cause, changed the setup or procedure, repeated the test, and checked whether the final data were repeatable and consistent with the project objective.

Detailed Explanation

A strong answer should show the interviewer how the experiments were planned, executed, corrected, and validated. Because the project-specific apparatus, measurements, and results were not supplied, those details should come from the candidate's actual graduate-school work rather than being invented.

Useful Questions to Ask the Interviewer
  • Would you like me to focus on one representative experiment or summarize the full test program?
  • Are you most interested in the experimental setup, instrumentation, the problems I encountered, or how I validated the results?
  • Would it be helpful if I explain how the experimental results compared with an analytical model or simulation, if that was part of the project?
How to Explain It in an Interview

I would organize the answer as an engineering test story.

First, I would state the purpose of the experiment in one sentence: what physical behavior, design question, or hypothesis the graduate-school project was trying to evaluate. I would then identify the input variables I intentionally changed, the quantities I measured, and the conditions I tried to hold constant. This establishes the boundary of the experiment and shows that the test had a defined objective rather than being an open-ended data-collection exercise.

Next, I would describe the physical setup using the actual project details. That includes the specimen or prototype, fixture, loading or operating condition, relevant environmental conditions, sensors, and data-acquisition system. For each important measurement, I would explain why the sensor type and measurement range were appropriate. If the experiment involved time-varying signals, I would also mention how I selected a sampling rate high enough to capture the physical behavior without aliasing.

Before relying on the data, I would explain how the measurement system was checked. Depending on what was actually done in the project, that could include sensor calibration, zeroing, a known reference condition, repeated measurements, or comparison with another measurement method. The important point is that the experiment should distinguish changes in the physical system from changes caused by the measurement system itself.

I would then describe the main problem encountered during testing. I would avoid saying only that the data 'looked wrong.' Instead, I would explain the observable symptom and how I investigated it. For example, if repeated tests disagreed, I would separate possible causes such as fixture variation, sensor placement, environmental changes, operator procedure, data-acquisition settings, or genuine variability in the test article. I would change one factor at a time where practical so that the effect of each change could be interpreted.

After identifying the cause, I would explain the corrective action actually used in the project. That might have been a change to the fixture, sensor mounting, calibration procedure, test sequence, operating condition, or data-processing method. I would then repeat the relevant experiment instead of assuming that the correction worked.

The final step is validation. I would explain how I determined that the corrected experiment produced credible evidence. I would look for repeatability under the same conditions and, where the project allowed it, reproducibility across different setups, specimens, operators, or test sessions. I would also discuss measurement uncertainty and whether the observed differences were large enough to distinguish a real physical effect from measurement variation.

If the project had a model, simulation, analytical prediction, or published reference, I would explain how the experimental results were compared with it and what level of agreement was reasonable. I would not claim that agreement alone proves the design is correct; instead, I would explain the remaining limitations and the service conditions that the experiment did or did not represent.

I would finish by connecting the experiments back to the project objective: what evidence the tests provided, what uncertainty remained, and what I would test next if more time or resources were available. This keeps the answer focused on engineering judgment rather than simply listing laboratory activities.

Technical Approach
  1. Define the engineering question or hypothesis being tested.
  2. Trace each experiment to the project objective and define the evidence needed to judge the result.
  3. Identify controlled variables, intentionally varied inputs, measured outputs, and operating conditions.
  4. Select the actual sensors, measurement ranges, fixtures, and data-acquisition settings used in the project.
  5. Verify calibration or reference checks before collecting decision-making data.
  6. Run the baseline experiment and document the procedure so it can be repeated.
  7. When a problem appears, describe the observable symptom and list plausible experimental and physical causes.
  8. Isolate important variables by changing one factor at a time or using a structured design of experiments when appropriate.
  9. Correct the setup or procedure based on evidence rather than intuition alone.
  10. Repeat the experiment and check repeatability, measurement uncertainty, and consistency with the expected physical behavior.
  11. Compare the validated results with the project requirement, analytical model, simulation, or other reference when one actually existed.
  12. State the conclusion, remaining limitations, and the next experiment that would reduce the most important uncertainty.
Practical Insights

The main tradeoff is between experimental realism, measurement quality, time, and cost. A more realistic test can represent service conditions better, but it may introduce more uncontrolled variables. A highly controlled laboratory test makes cause and effect easier to understand, but it may represent the real system less completely. Higher sampling rates and more sensors can provide more information, but they also increase data volume and do not compensate for poor sensor selection or calibration. Repeating tests improves confidence in repeatability, but additional runs require time and test resources. The goal is therefore not to collect the maximum amount of data; it is to collect enough reliable data to answer the engineering question with known limitations.

Why Interviewers Ask This

The interviewer is evaluating whether you can turn an engineering question into a controlled experiment, select an appropriate measurement approach, recognize problems in the setup or data, and use evidence to improve the test rather than simply reporting a result. They also want to see whether you understand repeatability, calibration, uncertainty, acceptance criteria, and the difference between a measured result and a validated engineering conclusion.

Common interview mistakes

Common mistakes are giving a long description of the graduate project without clearly stating what each experiment was intended to prove; listing equipment without explaining why it was selected; presenting a single measurement as conclusive without discussing repeatability or uncertainty; saying that the data were noisy without explaining how the source was isolated; changing several parts of the setup at once and then being unable to identify which change solved the problem; claiming validation when the test did not represent the required operating conditions; and inventing numerical results or experimental details that cannot be supported by the actual project.

Interview tip

Use one representative experiment as the backbone of the answer. Explain the objective, setup, measurements, problem, investigation, correction, repeated test, and final validation in that order. Include real numbers, instruments, conditions, and results only when they come from your actual graduate-school project. The strongest part of the answer is usually not that the first test worked perfectly, but that you recognized a limitation, isolated its cause systematically, corrected it, and verified the improvement.

Interviewer may ask next
How did you know that the experimental results were reliable?

I would answer using the checks I actually performed in the project. In general, I would look for calibration or reference checks, repeatability across repeated runs, consistency of the measurement system, and an estimate of measurement uncertainty. I would also check whether the result followed physically reasonable trends and, when available, compare it with an analytical prediction, simulation, or independent measurement. The important point is that a result should be supported by evidence that the observed change is larger than the uncertainty and is not simply an artifact of the fixture, sensor, operator, or data-acquisition system.

What would you change if you had to repeat the project with less testing time?

I would first identify which uncertainty or failure mode had the greatest influence on the project conclusion. I would preserve the tests required to establish a trustworthy baseline and validate that critical behavior, then reduce low-value repetitions or conditions that provide little additional information. Where several variables must be studied, I would consider a structured design of experiments rather than testing every possible combination. I would not reduce testing simply by taking fewer measurements; I would prioritize the experiments that provide the highest-value evidence while keeping the measurement system and acceptance logic intact.

5. Describe your technical work related to system analysis and fault assessment.NEWTroubleshooting And Failure AnalysisMediumLockheed Martin

Question Details

Focus on the analysis and fault-assessment work you personally performed.

Short Interview Answer (30-60 seconds)

My approach to system analysis and fault assessment is evidence-driven. I start by preserving the failed condition, defining the system boundary, and understanding the actual operating history. I separate the observed symptom from the failure mode, physical mechanism, and root cause. Then I compare expected behavior with measurements and inspection evidence, develop competing hypotheses, and use tools such as fault trees, Five Whys, or FMEA where appropriate. I avoid replacing components until the evidence supports the cause. After corrective action, I verify the fix under representative conditions and identify controls or monitoring that can prevent recurrence.

Detailed Explanation

I treat system analysis and fault assessment as a structured process for moving from an observed symptom to a defensible root cause. The important distinction is that a symptom, a failure mode, a physical failure mechanism, and the root cause are not the same thing. For example, excessive vibration may be the symptom, bearing degradation may be the failure mode, fatigue or lubrication breakdown may be the mechanism, and the root cause could be misalignment, imbalance, contamination, incorrect loading, or another operating condition. I would not assume which one is responsible without evidence.

Useful Questions to Ask the Interviewer
  • What system or subsystem is being evaluated?
  • What was the observed symptom, and when did it occur?
  • Did the condition appear suddenly or gradually?
  • What were the actual loads, speeds, temperatures, pressures, duty cycle, environment, and maintenance history?
  • Are failed parts still available for inspection?
  • What measurements, drawings, specifications, inspection records, or previous fault data are available?
  • Was there any recent maintenance, configuration change, installation work, or operating change before the problem appeared?
  • What would constitute a successful verification test after corrective action?
How to Explain It in an Interview

My first step is to establish safe conditions and preserve evidence. I avoid disturbing fracture surfaces, wear patterns, deposits, damaged seals, fastener positions, lubricant condition, or other evidence until it has been documented. I define the physical boundary of the system so that I know which components, interfaces, loads, and operating inputs are included in the assessment.

Next, I establish the expected operating condition. I review the applicable design information, operating limits, drawings, service history, and available measurements. I then compare those expectations with what actually occurred. The goal is to identify the gap between expected and observed behavior without assuming the cause.

I then separate the problem into four levels. The symptom is what was observed, such as vibration, overheating, leakage, noise, reduced performance, or unexpected motion. The failure mode describes how a component or function failed, such as bearing damage, seal leakage, deformation, fracture, excessive wear, or loss of alignment. The failure mechanism explains the physical process, such as fatigue cracking, corrosion, abrasion, overheating, inadequate lubrication, or overload. The root cause explains why that mechanism developed under the actual system conditions.

After that, I build competing hypotheses. For a vibration problem, for example, possible causes might include imbalance, misalignment, looseness, bearing degradation, structural resonance, or an external excitation source. I identify what evidence should be present if each hypothesis is true. That creates a testable diagnostic path instead of a guess.

The next step is measurement and inspection. The exact tools depend on the system, so I would not claim a specific test without context. Typical evidence could include dimensional inspection, alignment measurements, vibration data, temperature measurements, wear patterns, lubricant condition, fracture-surface observations, fastener condition, pressure or flow data, or comparison with an undamaged reference component. I keep units and measurement conditions consistent so that the comparison is meaningful.

I may organize the reasoning with a fault tree when several paths could produce the same top-level failure. Five Whys can help trace a verified failure mechanism back through process or operating causes, but I would not use it as a substitute for physical evidence. FMEA is useful for checking whether the identified failure mode is part of a broader risk pattern and whether other consequences or controls should be considered. A fishbone analysis can also help make sure categories such as machine, material, method, environment, measurement, and human factors are not overlooked.

As evidence accumulates, I eliminate hypotheses that do not match the observations. For example, if a proposed cause predicts a specific wear pattern, vibration signature, or other measurable response and that evidence is absent, its likelihood should decrease. I continue until the remaining explanation is consistent with the observed failure, operating history, and physical mechanism.

Once the root cause is sufficiently supported, I define corrective action at the appropriate level. Replacing the failed component alone may restore function but may not remove the cause. If the evidence points to misalignment, contamination, inadequate lubrication, an unsuitable operating condition, an installation problem, or another systemic factor, the corrective action should address that factor as well as the damaged part.

Verification is essential. I repeat the relevant measurement or functional test under representative conditions and compare the result with the expected behavior or acceptance criteria. If the original symptom was vibration, for example, the verification should include a repeatable vibration check rather than relying only on the fact that the machine runs. I also document assumptions, remaining uncertainty, and any monitoring needed to confirm that the failure does not recur.

The main limitation in any fault assessment is evidence quality. Missing service history, disturbed failed parts, incomplete measurements, or uncertain operating conditions can make the root cause less certain. In that case, I state the uncertainty clearly and identify what additional evidence would change or strengthen the conclusion.

Overall, my goal is to move from symptom to failure mode, from failure mode to physical mechanism, and from mechanism to root cause using measurements and testable evidence. Then I verify that the corrective action removes the problem rather than simply masking it.

Technical Approach
  1. Establish safe conditions and preserve the failed state and physical evidence.
  2. Define the system boundary, interfaces, operating conditions, and service history.
  3. Record the observed symptom without assuming a cause.
  4. Identify the possible failure mode and physical failure mechanisms.
  5. Compare actual operation with design assumptions, specifications, and expected behavior.
  6. Develop multiple competing root-cause hypotheses.
  7. Define what measurement or inspection evidence would support or reject each hypothesis.
  8. Collect and compare relevant measurements, inspection findings, and historical evidence.
  9. Use structured methods such as a fault tree, Five Whys, FMEA, or fishbone analysis where they improve the reasoning.
  10. Eliminate hypotheses that conflict with the evidence and identify the most strongly supported root cause.
  11. Define corrective action that addresses both the failed component and the underlying cause.
  12. Verify the corrective action with a repeatable test under representative conditions.
  13. Document residual uncertainty, recurrence-prevention actions, and any ongoing monitoring.
Practical Insights

The main tradeoff is between diagnostic speed and confidence. Replacing a suspected component quickly may restore operation, but it can destroy evidence or leave the underlying cause unresolved. A more structured investigation may require additional inspection or testing, but it provides stronger confidence that the corrective action addresses the actual failure mechanism. Another tradeoff is test depth: simple measurements are faster and less expensive, while more detailed inspection or instrumentation may be justified when the failure has high consequence, is intermittent, or has several plausible causes. The investigation should use enough evidence to support the decision without adding tests that do not materially reduce uncertainty.

Why Interviewers Ask This

Interviewers want to evaluate whether I can diagnose mechanical problems systematically rather than treating symptoms. They are looking for judgment in preserving evidence, defining the system and operating conditions, distinguishing failure mode from root cause, using measurements to test competing hypotheses, selecting an appropriate corrective action, and verifying that the problem is actually resolved.

Common interview mistakes

Common mistakes include replacing the failed component before preserving evidence; treating the visible symptom as the root cause; jumping to one preferred hypothesis without considering alternatives; relying on assumptions instead of measurements; ignoring actual service history or operating conditions; confusing a failure mechanism such as fatigue with the reason the fatigue occurred; using Five Whys without validating each step physically; mixing measurement conditions or units; declaring the problem fixed because the equipment operates once; and failing to verify the corrective action under representative conditions.

Interview tip

Explain your reasoning as a sequence from symptom to failure mode to mechanism to root cause. Emphasize what evidence you would preserve, what measurements would distinguish competing hypotheses, and how you would verify the corrective action. If the interviewer has not supplied specific test results or system details, do not invent them. State what you would inspect or measure and why that evidence matters.

Interviewer may ask next
How would you handle the assessment if important failure evidence or operating history were missing?

I would separate what is known from what is uncertain and avoid presenting a probable cause as a confirmed root cause. I would document the available evidence, identify the missing information that has the greatest effect on the diagnosis, and use independent evidence where possible. For example, I might compare the damaged component with similar components, review available inspection or maintenance records, examine surrounding components for secondary evidence, or reproduce operating conditions in a controlled test if appropriate. I would rank the remaining hypotheses by how well they fit the available evidence and state what additional measurement or observation would distinguish them. The final conclusion would include the uncertainty rather than hiding it.

How would your approach change if the equipment had to return to service quickly?

I would separate immediate containment from permanent root-cause correction. First, I would establish whether a temporary action can restore function without creating an unacceptable mechanical or operational risk. At the same time, I would preserve as much evidence as possible before replacing or disturbing components. I would perform the highest-value measurements first, focusing on tests that distinguish the leading hypotheses quickly. If a component must be replaced, I would retain and document the failed part for later analysis. After restoring service, I would still complete the root-cause assessment and verify that any permanent corrective action addresses the underlying mechanism. Schedule pressure may change the order and depth of testing, but it should not turn an unverified assumption into a confirmed cause.

6. What was the most challenging maintenance situation you ever had during your Air Force service?NEWTroubleshooting And Failure AnalysisHardLockheed Martin

Question Details

What did you do to fix the discrepancy?

Short Interview Answer (30-60 seconds)

I would answer this with a real Air Force maintenance event rather than inventing details. I would briefly describe the difficult discrepancy, explain how I first established safe conditions and preserved the evidence, then show how I confirmed the symptom, reviewed the maintenance history, and used inspections and measurements to eliminate competing causes. After identifying the actual failure mechanism, I would explain the corrective action I performed under the applicable maintenance requirements and how I repeated the original operational check to verify the discrepancy was gone. The key lesson would be that good troubleshooting means proving the root cause and the repair, not just replacing a suspected part.

Detailed Explanation

The source prompt does not provide the candidate's actual Air Force maintenance event, so the answer should not invent aircraft, components, measurements, failures, or results. The best response is to use a real event from the candidate's service and explain the troubleshooting logic clearly.

A strong story begins with the discrepancy and why it was difficult. An intermittent or repeat discrepancy is especially useful because it demonstrates diagnostic discipline: the equipment may appear normal during one check and fail during another, so replacing the first suspected component can hide the true cause.

The diagnostic path should start by establishing safe conditions and preserving the failed condition or available evidence before disturbing the system. Then review the original discrepancy, relevant maintenance history, recent work, and the operating conditions associated with the problem. This separates confirmed facts from assumptions.

Next, confirm or reproduce the symptom when authorized and practical. Compare expected operation with actual operation and identify the conditions under which the discrepancy appears. Depending on the real event, useful variables could include operating mode, load, temperature, vibration, sequence, or another condition documented during the failure. Do not add any variable that was not actually relevant to the candidate's event.

Then develop competing hypotheses rather than committing immediately to one suspected component. The candidate should explain the real failure possibilities that were considered and the inspections or measurements used to rule them in or out. Possible mechanical mechanisms in a real maintenance problem could include wear, misalignment, vibration, inadequate lubrication, overheating, contamination, corrosion, a damaged interface, or another mechanism supported by the actual evidence.

The explanation should keep four ideas separate. The symptom is what was observed. The failure mode is how the item failed to perform its required function. The failure mechanism is the physical process that produced the failure. The root cause is the underlying condition that allowed the failure to occur. A failed component can be the immediate failure mode without being the root cause.

Once the evidence supports a root cause, explain the authorized corrective action that was actually taken. Then describe how the repair was verified. The best verification is a repeat of the test or operating condition that originally exposed the discrepancy, performed under representative and permitted conditions. A single normal observation after maintenance is weaker evidence than successfully repeating the condition that previously produced the failure.

The conclusion should emphasize what made the event challenging and what professional judgment was demonstrated. A strong closing point is that the difficult part was not merely replacing or repairing hardware; it was preserving evidence, avoiding premature conclusions, isolating the real failure mechanism, and proving that the corrective action removed the original discrepancy.

Useful Questions to Ask the Interviewer
  • "Would you like me to focus more on the technical troubleshooting process or on how I coordinated the maintenance response?"
  • "Would you like me to go deeper into how I isolated the root cause and verified the repair?"
How to Explain It in an Interview

Keep the story chronological. First, state the real discrepancy and why it was difficult. Second, explain how you established safe conditions and preserved useful evidence. Third, describe the competing causes you considered and the real inspections or measurements that ruled them in or out. Fourth, state the root cause and corrective action without adding unsupported technical details. Finally, explain how you repeated the relevant check and demonstrated that the original discrepancy was resolved. If specific equipment details are sensitive or unnecessary, describe the subsystem generically while preserving the true troubleshooting sequence.

Technical Approach
  1. Establish safe conditions and preserve the failed condition or available evidence before disturbing the system.
  2. Define the reported symptom precisely and review the relevant maintenance history and operating conditions.
  3. Separate confirmed facts, assumptions, and unknowns.
  4. Reproduce or confirm the symptom when authorized and practical.
  5. Compare expected operation with actual operation and identify the conditions associated with the discrepancy.
  6. Separate the observed symptom, failure mode, possible failure mechanisms, and potential root causes.
  7. Develop multiple competing hypotheses rather than assuming the first suspected component is responsible.
  8. Prioritize inspections and measurements that can eliminate competing hypotheses while disturbing the evidence as little as possible.
  9. Use the collected evidence to identify the most strongly supported failure mechanism and root cause.
  10. Perform the authorized corrective action using the applicable maintenance requirements.
  11. Repeat the original functional or operational check under representative conditions to verify that the discrepancy is removed.
  12. Document the result and address recurrence prevention through the appropriate maintenance process when supported by the evidence.
Practical Insights

The main tradeoff is between restoring equipment quickly and taking enough time to prove the real cause. Replacing a suspected component immediately may appear faster, but it can waste parts and leave an intermittent root cause in place. A disciplined investigation requires more effort because evidence must be preserved, several plausible causes may need to be considered, and measurements must be interpreted before corrective action is chosen. Verification also matters: a repair that passes one simple check may still fail under the conditions that originally produced the discrepancy. The objective is therefore not to perform the largest number of tests, but to use the most informative inspections and measurements needed to establish the cause and demonstrate that the repair works.

Why Interviewers Ask This

The interviewer is evaluating whether the candidate can troubleshoot a difficult maintenance discrepancy safely and methodically, distinguish a symptom from a failure mode and root cause, use evidence and measurements before taking corrective action, exercise sound maintenance judgment under pressure, and verify that a repair actually resolved the original problem.

Common interview mistakes

Common mistakes include inventing a maintenance story or technical details that were not supplied, jumping from the symptom directly to a suspected component, replacing parts without evidence, disturbing or discarding failed parts before preserving useful evidence, confusing a failed component with the root cause, listing maintenance actions without explaining the diagnostic reasoning, and claiming the problem was fixed without showing how the original discrepancy was retested. Another mistake in an interview is exposing sensitive or unnecessary equipment details when the same troubleshooting judgment can be explained at a suitable system level.

Interview tip

Use an actual Air Force maintenance event that you can defend in detail. Spend less time naming hardware and more time explaining your reasoning: what you observed, what possibilities you considered, what evidence ruled each possibility in or out, what established the root cause, what corrective action you actually took, and how you verified the repair. If equipment details are sensitive or unnecessary, describe the subsystem generically while keeping the real sequence and engineering logic unchanged.

Interviewer may ask next
How did you know you had found the root cause rather than just removed the symptom?

I would support the root cause with converging evidence. The proposed cause should explain the original symptom and the conditions under which it occurred, and the relevant inspection or measurement evidence should support that mechanism. After the corrective action, I would repeat the check that originally exposed the discrepancy under representative conditions. If the original symptom no longer occurred and the applicable inspection or measurement results were acceptable, that would provide stronger evidence than simply seeing the equipment operate normally once. If the evidence did not clearly support the proposed cause, I would treat the diagnosis as unconfirmed and continue troubleshooting rather than declaring the problem solved.

What would you do differently if the discrepancy disappeared before you could reproduce it?

I would not assume the problem had fixed itself. I would preserve whatever evidence remained, review the maintenance and operating history, and identify the conditions present when the discrepancy occurred. I would then develop competing hypotheses and look for inspections or measurements that could reveal a latent problem even while the symptom was absent. The exact checks would depend on the real equipment and the applicable maintenance requirements. Because an intermittent failure provides less direct evidence, I would be more conservative about declaring the discrepancy resolved and place greater emphasis on repeatable verification and evidence of recurrence.

7. What division of Lockheed Martin appeals to you most?NEWBehavioralEasyLockheed Martin

Question Details

If a position was offered, what would you choose?

Interview tip:

Use STAR to structure your answer: briefly explain the Situation and Task, make Action the most detailed part, and finish with the Result. For example, describe a previous mechanical engineering project that helped you understand which type of technical work motivates you, what responsibilities you enjoyed most, how you worked through design and manufacturing decisions, and why that experience makes a specific Lockheed Martin division the strongest fit for you.

Situation

During a previous mechanical engineering project, I worked on a structural assembly where the design had to balance strength, weight, manufacturability, and ease of inspection. That experience gave me a clearer view of the type of engineering work I enjoy most.

Task

My responsibility was to support the mechanical design, review the load paths, check whether the proposed geometry could be manufactured reliably, and work with other engineers to resolve issues before the design moved forward.

Action

I started by understanding the functional requirements and identifying the areas where loads entered and left the structure. I reviewed the geometry and material choices, then used engineering calculations and analysis results to check whether the design had enough strength and stiffness. I also looked beyond the analysis itself. I spoke with manufacturing and other engineering team members about access, tolerances, assembly sequence, and inspection needs because a design is only useful if it can be built and verified. When we found areas that could create unnecessary manufacturing difficulty, I helped compare simpler design options while protecting the important structural requirements. I enjoyed this combination of mechanics, design judgment, analysis, manufacturing, and teamwork. Because of that experience, the Aeronautics division of Lockheed Martin appeals to me most. It matches the kind of mechanical engineering problems I find most interesting, especially work involving aircraft structures, mechanical systems, integration, and design decisions where performance and practical manufacturing considerations must be considered together.

Result

The project moved forward with a design that the team could analyze, manufacture, assemble, and inspect with greater confidence. More importantly, the experience helped me understand that I am most motivated by mechanical engineering work connected to complex aircraft and structural systems. If I were offered a position, Aeronautics would therefore be my first choice, while I would still be open to other Lockheed Martin divisions where my mechanical engineering skills could contribute.

Why Interviewers Ask This

Interviewers ask this question to understand whether the candidate has thought carefully about where they want to work inside Lockheed Martin and whether their interests match the technical work of a particular division. A strong answer shows clear motivation, awareness of the type of engineering work that fits the candidate, and enough flexibility to consider other suitable opportunities.

Interviewer may ask next
What specifically about Aeronautics fits your mechanical engineering interests?

I am most interested in the combination of structural design, mechanical systems, analysis, manufacturing, and integration. On my previous project, I enjoyed having to think about both engineering performance and whether the design could actually be built, assembled, and inspected. Aircraft programs require that same kind of practical engineering judgment, which is why Aeronautics is especially appealing to me.

Would you consider a position in another Lockheed Martin division?

Yes. Aeronautics would be my first choice because it aligns closely with the type of work I enjoyed on my previous project, but I would also consider another division if the role involved meaningful mechanical design, analysis, manufacturing support, or system integration. I would evaluate the actual responsibilities and where I could contribute most effectively.

8. Name a time where you used something you learned in class/internship to solve a problem in a different setting.NEWBehavioralMediumLockheed Martin

Question Details

Describe that application.

Interview tip:

Use STAR to structure your answer: briefly explain the Situation and Task, make Action the most detailed part, and finish with the Result. For example, describe a time when you applied an engineering method learned in class or during an internship to a different mechanical problem, explain your responsibility, how you adapted the method, how you worked with others, why you chose your approach, and what result you achieved.

Situation

During a previous mechanical project, our team was reviewing a mounting bracket that was showing slight movement during testing. The part was not failing, but the movement could affect alignment. I remembered a method from a machine design class where we used free body diagrams to separate forces and understand how loads move through a structure.

Task

I was responsible for helping determine why the bracket was moving and suggesting a practical change. I needed to apply what I had learned in class to a real assembly where the loading and contact conditions were less controlled than the examples we had studied.

Action

I started by simplifying the assembly into a free body diagram so I could identify the main forces, support points, and possible moments acting on the bracket. I then compared that simplified model with the actual assembly and noticed that one load path was creating a bending effect that was easy to miss when looking only at the full model. I checked the assumptions with another engineer and reviewed the mounting surfaces to make sure the simplified model still represented the real hardware. Based on that analysis, I suggested improving the support near the area carrying the bending load instead of simply making the whole bracket thicker. That mattered because adding material everywhere would increase weight without addressing the main cause. I also explained the load path to the team using a simple sketch so everyone could see why the local support change made sense.

Result

The revised approach reduced the unwanted movement during the next review and gave the team a clearer understanding of the load path. I learned that methods from class are most useful when I understand the idea behind them and can adapt them to a less ideal real world situation instead of applying them mechanically.

Why Interviewers Ask This

Interviewers ask this question to understand whether a candidate can transfer knowledge from one setting to another. A strong answer shows that the candidate understands engineering principles well enough to adapt them, uses sound judgment when assumptions change, communicates the reasoning clearly, and turns theory into a practical solution.

Interviewer may ask next
Why did you choose to improve the local support instead of making the entire bracket thicker?

The free body diagram showed that the main issue came from a specific load path that was creating bending near one area. Increasing thickness everywhere could have reduced movement, but it would also add unnecessary material and would not directly address the cause. Improving the support near the load path was a more focused solution.

What did you learn from applying a classroom method to a real engineering problem?

I learned that the basic method still works, but the assumptions need more attention in a real assembly. In class, the loads and supports are usually clearly defined. In practice, I had to examine contact points, confirm how the hardware was actually constrained, and check my simplified model with another engineer before using it to guide a design decision.

9. Explain your experience generating procedural documentation.NEWBehavioralMediumLockheed Martin

Question Details

Discuss your role in ensuring procedural compliance.

Interview tip:

Use STAR to structure your answer: briefly explain the Situation and Task, make Action the most detailed part, and finish with the Result. For example, describe a mechanical engineering task where you created or updated a procedure, verified the required steps and safety controls, worked with the people who used the document, and helped ensure the approved procedure was followed consistently.

Situation

In my last role, I supported a mechanical assembly process that depended on a written procedure for inspection, setup, assembly, and final verification. The existing document had been updated over time, but some steps were not clear enough for someone who was less familiar with the process. That created a risk of people interpreting the same requirement differently.

Task

I was responsible for reviewing the procedure and preparing an updated version that was technically accurate, easy to follow, and consistent with the approved engineering requirements. I also needed to make sure the document could be used in practice without creating confusion or encouraging people to skip required checks.

Action

I first walked through the complete process myself and compared each step with the applicable drawings, specifications, inspection requirements, and safety instructions. I identified places where the procedure assumed knowledge that was not actually written down. I then rewrote those sections in a clear sequence so each action had an obvious starting point, required input, and expected result. Where a measurement or inspection was required, I stated what needed to be checked and where the acceptance requirement came from rather than relying on memory. I also separated important warnings and verification steps from normal instructions so they were easier to notice. After preparing the draft, I reviewed it with the technicians who performed the work and with the engineering and quality team members responsible for the requirements. Their feedback helped me catch wording that was technically correct but not clear during actual use. I resolved those comments, confirmed that the final version matched the controlled engineering information, and followed the document approval process before the procedure was released. I also made sure the team understood that only the approved version should be used, because procedural compliance depends on both accurate content and proper document control.

Result

The updated procedure gave the team a clearer and more consistent way to perform the work and verify the required checks. It also reduced uncertainty about which steps were mandatory and which source requirements applied. I learned that good procedural documentation is not only about writing instructions. It requires technical accuracy, input from the people doing the work, clear approval control, and enough detail to support consistent compliance without making the procedure difficult to use.

Why Interviewers Ask This

Interviewers ask this question to understand whether a mechanical engineer can turn technical requirements into clear, controlled instructions that people can follow correctly. A strong answer shows attention to detail, ownership of compliance, practical communication with technicians and quality teams, and sound judgment about document review, approval, and use.

Interviewer may ask next
How did you make sure the procedure was practical for the people actually performing the work?

I reviewed the process with the technicians who used the procedure and asked them to point out steps that were unclear, out of sequence, or dependent on knowledge that was not written down. I used that feedback to improve the wording and order of the instructions while still keeping every requirement aligned with the approved engineering information.

What would you do if someone wanted to skip a required step because they believed it was unnecessary?

I would first understand why they believed the step was unnecessary, because the concern might reveal a real issue with the procedure. I would then check the engineering, quality, or safety requirement behind that step. If the requirement still applied, I would explain why the step had to be followed and use the formal change process if the team believed the procedure should be revised. I would not support bypassing an approved requirement without review and authorization.

10. How do you approach a new project where you do not know what you're doing?NEWBehavioralMediumLockheed Martin

Question Details

Consider starting work that is unfamiliar to you.

Interview tip:

Use STAR to structure your answer: briefly explain the Situation and Task, make Action the most detailed part, and finish with the Result. For example, describe a project that was unfamiliar to you, how you identified what you needed to learn, asked focused questions, broke the work into manageable steps, checked your assumptions with experienced team members, and used what you learned to complete the work successfully.

Situation

During a previous project, I was asked to support the design of a mechanical assembly that used components and analysis methods I had not worked with before. I understood the basic mechanical principles, but I did not yet know the specific design requirements, common failure risks, or the team's normal review process.

Task

My responsibility was to contribute useful engineering work without pretending that I already knew everything. I needed to learn the unfamiliar parts quickly, understand the design constraints, and make sure my work was technically sound before it affected later design decisions.

Action

I first separated what I already understood from what I needed to learn. I reviewed the available requirements, drawings, previous design notes, and relevant engineering standards so I could build basic context before asking questions. Then I wrote down the specific gaps that could affect my work, such as load assumptions, material limits, interface requirements, and how the team normally checked the design. I discussed those questions with experienced engineers instead of asking them to explain the entire project from the beginning. That helped me learn faster and also showed that I had done my own preparation. I then broke my assignment into small steps. I started with the simplest calculations and assumptions, checked them against known examples, and shared my reasoning early with a more experienced engineer. When I found an assumption that was unclear, I stopped and confirmed it rather than building more work on something uncertain. As I learned, I kept short notes about the decisions, sources, and lessons so I would not repeat the same questions. I also gave the team clear updates about what I understood, what was still uncertain, and where I needed input.

Result

I was able to become productive on the unfamiliar work while keeping the technical risk under control. My early questions helped catch unclear assumptions before they became part of the design, and I became more independent as the project continued. I learned that when I do not know something, the best approach is to be open about the gap, prepare before asking for help, test my understanding in small steps, and communicate uncertainty early.

Why Interviewers Ask This

Interviewers ask this question to understand how a candidate handles uncertainty and unfamiliar technical work. A strong answer shows curiosity, humility, structured learning, good judgment, clear communication, and the ability to make progress without hiding knowledge gaps or taking unnecessary engineering risks.

Interviewer may ask next
How did you decide when to ask another engineer for help instead of continuing on your own?

I asked for help when the uncertainty could affect an important design assumption or when continuing would create work based on something I could not verify. Before asking, I reviewed the available information and formed a specific question. That made the discussion efficient and helped me learn the reasoning instead of simply receiving an answer.

What would you do differently the next time you start a project in an unfamiliar area?

I would create the list of known items, unknown items, and high risk assumptions even earlier. That approach worked well during this project, and doing it at the very beginning would help me identify the most important learning needs sooner and make my first discussions with experienced engineers even more focused.

Disclaimer: This interview guide is for educational and informational purposes only. It is designed to help readers prepare, but it does not guarantee any interview result, hiring decision, offer, or outcome. Interview questions, hiring criteria, and preferred answers can vary by employer, interviewer, industry, location, and time. All answers, examples, and explanations in this guide are suggested examples for interview preparation, not definitive answers or instructions for professional practice. They are based on research and judgment, are provided without warranties of any kind, and should be adapted to the question, role, and applicable laws and professional requirements. Diagrams are simplified illustrations intended to highlight the main concepts and their relationships; actual situations, systems, and practices may be more complex. Alternative approaches may be equally valid or better suited to a particular question, context, or interviewer. To the fullest extent permitted by applicable law, the contributors and publisher are not liable for decisions made, actions taken, or losses incurred based on this guide.

State Laws and Professional Responsibilities: Laws and requirements governing an occupation vary by state and jurisdiction. You are responsible for checking the current laws, licensing requirements, and scope-of-practice rules that apply to your location and role, and for ensuring that your answers and actions comply with them. Adapt examples in this guide to those requirements. This guide is not legal advice.

Company Notice: This guide is an independent educational resource and is not affiliated with, endorsed by, sponsored by, or approved by the company named in this guide. Company names identify reported interview experiences or the employer context of clearly labeled original practice exercises. Interview practices can change without notice, and inclusion of company-specific content does not mean these questions are official, complete, or guaranteed to be asked. To the fullest extent permitted by law, the author, contributors, and publisher are not responsible for outcomes related to use of this material.

Content Accuracy and Verification: To the fullest extent permitted by applicable law, we do not represent or warrant that interview guides, questions, answers, examples, or diagrams are accurate, complete, current, error-free, or suitable for any particular purpose. You are responsible for independently reviewing and verifying the information before relying on it.